You’ve just received an email from a gallery interested in your work. They ask for your press kit. Your heart races with excitement, then immediately sinks. Press kit? I don’t have one of those.
You frantically Google “artist press kit” and find yourself drowning in guides about music EPKs, vague checklists, and templates that don’t quite fit what you do as a visual artist. Sound familiar?
If you’re a painter, sculptor, illustrator, or photographer, you need promotional materials that speak to the unique demands of the visual arts world—not the music industry. You need a media kit that showcases your work professionally, tells your story compellingly, and makes it effortless for galleries, press, and brands to say “yes” to working with you.
This comprehensive guide will show you exactly how to create a professional artist media kit from scratch. You’ll learn what to include, how to format it, how to tailor it for different audiences, and how to avoid the common mistakes that cost artists opportunities. Whether you’re an emerging artist with limited exhibition history or an established professional updating your materials, you’ll find practical, actionable guidance here.
By the end of this guide, you’ll have everything you need to build a media kit that positions you as a serious professional and opens doors to gallery representation, press coverage, and brand partnerships.
Let’s begin.
What Is an Artist Media Kit (And Why Every Visual Artist Needs One)
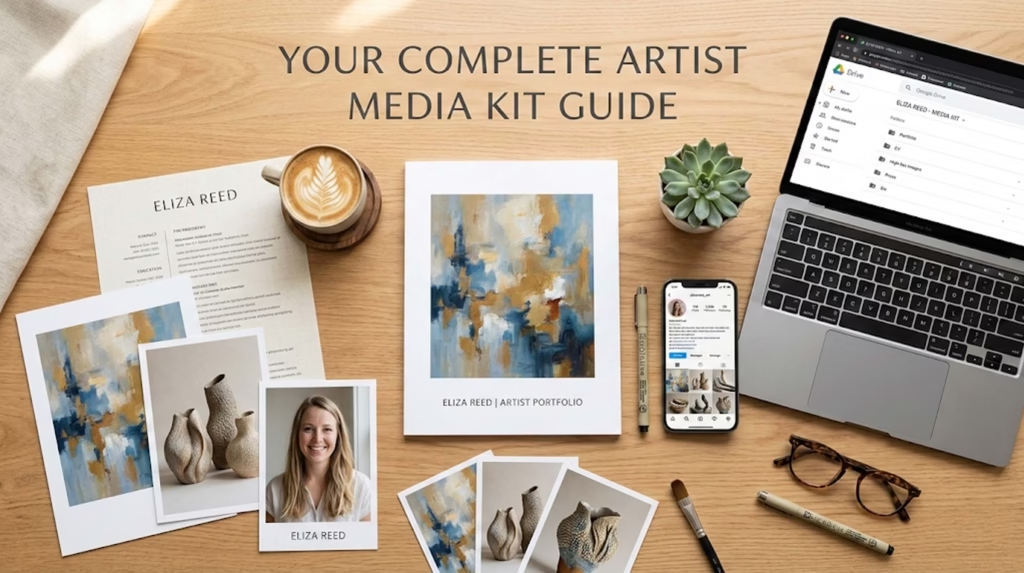
An artist media kit is your professional portfolio packaged for decision-makers. Think of it as a condensed, business-oriented version of your website designed specifically for people who need to quickly evaluate whether to work with you.
When a gallery owner receives fifty artist submissions in a week, or a journalist juggles twenty story pitches, or a brand manager considers potential collaborators, they don’t have time to dig through your Instagram or piece together information from multiple sources. Your media kit does that work for them—presenting your background, achievements, and current work in one organized, professional package.
But here’s what trips up many visual artists: the terminology can be confusing, especially when search results are dominated by music industry guides. Let’s clear that up immediately.
Media Kit vs. Press Kit: Understanding the Difference
These terms are often used interchangeably, which creates confusion. Here’s the actual distinction that matters for visual artists:
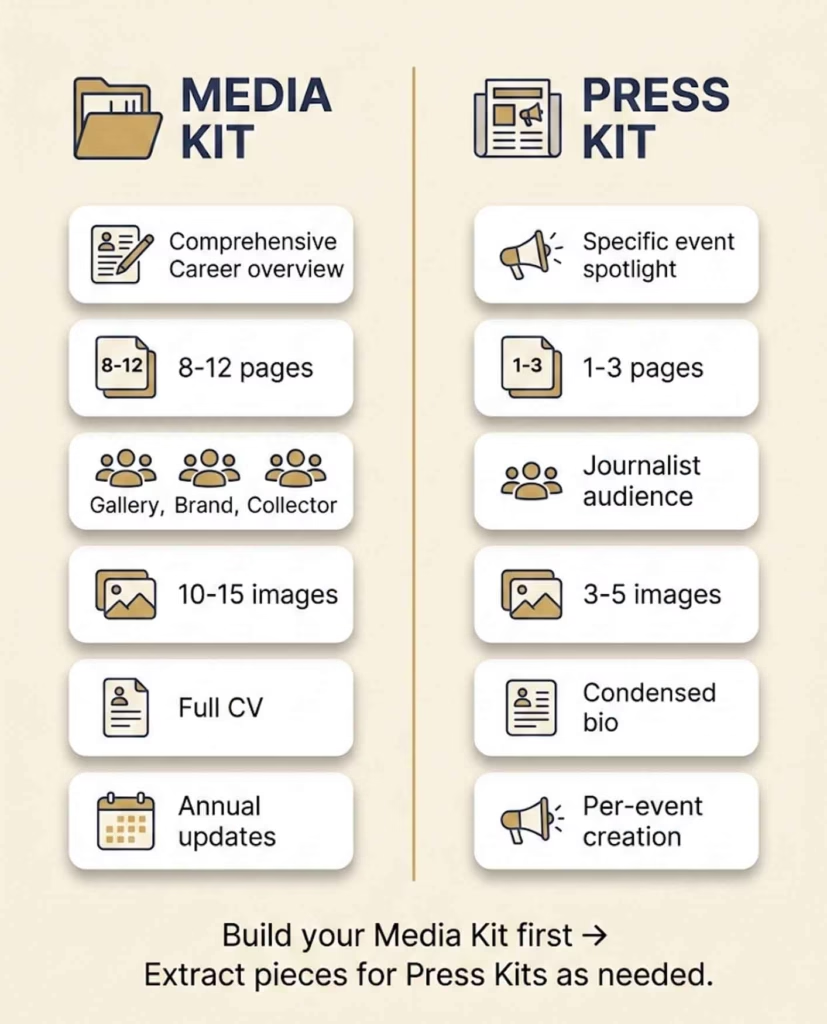
An artist media kit is a comprehensive portfolio covering your entire career and artistic practice. It includes your bio, complete CV, full body of work samples, exhibition history spanning years, artist statement, press coverage, and contact information. This is your general “resume” as an artist—the materials you’d provide to a gallery considering representation, a brand exploring collaboration, or a collector researching your background.
A press kit is a focused package for a specific event, exhibition, or announcement. It contains your current project description, relevant images from that specific body of work, an event-focused press release, a condensed bio highlighting recent achievements, and contact information. This is what you’d send to a journalist covering your upcoming solo show or a blogger writing about your new series.
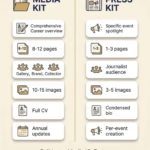
Here’s a simple comparison:
Feature
Media Kit
Press Kit
Purpose
Comprehensive career overview
Specific event/exhibition announcement
Length
8-12 pages
1-3 pages
Audience
Galleries, brands, general press inquiries
Event-specific media contacts
Artwork Samples
10-15 images showing range
3-5 images from current project
Bio
Full career narrative (all three lengths)
Condensed recent achievements
CV
Complete exhibition/award history
Recent highlights only
Updates
Annually or after major achievements
Created for each specific event
Tone
Professional, comprehensive
Timely, newsworthy
Most visual artists need a comprehensive media kit first. You can then extract relevant pieces to create event-specific press kits as opportunities arise. This guide focuses primarily on building your complete media kit, with guidance on adapting it for specific purposes.
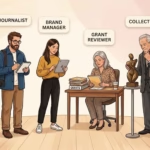
Who Needs Your Media Kit
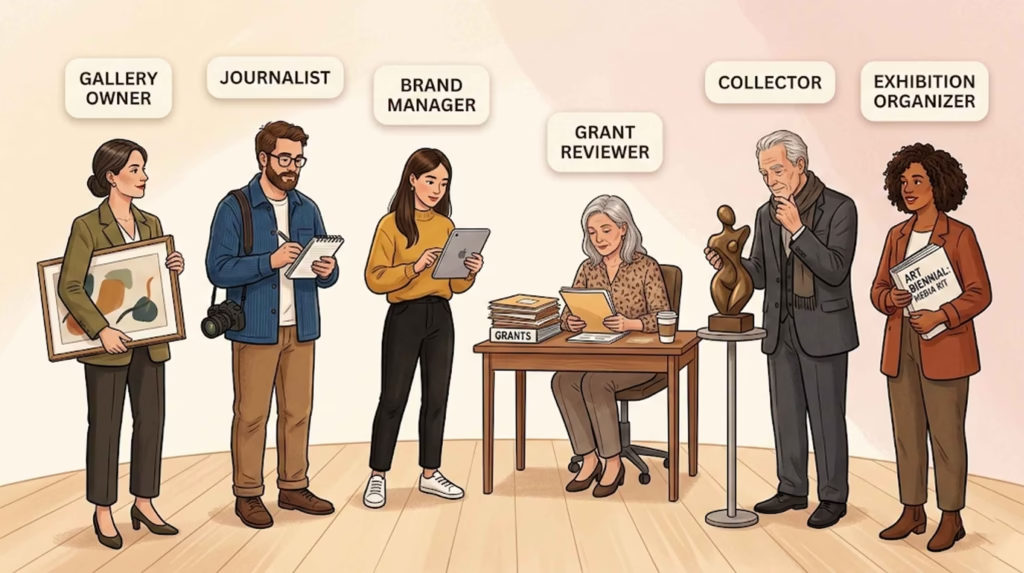
Your media kit serves multiple audiences, each with slightly different priorities:
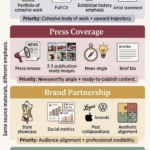
Gallery owners and curators evaluating whether to represent you or include you in exhibitions. They’re looking for professional images, exhibition history, artistic coherence, and evidence of market interest. Your media kit helps them envision how your work fits their program and how they’d present you to collectors.
Journalists and bloggers researching artists for features, interviews, or exhibition coverage. They need compelling story angles, high-resolution images they can publish, quotable biographical information, and easy access to your contact information. Your media kit gives them everything they need to write about you without a lengthy back-and-forth.
Brand partnership managers assessing potential collaborations. They want to understand your aesthetic, audience reach, professional credibility, and how your artistic vision aligns with their brand values. Your media kit demonstrates you’re a professional who takes your practice seriously.
Grant reviewers and competition juries evaluating applications. They need clear evidence of artistic merit, professional development, exhibition record, and community impact. Your media kit provides organized documentation of your achievements and artistic vision.
Art collectors and buyers researching your background before purchasing. They’re interested in your artistic training, exhibition history, press coverage, and the narrative behind your work. Your media kit establishes your credibility and helps them understand the context of your practice.
Exhibition organizers and art fair directors considering including your work in group shows or special exhibitions. They need professional materials they can immediately use for promotional purposes—catalogues, websites, press releases.
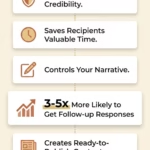
What a Great Media Kit Accomplishes
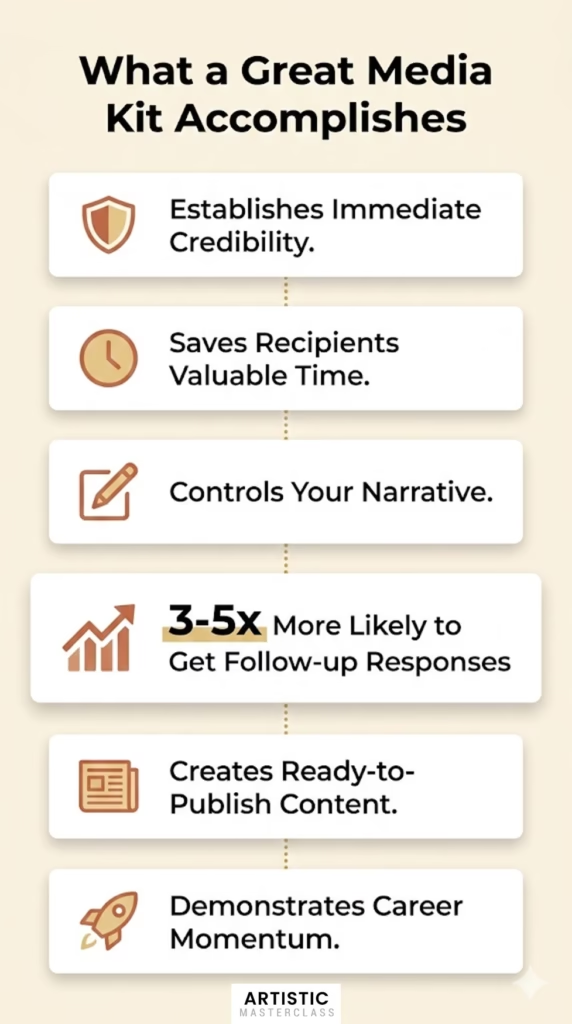
A well-crafted media kit doesn’t just inform—it persuades. Here’s what it does for your career:
Establishes immediate credibility. A professional media kit signals you take your practice seriously and understand how the art world operates. It differentiates you from the dozens of artists who send casual emails with Instagram links.
Saves recipients valuable time. Decision-makers appreciate when you’ve anticipated their questions and provided all necessary information upfront. This consideration makes them more likely to respond positively.
Controls your narrative. Rather than letting someone piece together your story from scattered online sources, you present exactly the achievements, projects, and perspectives you want emphasized.
Increases conversion rates significantly. Based on conversations with gallery directors, artists with professional media kits are 3-5 times more likely to receive follow-up responses compared to those submitting incomplete materials.
Creates “ready to publish” content. Journalists can pull quotes from your bio, download high-resolution images, and access all necessary information without additional requests. This ease of use dramatically increases the likelihood of coverage.
Demonstrates career momentum. An organized media kit allows recipients to quickly grasp your trajectory—where you’ve been, where you are, and where you’re headed.
In short: a media kit is not optional if you’re serious about professional opportunities. It’s the baseline expectation for anyone operating professionally in the visual arts.
Now let’s build yours.
Essential Components of a Visual Artist Media Kit
Every effective artist media kit contains core components that decision-makers expect to find. Skip any of these, and you risk appearing unprepared or amateur. Include all of them thoughtfully, and you position yourself as a consummate professional.
Artist Bio: Short, Medium, and Long Versions
Your artist bio tells the story of who you are and why your work matters. Unlike your CV (which lists achievements chronologically), your bio weaves these accomplishments into a compelling narrative about your practice.
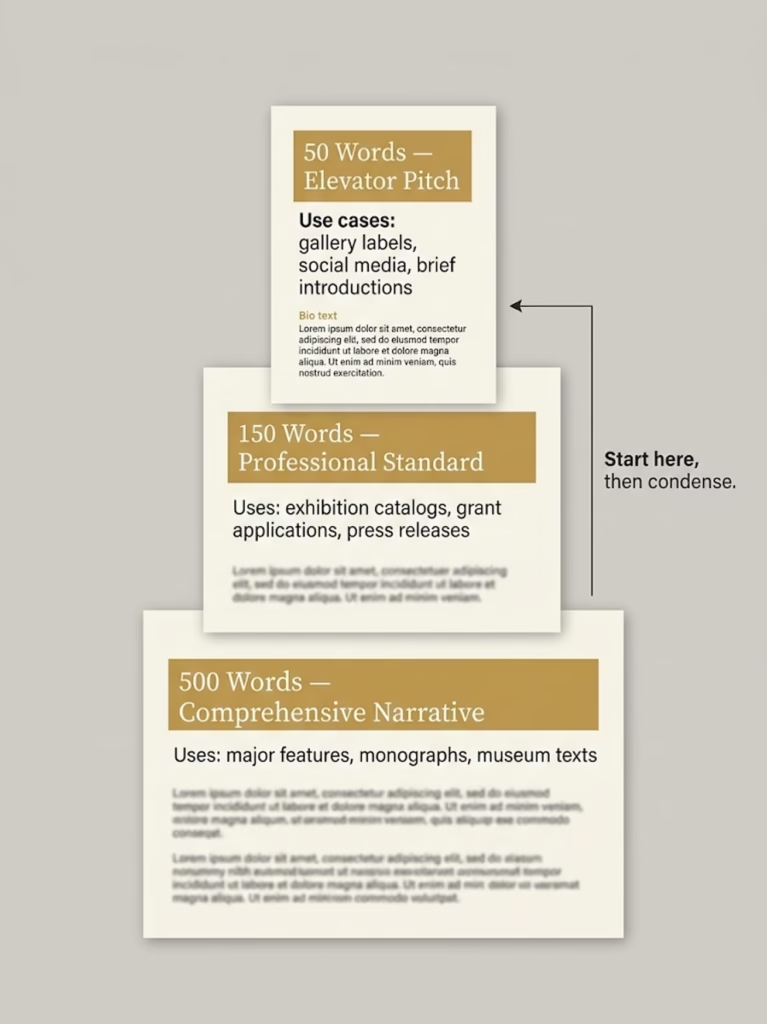
Professional visual artists maintain three versions of their bio, each serving different purposes:
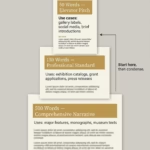
The 50-word bio is your elevator pitch. Use it for gallery labels, online directory listings, brief introductions at talks, and social media profiles. It answers: Who are you? What do you make? What’s most notable about your practice?
Example (50 words): “Sarah Chen is a contemporary painter based in Portland, Oregon, whose large-scale abstractions explore the intersection of memory and landscape. Her work has been exhibited at the Portland Museum of Art and featured in Artforum. Chen holds an MFA from Yale School of Art and is represented by Gallery Henoch in New York.”
The 150-word bio provides more context while remaining concise. Use it for exhibition catalogs, grant applications, press releases, and most gallery submissions. It includes your artistic focus, notable achievements, education, and current work.
Example (150 words): “Sarah Chen is a contemporary painter based in Portland, Oregon, whose large-scale abstractions explore the intersection of memory and landscape through layered applications of oil and cold wax. Her process-intensive works investigate how personal and collective histories embed themselves in physical spaces.
Chen’s paintings have been exhibited at the Portland Museum of Art, Seattle Art Museum, and the Aldrich Contemporary Art Museum. Her work has been featured in Artforum, Art in America, and The New York Times, and acquired by the Microsoft Art Collection and numerous private collectors.
She received her MFA from Yale School of Art and her BFA from RISD. Chen has been awarded residencies at the MacDowell Colony and Yaddo, and received grants from the Pollock-Krasner Foundation and the Oregon Arts Commission. She is represented by Gallery Henoch in New York and maintains her studio in Portland’s Pearl District.”
The 500-word bio is comprehensive and used for major features, artist monographs, museum wall texts, and detailed press kits. It provides the full narrative of your artistic development, influences, methodology, and career trajectory.
For the 500-word version, structure it as:
Opening paragraph: Current work and artistic focus (what you make now and why it matters)
Second paragraph: Artistic methodology and influences (how you work, what inspires you)
Third paragraph: Exhibition history and major achievements (career highlights)
Fifth paragraph: Current status (representation, upcoming projects, where you work)
Third person vs. first person: which to use?
For media kits, always write in third person (“Sarah Chen creates…” not “I create…”). This is standard in the art world because:
It allows others (galleries, journalists, curators) to use your bio directly in their materials
It sounds more professional and objective
It signals you understand professional conventions
Save first-person writing for artist statements, blog posts, and personal correspondence.
Common bio mistakes to avoid:
Vague descriptions like “explores themes of identity” without specifics
Starting with “Artist Jane Doe was born in…” (unless birth circumstances are artistically relevant)
Including irrelevant information (high school achievements, unrelated jobs)
Using overly academic or pretentious language that obscures meaning
Forgetting to update after significant achievements
Writing only one length and trying to force-fit it everywhere
Template for crafting your 150-word bio:
[Your name] is a [medium] artist based in [city/region] whose work [central focus/what makes it distinctive]. [Brief methodology or approach in one sentence].
[He/She/They] has exhibited at [2-3 most impressive venues], and [his/her/their] work has been featured in [notable publications/collections]. [Optional: Specific notable achievement like award or major commission].
[Your name] received [highest degree] from [institution] and [other relevant degree if applicable]. [He/She/They] has been awarded [1-2 notable grants/residencies/awards]. [Current representation if applicable]. [He/She/They] lives and works in [location].
Fill in this template with your specific information, then refine the language to sound natural rather than formulaic.
Artist Statement: Articulating Your Practice
While your bio tells who you are, your artist statement explains why you make the work you make and what it means. This is where you articulate your artistic vision, process, and intentions.
A strong artist statement for a media kit should be 250-400 words. Longer than this and you risk losing busy readers; shorter and you haven’t provided enough substance.
Framework for writing your artist statement:
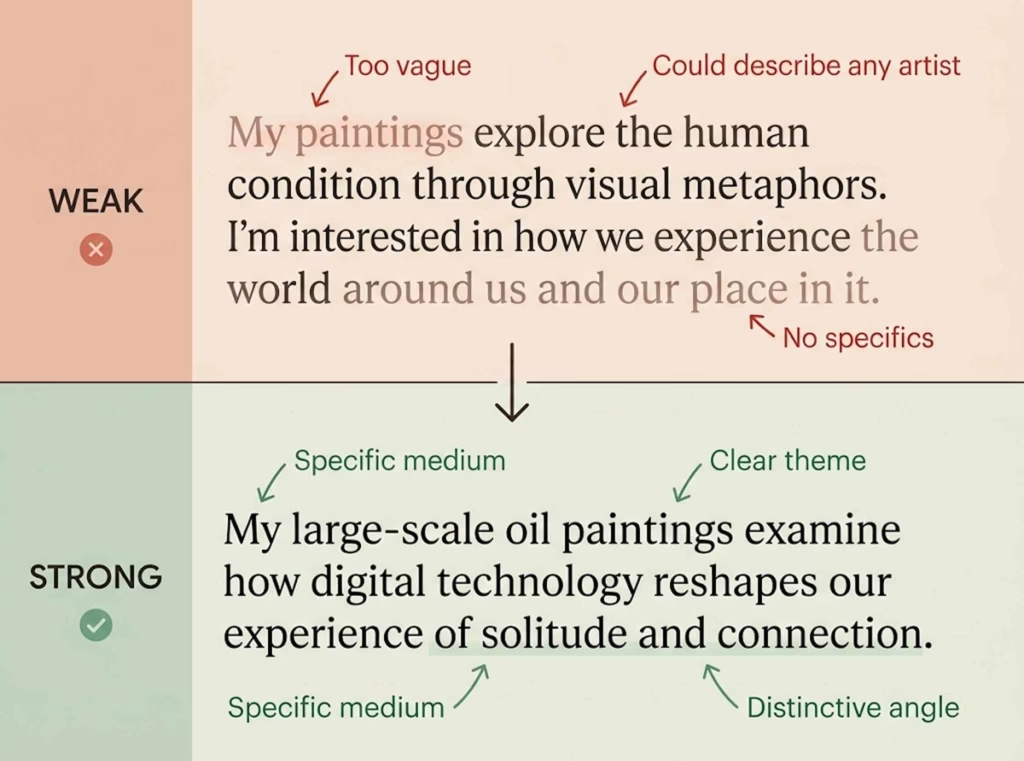
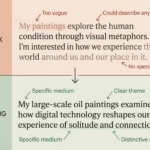
Paragraph 1: What you make and its central concerns Begin with a clear description of your medium and the core questions or themes your work addresses. Avoid vague language—be specific about what drives your practice.
Weak: “My paintings explore the human condition.” Strong: “My large-scale oil paintings examine how digital technology reshapes our experience of solitude and connection.”
Paragraph 2: How you work (methodology and process) Describe your actual working process and why it matters to your conceptual goals. This helps viewers understand the relationship between your methods and meaning.
Example: “I build each painting through dozens of thin glazes applied over weeks, allowing colors to accumulate and interact in ways I can’t fully predict. This slow, meditative process mirrors my interest in how memories layer and blur over time.”
Paragraph 3: Why this matters (broader context or impact) Connect your personal artistic concerns to larger cultural, social, or aesthetic conversations. What traditions are you responding to? What questions are you raising for viewers?
What NOT to include in your artist statement:
Your entire life story (save that for your bio)
Vague platitudes about “beauty” or “the human spirit”
Overly academic jargon that obscures meaning
Defensive explanations of why you make what you make
Comparisons to famous artists (“my work is like Rothko meets…”)
Example of an effective artist statement (330 words):
“My sculptures investigate the precarious balance between natural systems and human intervention. Using reclaimed industrial materials—steel, concrete, glass—I construct forms that reference both organic growth patterns and architectural ruins. Each piece exists in a state of careful imbalance, suggesting both collapse and emergence.
I’m drawn to materials that bear the marks of their previous uses: rusted beams from demolished factories, concrete fragments from highway demolitions, weathered glass from abandoned buildings. These materials carry histories of labor, utility, and eventual obsolescence. By reconfiguring them into forms that echo natural phenomena—branching, crystallization, erosion—I ask viewers to reconsider the boundary between built and natural environments.
My process is physically demanding and often frustrating. I weld heavy steel sections into cantilevered arrangements that seem to defy gravity, spending weeks calculating weight distribution and stress points. The final sculptures often appear effortless, almost delicate, belying the intensive engineering required to achieve that visual lightness. This contradiction between appearance and reality reflects my interest in how we romanticize “nature” while depending entirely on complex technological systems.
This body of work grew from my experience watching my hometown’s steel mill close and gradually be reclaimed by vegetation. I was struck by how quickly human infrastructure could become archaeological ruin, and how tenaciously living things colonized these spaces. Those shuttered factories—simultaneously dying and regenerating—became my central metaphor for thinking about sustainability, collapse, and adaptation.
My sculptures ask viewers to sit with uncertainty. They lean, cantilever, and balance in ways that create visual tension. Will they fall? Are they growing or decaying? Are they monuments to industry’s failure or celebrations of nature’s resilience? I intentionally leave these questions unresolved, creating space for viewers to project their own anxieties and hopes about our environmental future.”
Notice how this statement clearly explains what the artist makes, how they work, why it matters, and what viewers should consider—all without resorting to jargon or vague generalities.
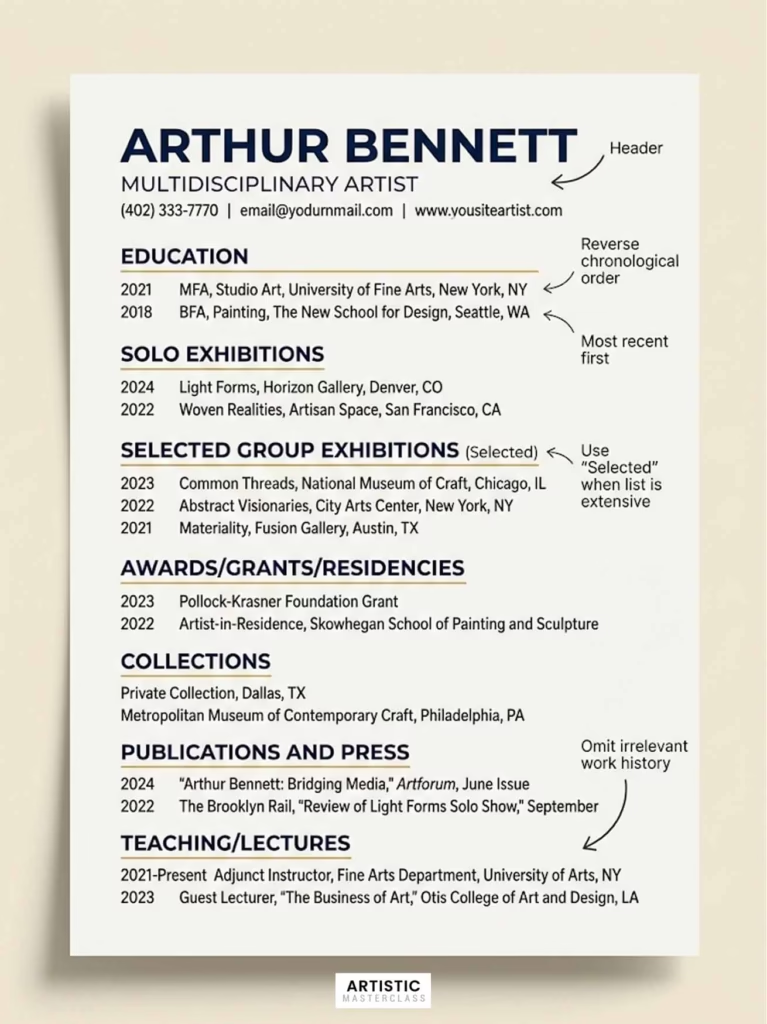
CV/Resume: Visual Artist Format
Your CV (curriculum vitae) provides the factual backbone of your career: education, exhibitions, awards, publications, and other professional accomplishments. Unlike a job resume, an artist CV grows throughout your career—you don’t edit out older achievements to fit one page.
“Private collections” (can be listed generally without names)
Publications and Press
Major features: “Featured artist, Artforum, September 2024”
Reviews: “Reviewed in The New York Times, John Smith, March 2023”
Catalogs: Artist monographs, exhibition catalogs
Interviews: Significant interviews or profiles
Bibliography (for established artists)
Separate from press if you have numerous publications
Book chapters, journal articles about your work
Critical essays in exhibition catalogs
Teaching/Lectures (if relevant)
Academic positions: “Visiting Artist, Yale School of Art, 2024”
Workshops: “Encaustic Techniques Workshop, Anderson Ranch, 2023”
Artist talks: Major venues only
Optional sections depending on your practice:
Commissions (public art, large private commissions)
Professional memberships (College Art Association, etc.)
Certifications (if relevant to your medium)
What NOT to include:
Unrelated work history (barista jobs, retail positions)
High school achievements
Every single small group show (curate for quality)
Personal information (marital status, age, hobbies unrelated to art)
References (provide separately if requested)
How to handle limited exhibition history:
If you’re an emerging artist with minimal shows, that’s perfectly normal. Include what you have:
Student exhibitions (note if juried or competitive)
Local coffee shops or alternative spaces (be honest about venues)
Online exhibitions (if juried or through recognized platforms)
Self-organized shows (note if collaborative)
What matters is showing you’re actively exhibiting and building a record. Everyone starts somewhere. Gallery directors would rather see an honest accounting of your early career than inflated claims or embarrassed gaps.
Sample CV excerpt (emerging artist):
MAYA RODRIGUEZ
Ceramic Sculptor
maya.rodriguez@email.com | 503-555-0123 | mayarodriguezceramics.com | Portland, OR

EDUCATION
MFA, Ceramics, Oregon College of Art and Craft, Portland, OR, 2024
BFA, Sculpture, University of Oregon, Eugene, OR, 2021

SOLO EXHIBITIONS
2024 | Fracture Patterns, Blackfish Gallery, Portland, OR
2023 | Thesis Exhibition, Oregon College of Art and Craft, Portland, OR

SELECTED GROUP EXHIBITIONS
2024 | Northwest Ceramics Annual, Museum of Contemporary Craft, Portland, OR
2024 | Emerging Artists, Froelick Gallery, Portland, OR
2023 | Regional Student Exhibition, Portland Art Museum, Portland, OR
2023 | Clay Forms, Radius Gallery, Seattle, WA

AWARDS AND GRANTS
2024 | Oregon Arts Commission Individual Artist Fellowship
2023 | Helen B. Greer Memorial Scholarship, Oregon College of Art and Craft
2023 | Windgate Fellowship, Center for Craft

RESIDENCIES
2024 | Pottery Northwest Artist in Residence, Seattle, WA (upcoming)
2023 | Watershed Center for Ceramic Arts, Newcastle, ME
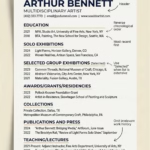
Sample CV excerpt (established artist):
JAMES MORRISON
Painter
james@jamesmorrisonart.com | 212-555-0199 | jamesmorrisonart.com | Brooklyn, NY
Represented by Pace Gallery, New York

EDUCATION
MFA, Painting, Yale School of Art, New Haven, CT, 2010
BFA, Rhode Island School of Design, Providence, RI, 2007

SELECTED SOLO EXHIBITIONS
2024 | Chromatic Shifts, Pace Gallery, New York, NY
2023 | Recent Works, Modern Art Museum of Fort Worth, Fort Worth, TX
2022 | Color Field Redux, Los Angeles County Museum of Art, Los Angeles, CA
2021 | New Paintings, Pace Gallery, London, UK
[listing continues with 10+ more solo shows]

SELECTED GROUP EXHIBITIONS
2024 | Contemporary Abstraction, Museum of Modern Art, New York, NY
2023 | The Whitney Biennial, Whitney Museum, New York, NY
[listing continues with 20+ significant group shows]

AWARDS AND GRANTS
2023 | Guggenheim Fellowship
2020 | Joan Mitchell Foundation Grant
2018 | Pollock-Krasner Foundation Grant

COLLECTIONS
Museum of Modern Art, New York, NY
Los Angeles County Museum of Art, Los Angeles, CA
Whitney Museum of American Art, New York, NY
[listing continues with museum and corporate collections]
Notice how the established artist uses “Selected” to indicate they’re curating highlights rather than listing everything. When you reach this level, prioritize museum shows, major galleries, and significant institutional exhibitions.
Professional Images of Your Artwork
Your artwork images are the heart of your media kit. Poor quality images can torpedo opportunities no matter how impressive your CV. Professional documentation of your work is worth the investment.
How many images to include:
Comprehensive media kit: 10-15 images showing range across your practice
Event-specific press kit: 3-5 images from the current project/exhibition
Gallery submission: 8-12 images of your strongest, most cohesive work
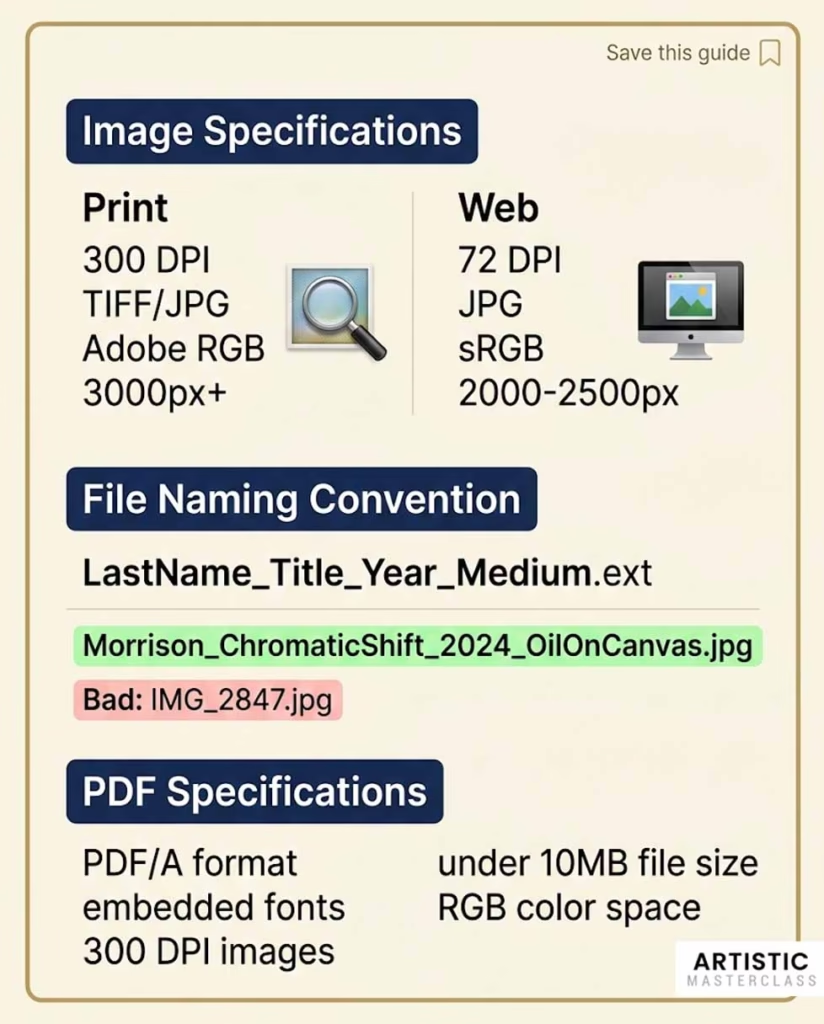
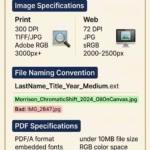
Technical specifications matter:
For print materials and professional use:
Resolution: 300 DPI minimum
File format: TIFF for highest quality, high-quality JPG for more manageable file sizes
Color space: Adobe RGB or sRGB
Dimensions: At least 3000 pixels on the longest side
For web/digital viewing:
Resolution: 72 DPI acceptable
File format: JPG
Dimensions: 2000-2500 pixels on longest side (large enough for publication but not unwieldy)
File naming convention:
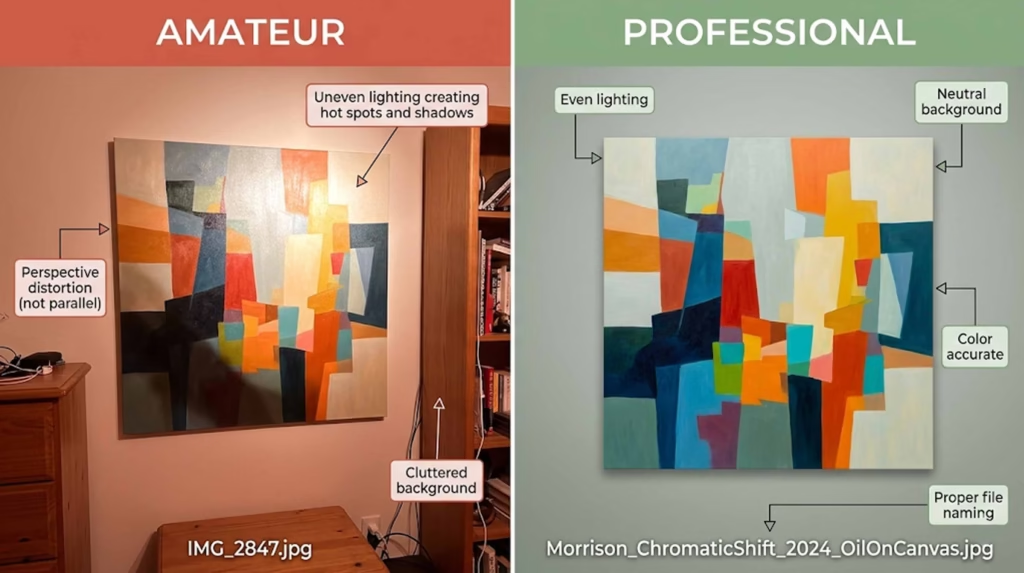
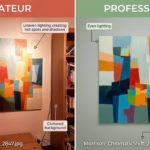
Never send files named “IMG_2847.jpg” or “untitled.jpg”. Use a clear, professional system:
Format: LastName_ArtworkTitle_Year_Medium.jpg
Examples:
Morrison_ChromaticShift_2024_OilOnCanvas.jpg
Rodriguez_FracturePattern03_2024_Ceramic.jpg
Chen_LandscapeMemory_2023_OilAndWax.jpg
This naming system ensures your files don’t get confused with others when recipients download multiple artists’ materials.
Image documentation (essential information):
Every image in your media kit should be accompanied by:
Title
Year
Medium
Dimensions (Height x Width x Depth for sculpture)
Collection information if applicable (“Collection of Portland Art Museum”)
Format consistently throughout your kit:
Sarah Chen, Landscape Memory #4, 2023, oil and cold wax on canvas, 60 x 48 inches
Professional photography vs. DIY:
Invest in professional photography when:
Preparing for gallery representation
Applying for major grants or competitions
Creating work for potential museum acquisition
Your work is three-dimensional or has complex surface qualities
Budget allows ($50-150 per image typically)
DIY photography is acceptable when:
You’re an emerging artist with limited budget
You have strong photography skills and proper equipment
Your work is two-dimensional and flat
You understand lighting and color correction
If photographing work yourself, invest time in learning proper techniques:
Use neutral, even lighting (overcast daylight or professional lights)
Shoot against neutral background (white or gray)
Keep camera parallel to artwork to avoid distortion
Use RAW format for maximum editing flexibility
Color-correct in editing software
Creating organized image folders:
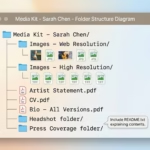
When hosting your media kit digitally (Google Drive, Dropbox), organize images into clear folders:
Media Kit - Sarah Chen/
  ├── Images - Web Resolution/
  │   ├── Chen_LandscapeMemory04_2023_Oil.jpg
  │   ├── Chen_LandscapeMemory08_2024_Oil.jpg
  │   └── [8-12 more images]
  ├── Images - High Resolution/
  │   ├── Chen_LandscapeMemory04_2023_Oil.tif
  │   └── [same images in print quality]
  ├── Artist Statement.pdf
  ├── CV.pdf
  └── Bio - All Versions.pdf
This organization makes it effortless for journalists to grab web-resolution images for online articles or high-resolution files for print publications.
Selecting which images to include:
Show cohesion and range simultaneously. Include:
Your strongest work from the past 2-3 years
Pieces that demonstrate your signature style or approach
Examples from different series if your practice includes variations
Range of scale if relevant (intimate works and large installations)
Variety of compositions while maintaining stylistic consistency
Avoid including:
Student work (unless very recent and truly exceptional)
Experimental pieces that don’t represent your mature practice
Work more than 5 years old unless it’s critically important to your narrative
Too many similar pieces (3 nearly identical paintings waste space)
When in doubt, ask trusted colleagues, mentors, or your gallery representative which pieces best represent your practice to someone unfamiliar with your work.
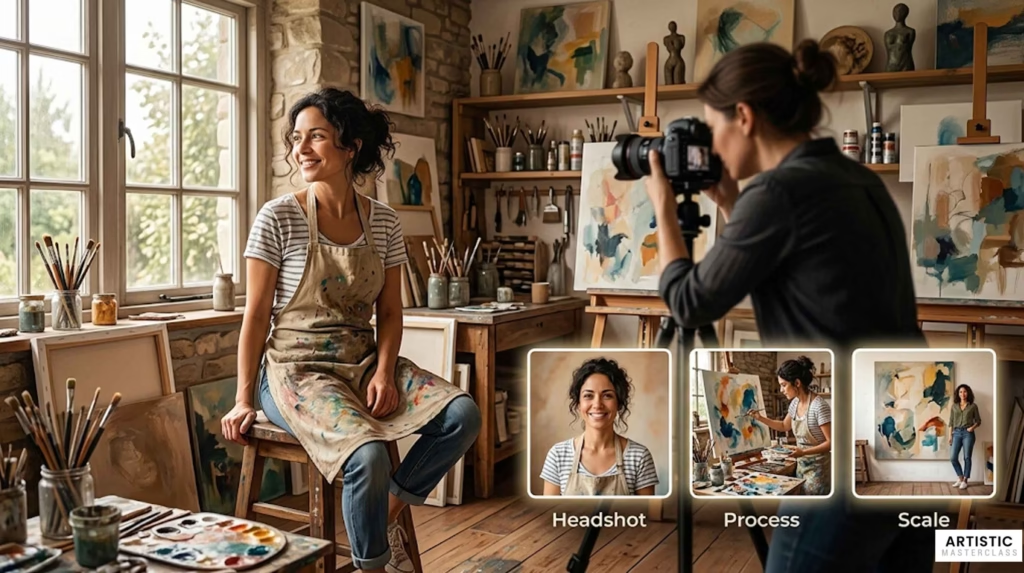
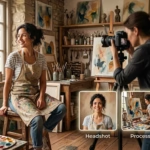
Professional Headshot and Studio Photos
While your artwork takes center stage, images of you (and your studio) humanize your practice and help press visualize featuring you.
Professional headshot guidelines:
Your headshot should be:
Recent: Updated every 2-3 years
High quality: Professional photography recommended, but excellent smartphone photos work
Well-lit: Natural light or professional lighting, no harsh shadows
Authentic: Look like yourself, not overly styled or stiff
Context-appropriate: Consider your medium (a ceramic sculptor covered in clay dust reads differently than a digital artist in clean minimalism)
Technical specs:
High resolution (300 DPI for print)
Multiple orientations (both portrait and landscape versions)
Neutral or simple background that doesn’t distract
File format: JPG
File naming: LastName_Headshot_2024.jpg
Studio/process photos:
Including 1-3 photos of you working in your studio adds depth to your media kit. These images:
Show your process and working methods
Provide context for the scale and physicality of your practice
Give journalists visual variety for articles
Help viewers understand the labor behind finished works
What works well:
You actively working (painting, sculpting, welding)
Studio environment showing works in progress
Details of process (grinding pigments, mixing glazes, welding)
Scale shots showing you next to large works
What to avoid:
Messy, chaotic backgrounds that read as unprofessional
Posed shots that look awkward or staged
Low-quality, dark, or blurry images
You don’t need expensive professional photography for studio shots—authentic, well-composed iPhone photos often work perfectly. Natural light from north-facing windows photographs beautifully.
Press Coverage and Media Mentions
Third-party validation builds credibility faster than any self-promotional statement. Even modest press coverage demonstrates that others find your work noteworthy.
How to present press coverage:
If you have extensive coverage (10+ mentions):
Create a “Selected Press” section highlighting:
Major publications (The New York Times, Artforum, Art in America)
Significant regional coverage (city magazines, major newspapers)
Exhibition reviews (prioritize museum shows, respected galleries)
Feature articles and interviews over brief mentions
Format with pull quotes: “Chen’s paintings offer a masterful exploration of memory and place.” — Artforum, September 2024
Include publication name, author if relevant, and date. Link to full article or include screenshot if particularly significant.
If you have moderate coverage (3-10 mentions):
Include all press, formatted consistently:
Major publications first
Regional/local coverage second
Blog mentions and online features last
If you have minimal coverage:
Don’t skip this section—even one blog mention is worth including. Format it professionally:
Press and Publications
Featured Artist, Portland Arts Blog, June 2024
Exhibition Review, Willamette Week, March 2024
Every artist started with zero press. Showing you’ve received any third-party attention demonstrates momentum.
Screenshot excerpts vs. links:
For particularly significant coverage, consider including:
Screenshot of the article header showing publication and headline
Pull quote highlighted
Caption with full citation and link to article
This provides visual impact while making it easy for recipients to access the full article.
Formatting quotes and attribution:
Always attribute sources properly:
Correct: “Rodriguez’s ceramic work challenges traditional vessel forms.” — American Craft Magazine, Linda Peterson, October 2024
Never fabricate or misattribute quotes. If quoting from social media or informal sources, note that: “@artcriticNYC, Instagram, June 2024.”
Avoiding copyright issues:
You can include brief excerpts (1-2 sentences) with proper attribution under fair use. Do not reproduce entire articles. Instead:
Include 1-2 sentence quote
Provide link to full article
Screenshot headlines/opening only, not full text
When in doubt, err on the side of less copying and more linking.
How to get press coverage to include:
This is a common challenge for emerging artists. Start small and build:
Pitch local arts blogs with unique story angles (not just “I have a show”)
Connect with arts writers on social media; engage genuinely with their work
Write for artist platforms (interviews, features) that accept contributions
Participate in group shows at galleries that generate press attention
Apply for awards and grants that announce recipients publicly
Document artist talks and panel participation (podcast appearances count)
Even blog mentions and podcast interviews count as press coverage. Build incrementally.
Current Project/Series Description
Your media kit should include information about what you’re working on now or what’s immediately available for exhibition. This section brings your materials up to the present moment.
For a comprehensive media kit:
Include a 200-300 word description of your current body of work:
Structure:
Project title (if applicable)
Timeline (began in 2023, ongoing, completed 2024)
Conceptual framework (what this series explores)
Formal characteristics (what it looks like, materials)
Context (how it relates to your broader practice)
Exhibition readiness (available for exhibition, 12-15 pieces completed)
Example:
Fracture Patterns (2023-2024)
This ongoing series of large-scale ceramic sculptures investigates geological processes as metaphors for psychological fragmentation. Each piece begins as a solid clay form that I deliberately stress through rapid firing and cooling cycles, generating unpredictable crack patterns that become the work’s defining visual characteristic.
The sculptures range from 18 to 36 inches tall, with surfaces that shift from glossy black glazes to raw, exposed clay bodies. The cracks—some hairline, others dramatically gaping—create literal fissures that simultaneously suggest damage and revelation. I’m interested in how fractures can both weaken a structure and expose its interior complexity.
This work emerged from research into how ceramists traditionally view cracks as failures to be avoided. I’ve inverted this relationship, making the fracture essential rather than accidental. The series has grown to include 12 completed sculptures, with 4 more in progress. Several pieces have been exhibited at Blackfish Gallery and Museum of Contemporary Craft, with strong collector interest.
For an event-specific press kit:
Your current project description becomes a press release format:
FOR IMMEDIATE RELEASE
Maya Rodriguez: Fracture Patterns Blackfish Gallery, Portland, OR Opening Reception: January 15, 2026, 6-9pm Exhibition Dates: January 15 – February 20, 2026
Blackfish Gallery presents Fracture Patterns, a solo exhibition of new ceramic sculptures by Portland-based artist Maya Rodriguez. The exhibition features 12 large-scale works that investigate geological processes as metaphors for psychological fragmentation…
[Continue with 2-3 paragraphs about the work, followed by brief artist bio]
This press release format gives journalists ready-to-publish content for event announcements.
Exhibition History
Your CV includes your complete exhibition record, but your media kit might highlight recent or significant exhibitions separately.
When to create a dedicated exhibition section:
If you have extensive exhibition history, consider featuring:
Solo exhibitions (past 5 years)
Museum shows (group or solo)
Significant institutional exhibitions
Upcoming confirmed exhibitions
Format clearly:
Upcoming Exhibitions 2026 | Solo Exhibition Title, Gallery Name, City, State (Opening March 2026)
Recent Exhibitions 2024 | Chromatic Shifts, Pace Gallery, New York, NY 2023 | Recent Works, Modern Art Museum of Fort Worth, Fort Worth, TX
This draws attention to your exhibition momentum without requiring recipients to parse your entire CV.
Including upcoming exhibitions:
Always include confirmed upcoming exhibitions in your media kit. This shows:
Active professional engagement
Gallery relationships
Near-term opportunities to see your work
Update this section immediately after opening receptions so “upcoming” exhibitions become “recent” exhibitions.
Awards, Grants, and Achievements
Competitive awards, grants, and residencies demonstrate peer recognition and artistic merit. Even local or regional awards matter—they show you’re actively engaged in the professional art world.
What counts as an achievement:
Include:
Competitive grants (Pollock-Krasner, Joan Mitchell, NEA, state arts councils)
Fellowships (Guggenheim, Fulbright, university fellowships)
Significant commissions (public art, major private commissions)
Teaching positions (visiting artist, adjunct faculty at respected institutions)
Notable publications (artist monographs, critical essays in major journals)
Lectures and talks (TEDx, museum lectures, conference presentations)
What not to inflate:
Don’t list:
High school awards (even if prestigious at the time)
Participation in non-juried shows as “awards”
Self-published books as major publications
Minor local recognitions that don’t add credibility
Be honest about the level and context of achievements. Gallery directors can distinguish between a Guggenheim Fellowship and a neighborhood arts council participation certificate.
Format for clarity:
Awards and Grants 2023 | Guggenheim Fellowship 2020 | Joan Mitchell Foundation Grant 2018 | Pollock-Krasner Foundation Grant, $30,000 2017 | Oregon Arts Commission Individual Artist Fellowship
Residencies 2023 | MacDowell Colony, Peterborough, NH 2022 | Yaddo, Saratoga Springs, NY 2020 | Vermont Studio Center, Johnson, VT
Including grant amounts is optional—some artists prefer to include them (particularly for major grants), others omit. Either approach works.
Contact Information
Make it effortless for opportunities to reach you. Include contact information on both the first page and last page of your media kit.
Essential contact details:
Professional email address: Ideally yourname@yourdomain.com rather than generic Gmail
If using Gmail/Yahoo: use professional variation (sarahchen.artist@gmail.com, not xoxosarahxo@gmail.com)
Website: Your professional artist website (critical—invest in this if you haven’t)
Studio location: City and state/region (not full address)
Example: “Studio located in Brooklyn, NY” or “Portland, OR”
Gallery representation:
If represented, include: “Represented by [Gallery Name], [City]” If available for representation: Omit this line (assumed)
What not to include:
Home address (city/region sufficient)
Multiple email addresses (confusing)
Every social media platform (Instagram only unless others professionally relevant)
Unmonitored contact methods (don’t list a phone number you never answer)
Placement:
Header/footer approach: Include basic contact (email, website) in header or footer of every page
Dedicated contact page: Final page with complete contact info, possibly including:
Headshot
Contact details
Social media links
Studio location
Gallery representation
This ensures no one has to hunt for how to reach you.
Optional but Valuable Additions
Beyond core components, consider including:
Video links
Studio tour videos (2-3 minutes showing your process)
Artist talks or lectures you’ve delivered
Documentation of performance or time-based work
Professional interviews
Include as links rather than embedding (keeps file sizes manageable).
Downloadable high-resolution images folder
Organized folder of print-quality images
Properly labeled and documented
Easy access for journalists and curators
Testimonials (use sparingly)
Brief quotes from curators, critics, or collectors
Only include if genuinely impressive
Never fabricate
Artist website or portfolio link
Direct link to your professional site
Ensure site is current and professional
Price list or commission information (for specific audiences)
Include only when appropriate (collector-focused materials)
Generally omit from press kits
Include for gallery submissions only if requested
Publications or exhibition catalogs
Links to digital versions
PDFs of significant catalogs
Only if they enhance your presentation
The key is not to overwhelm recipients. Core components matter most—add optional elements only when they genuinely strengthen your case.
Physical vs. Digital Media Kits: Choosing the Right Format
Twenty years ago, artists shipped elaborate printed press kits in heavy folders. Today, most submissions happen digitally. Understanding when to invest in physical materials versus digital formats saves money and increases effectiveness.
When to Create a Physical Press Kit
Despite the digital shift, physical media kits still matter in specific situations:
Gallery openings and in-person meetings When meeting a gallery director or curator face-to-face, having a professional printed kit to leave behind creates a tangible reminder of your conversation. The physical object sits on their desk rather than disappearing into an email inbox.
Art fairs and networking events At art fairs, portfolio reviews, and professional networking events, you can’t hand someone a PDF. A well-designed physical media kit (or at minimum, a one-sheet) gives interested parties your information in a memorable format.
Mailing to curators and galleries (still relevant for some) Some older-generation gallerists and curators still prefer physical materials they can review at their leisure. High-end galleries occasionally expect traditional physical submissions.
Professional presentation requirements Certain grant applications, residency programs, or competition submissions still request physical materials. Always follow specific submission guidelines.
Design specifications for physical kits:
If creating physical materials, invest in quality:
Consistent branding on cover (your artwork, name, website)
Paper quality:
Resume-weight paper minimum (24lb)
Matte or satin finish (not glossy—difficult to read)
Professional printing (not home inkjet unless high-quality)
Organization:
Table of contents or organized pockets
Each component clearly labeled
Contact info on multiple pages (in case pages separate)
Quantity: Print in small batches (10-20) rather than hundreds. Your materials will change as your career develops, and you’ll waste money on outdated kits.
Typical cost: Budget $5-15 per physical kit depending on quality level. This adds up, so reserve physical kits for situations where they genuinely add value.
Digital Media Kit Formats
Digital formats offer flexibility, ease of updating, and zero marginal cost. Most opportunities now expect digital materials.
PDF media kit (most versatile)
Pros:
Email-friendly (attachable to pitch emails)
Maintains formatting across all devices
Professional appearance
Can be saved and shared easily
Works offline
Cons:
File size can be large if many high-res images
Not easily updatable (requires recreating PDF)
Linear format (recipients must browse sequentially)
Best for:
Email submissions to galleries
Grant applications
General inquiries
Providing complete materials in single file
Technical specs:
PDF/A format for archival compatibility
Embed fonts (ensures consistent display)
Compress images to keep file under 10MB if possible
Export at high quality (300 DPI for images)
Dedicated website page (always accessible)
Pros:
Always current (update in real-time)
Shareable via simple link
Analytics (see who’s viewing)
Can include video, audio, interactive elements
No file size limitations
Cons:
Requires website
Relies on internet access
Recipients might prefer downloadable materials
Best for:
Email signature inclusion (standing link to your media kit)
Social media bio links
Long-term reference
Journalists who prefer browsing online
Platform options:
Squarespace, Wix, WordPress (dedicated page on your artist site)
Cargo Collective, Format (portfolio platforms with media kit templates)
Simple Google Site (free, minimal design)
Cloud storage folder (Google Drive, Dropbox)
Pros:
Highly organized (separate folders for different components)
Easy to update individual files
Can provide both web and print resolution images
Recipients download only what they need
Shareable link easy to distribute
Cons:
Less visually polished than designed PDF
Requires recipients to navigate folders
Dependent on cloud platform (link changes if you switch services)
Include a README.txt file explaining what’s in each folder and which resolution images are for which purpose.
One-sheet PDF (condensed version)
Pros:
Quick to review (single page)
Easy to email
Perfect for casual inquiries
Can be printed easily
Cons:
Limited information
Not comprehensive
Best for:
Introductory emails
Quick follow-ups
When full media kit seems excessive
Handouts at openings or talks
A one-sheet typically includes: your name, one strong image, 50-word bio, contact info, and website link—all on a single professionally designed page.
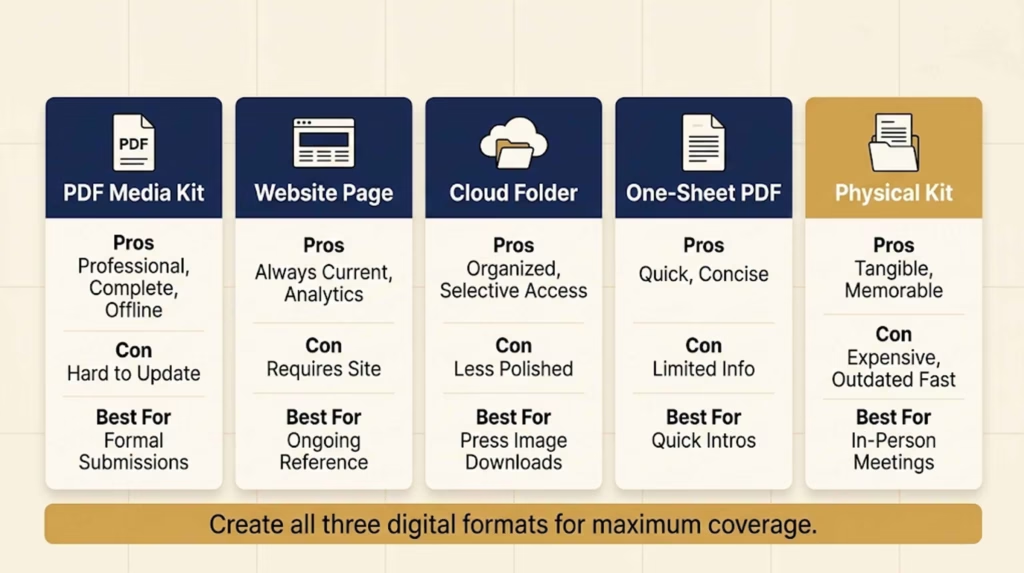
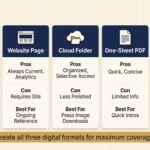
Comparison table:
Format
Best For
Pros
Cons
Update Ease
PDF Media Kit
Email submissions, applications
Professional, complete, offline access
Large file size, linear format
Low (must recreate)
Website Page
Ongoing reference, link sharing
Always current, analytics, multimedia
Requires site, internet dependent
High (update instantly)
Cloud Folder
Press needing images, comprehensive materials
Organized, selective downloading
Less polished, navigation required
High (swap files easily)
One-Sheet PDF
Quick intros, handouts
Concise, fast review
Limited information
Medium
Physical Kit
In-person meetings, traditional venues
Tangible, memorable
Expensive, outdated quickly
Low
Recommendation: Create all three digital formats:
Comprehensive PDF media kit for formal submissions
Dedicated website page for standing reference
Google Drive folder for press and detailed inquiries
This covers all scenarios without excessive work—the same core content just formatted three ways.
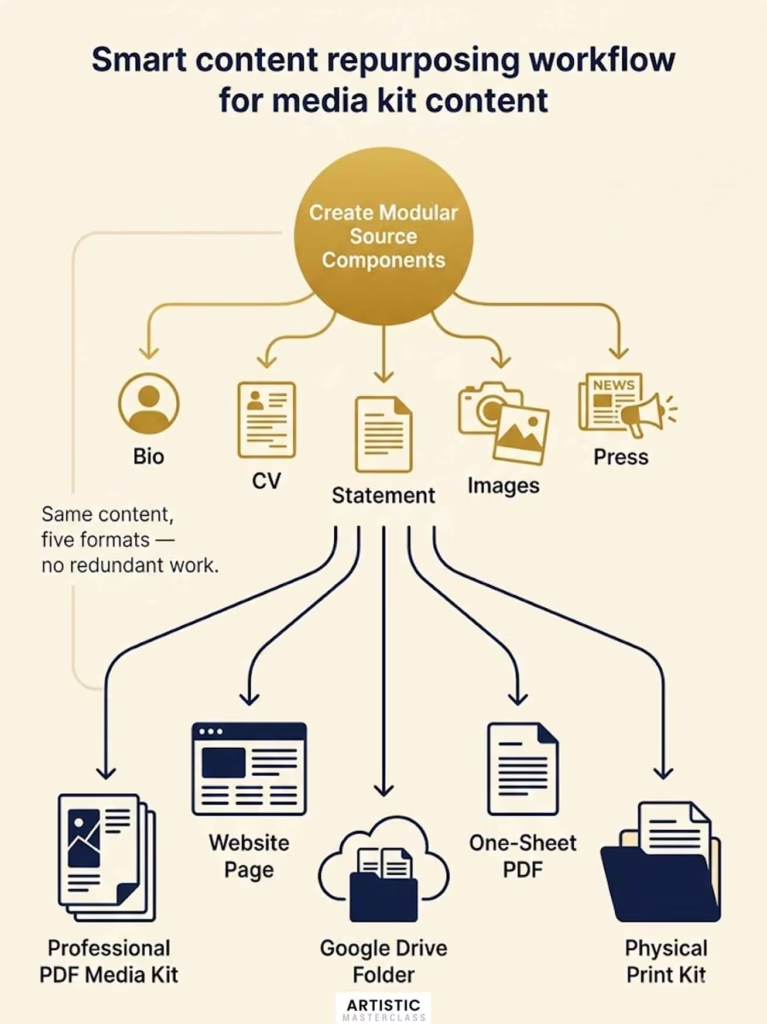
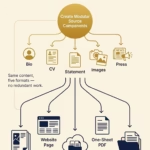
Creating Both from the Same Source Materials
Smart workflow: build your components once, then adapt them into different formats as needed.
Start with modular components:
Create separate, well-formatted files:
Bio (all three lengths) as Word document
CV as Word document
Artist statement as Word document
Images organized in folders (web-res and print-res versions)
Press coverage compiled as PDFs
From these source files, you can:
Design professional PDF media kit (using Canva, InDesign, or Word)
Upload to dedicated website page
Organize into Google Drive folder
Extract highlights for one-sheet
Repurposing workflow:
Create comprehensive PDF first (forces you to think through complete presentation)
Extract pages/sections for website (copy text, upload images)
Organize source files into Google Drive (for press/image downloads)
Condense PDF into one-sheet (select strongest image, shortest bio)
Print physical copies if needed (from same PDF design)
This prevents redundant work—you’re not creating entirely different materials for each format, just adapting existing content intelligently.
Cost-effective approach:
Time investment: 8-12 hours creating initial comprehensive materials
Ongoing maintenance: 1-2 hours quarterly updating
Software needs: Free tools work (Canva, Google Docs, Google Drive)
Optional investment: Professional designer ($300-500) for PDF layout if budget allows
The key is creating quality content once, then distributing it efficiently across formats.
Designing Your Media Kit: DIY vs. Professional Design
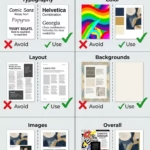
Your media kit’s design should support your content, not compete with it. As a visual artist, you already understand the importance of presentation—apply those same principles to your professional materials.
Budget-Friendly DIY Design Tools
You don’t need expensive software or design skills to create professional-looking materials. These tools offer templates and intuitive interfaces:
Canva (canva.com)
Best for: Artists with minimal design experience who want polished results quickly
Pros:
Hundreds of media kit templates specifically for artists/creatives
Drag-and-drop interface (no design experience required)
Free version includes most essential features
Exports high-quality PDFs
Canva Pro ($13/month) adds brand kit, additional templates, background remover
Cons:
Templates can look generic if not customized
Free version has Canva watermark on some elements
Other artists may use identical templates
How to use it well:
Choose minimalist template that lets your artwork stand out
Customize colors to match your work (avoid default color schemes)
Replace all placeholder text and images thoroughly
Export as PDF (high quality, 300 DPI)
Google Docs/Slides (free)
Best for: Artists who prefer clean, simple layouts without design flourishes
Pros:
Completely free
Familiar interface
Professional, clean results if well-formatted
Easy to update
Exports PDFs
Cons:
More limited design flexibility
No templates specifically for media kits
Requires more design thinking on your part
How to use it well:
Use simple, professional fonts (Helvetica, Georgia, Garamond)
Generous white space
Consistent formatting throughout
Let your artwork images provide visual interest
Visme (visme.co) and Adobe Express
Best for: Artists wanting more design control than Canva but still template-based
Similar to Canva with different template aesthetics. Try both and see which resonates with your style.
When DIY is sufficient:
DIY design works well when:
You’re an emerging artist with limited budget
Your materials are primarily text-based (bio, CV, statement)
You have some design sensibility (even if not formally trained)
You’re willing to invest time learning tools
You’re seeking local or regional opportunities
When DIY might look amateur:
Watch out for:
Using decorative fonts that compete with your artwork
Over-designing with too many colors, borders, graphics
Misaligned elements or inconsistent spacing
Low-resolution images
Templates that scream “template” (highly recognizable designs)
If you’re unsure, get feedback from artist colleagues or mentors before sending materials to important opportunities.
Working with a Professional Designer
For artists pursuing gallery representation or major opportunities, professional design can be worth the investment.
When to invest in professional design:
You’re approaching major galleries or museums
You have budget available ($300-1,500 typically)
Your DIY attempts don’t reflect the quality of your artwork
You need cohesive branding across materials
You’re terrible at design and know it
What to expect cost-wise:
Basic media kit design: $300-600 (using templates, minimal customization)
Custom media kit design: $600-1,200 (original layout, multiple rounds of revision)
Don’t pack every inch with content. Generous white space:
Makes materials easier to read
Looks more professional
Allows your artwork images to breathe
Prevents overwhelming recipients
Aim for 30-40% white space on each page.
Readable, professional typography
Body text: 10-12pt minimum (10pt absolute minimum for print)
Headlines: 16-24pt depending on hierarchy
Line spacing: 1.15-1.5 leading for body text
Alignment: Left-aligned body text (easier to read than justified)
Never use:
All caps for body text (hard to read)
Centered body text (difficult to scan)
Italics for long passages (tiring to read)
Decorative fonts for body text
Professional color choices
If using color:
Pull directly from your artwork (creates cohesion)
Use neutrals (black, grays, white) for text and backgrounds
Ensure sufficient contrast for readability (dark text on light background)
Test how colors print (what looks good on screen may print poorly)
When in doubt, go with black text on white background—classic, professional, never wrong.
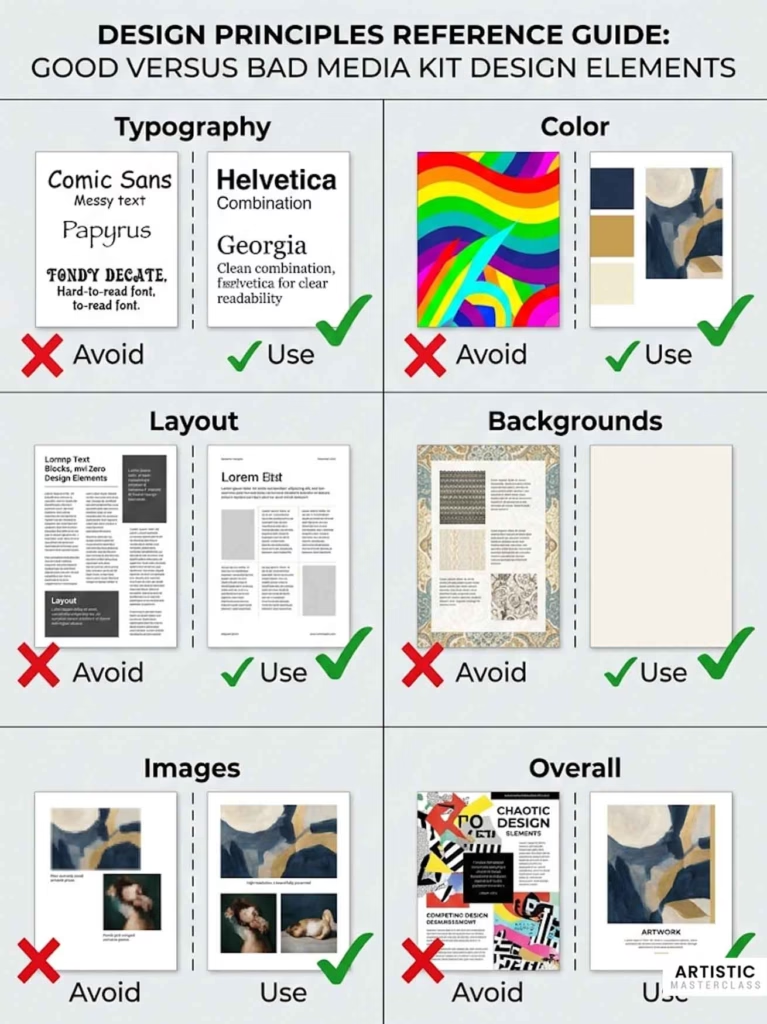
Visual examples of good vs. bad design:
Bad design signals:
Multiple fonts that don’t coordinate
Bright, busy backgrounds that compete with images
Misaligned elements (text boxes floating randomly)
Low-resolution, pixelated images
Inconsistent spacing and margins
Decorative elements that add no value
Too much text crammed on pages
Good design signals:
Single cohesive font family
Clean white or neutral backgrounds
All elements aligned to invisible grid
High-quality, properly sized images
Consistent spacing throughout
Purposeful use of color
Easy-to-scan organization
Think like your audience:
Gallery directors and curators review dozens of artist submissions weekly. Your media kit should:
Make information instantly accessible
Look professional and serious
Reflect the quality of your artwork
Be easy to navigate
Design that accomplishes these goals—whether DIY or professional—succeeds.
Tailoring Your Media Kit for Different Audiences
A one-size-fits-all media kit wastes opportunities. What a gallery director needs differs from what a journalist wants or a brand partnership manager evaluates. Smart artists create modular materials they can adapt for specific audiences.
Media Kit for Gallery Representation
Galleries evaluate whether your work will sell, fit their program aesthetically, and enhance their reputation. Your media kit should address these concerns directly.
What galleries prioritize:
Professional, high-quality images showing cohesive body of work
Galleries need to envision your work on their walls
Include 8-12 images of your strongest, most recent work
Show consistency (they want to see you have a developed practice, not scattered experiments)
Provide multiple images from current series (demonstrates depth)
Exhibition history demonstrating upward trajectory
Museums and established galleries (even group shows count)
Consistent exhibition activity (shows momentum)
Quality venues over quantity of shows
Gallery representation history (if applicable)
Evidence of market interest
Press coverage (third-party validation)
Awards and grants (peer recognition)
Collections (corporate or museum acquisitions)
Past sales (if impressive—$10K+ works, not $200 pieces)
Clear artistic vision
Artist statement that’s intelligent but accessible
Coherent body of work with clear direction
Understanding of where your work fits in contemporary art landscape
What to include in gallery submission media kit:
✓ 50-word and 150-word bio ✓ Comprehensive CV (full exhibition history) ✓ Artist statement (250-400 words) ✓ 8-12 professional images of current work ✓ Press coverage (emphasize gallery/museum reviews) ✓ Current project description ✓ Contact information and website
What to omit or downplay:
✗ Experimental work outside your main practice ✗ Student work or very early career pieces ✗ Prices (unless specifically requested—let them ask) ✗ Too much personal narrative (keep professional) ✗ Desperation signals (“I really need gallery representation”)
Downloadable checklist: Gallery Submission Media Kit
□ Professional PDF media kit with cohesive current work □ Images show 1-2 series in depth (not scattered across 10 different styles) □ CV emphasizes museum/gallery exhibitions □ Artist statement is clear and sophisticated □ Press coverage from respected sources □ Professional headshot included □ Website is current and professional □ Cover email is brief and professional (3-4 sentences maximum)
Press Kit for Media Coverage
Journalists work under tight deadlines and need specific elements to write about you quickly.
What journalists need:
Compelling story angles
Why is this newsworthy NOW? (new exhibition, award, timely theme)
Human interest elements (unique background, interesting process)
Connection to larger cultural conversations
Local angle (hometown artists, community impact)
High-resolution images they can publish
Web-resolution for online articles (1200-2000px)
Print-resolution for magazines (300 DPI, 3000px+)
Multiple images to choose from
Image credits and captions ready to copy-paste
Quotable biographical information
Pull quotes they can use directly
Brief, punchy bio (150 words maximum for press)
Interesting facts or unusual background details
Ready-to-publish content
Press release for current exhibition/project
All basic information (who, what, when, where, why)
Artist statement that’s accessible (not overly academic)
What to include in press kit:
✓ Press release for current project/exhibition (1-2 pages) ✓ 50-word and 150-word bio ✓ 3-5 high-quality images from current project ✓ Downloadable high-res image folder with captions ✓ Artist statement about current project (200-300 words) ✓ Pull quotes from previous press if available ✓ Exhibition details (dates, location, opening reception) ✓ Contact information (yours and gallery if applicable)
What to omit:
✗ Full CV (provide if requested, but lead with current project) ✗ Old projects (keep focus on what’s newsworthy now) ✗ Academic jargon (journalists need accessible language) ✗ Too many images (they need 3-5 strong options, not 20 mediocre ones)
Press release structure:
Headline: Artist Name: Exhibition Title Subhead: Gallery/Venue, City, Dates
Paragraph 1: The news—what’s opening, when, where Paragraph 2: What the work is about (themes, materials, approach) Paragraph 3: Why it matters (context, significance, unique angle) Paragraph 4: Artist bio (brief—3-4 sentences of highlights) Final paragraph: Exhibition details and contact info
Downloadable checklist: Press Kit for Media
□ Press release written in journalistic style (not academic) □ Strong news angle clearly stated in first paragraph □ 3-5 publication-ready images with full captions □ Separate high-res image folder for download □ Brief artist bio emphasizing current achievements □ Exhibition details easy to find (dates, times, location, admission) □ Contact info for both artist and venue □ Sent 4-6 weeks before exhibition opening (ideal lead time)
Collaboration Kit for Brand Partnerships
Brands evaluate potential collaborators differently than galleries or press. They care about audience alignment, professional credibility, and collaboration track record.
What brands look for:
Audience alignment and reach
Instagram followers and engagement rates (if significant)
Audience demographics matching their customer base
Your artistic aesthetic fitting their brand values
Professional online presence
Professional credibility
Exhibition history (shows you’re established)
Press coverage (third-party validation)
Professional presentation (you’ll represent them well)
Clear artistic identity
Collaboration experience
Past brand partnerships or commissions
Public art installations
Licensing arrangements
Commercial projects (if relevant to your practice)
Clear terms and availability
How you could collaborate (murals, product design, licensing)
Timeline availability
Process for working together
Professionalism in communication
What to include in brand collaboration media kit:
✓ Brief bio emphasizing unique style and vision (150 words) ✓ 10-12 images showing range and style consistency ✓ Instagram/social media metrics if impressive (optional) ✓ Past collaborations or commissions ✓ Press coverage (emphasizes market visibility) ✓ Artist statement focusing on aesthetic and process ✓ Ideas for potential collaboration (optional—can discuss in conversation) ✓ Professional headshot and studio images
What to potentially include (depending on brand):
✓ Audience demographics if you have them (mailing list, social media analytics) ✓ Past commercial work or product designs ✓ Examples of your work in various contexts (installations, public spaces) ✓ Testimonials from previous collaborations
What to omit:
✗ Overly academic or conceptual language ✗ Extensive CV (brands care less about exhibition history) ✗ Prices for individual artworks (licensing/collaboration is separate) ✗ Gallery representation details (usually not relevant)
Downloadable checklist: Brand Partnership Media Kit
□ Bio emphasizes your unique aesthetic and professional credibility □ Images showcase your signature style clearly □ Past collaborations highlighted (if any) □ Social media presence professional and active □ Website includes diverse applications of your work □ Communication professional and responsive □ Clear about what types of collaborations interest you
Application Kit for Grants and Residencies
Grant panels and residency selection committees have specific evaluation criteria. Your media kit should address their rubric directly.
What grant reviewers evaluate:
Artistic merit
Quality and originality of work
Depth of practice and conceptual sophistication
Technical skill and innovation
Professional development
Clear trajectory and goals
How grant/residency fits your development
Potential for growth
Feasibility
Realistic project proposals
Appropriate budget (for grants)
Timeline makes sense
Impact
Community engagement (for some grants)
Contribution to field
Alignment with grant mission
What to include:
✓ Tailored artist statement addressing grant themes ✓ CV emphasizing relevant experience ✓ Work samples following exact specifications ✓ Project proposal (if required) ✓ Budget (if required) ✓ Letters of recommendation (if required)
Critical: Follow application guidelines exactly
Grant applications are often disqualified for not following instructions:
Image requirements (number, file format, size)
Page limits (strictly enforced)
Required documents (don’t submit extras)
Deadline (late applications typically rejected)
Your general media kit is source material—adapt it precisely to each application’s requirements.
□ Read entire application guidelines before starting □ Highlight all requirements and deadlines □ Tailor artist statement to grant mission and themes □ CV emphasizes relevant experience for this opportunity □ Work samples follow exact specifications (number, format, resolution) □ Project description addresses evaluation criteria □ Budget is realistic and well-justified (if required) □ All required documents included, nothing extra □ Proofread everything multiple times □ Submit before deadline (ideally 24 hours early)
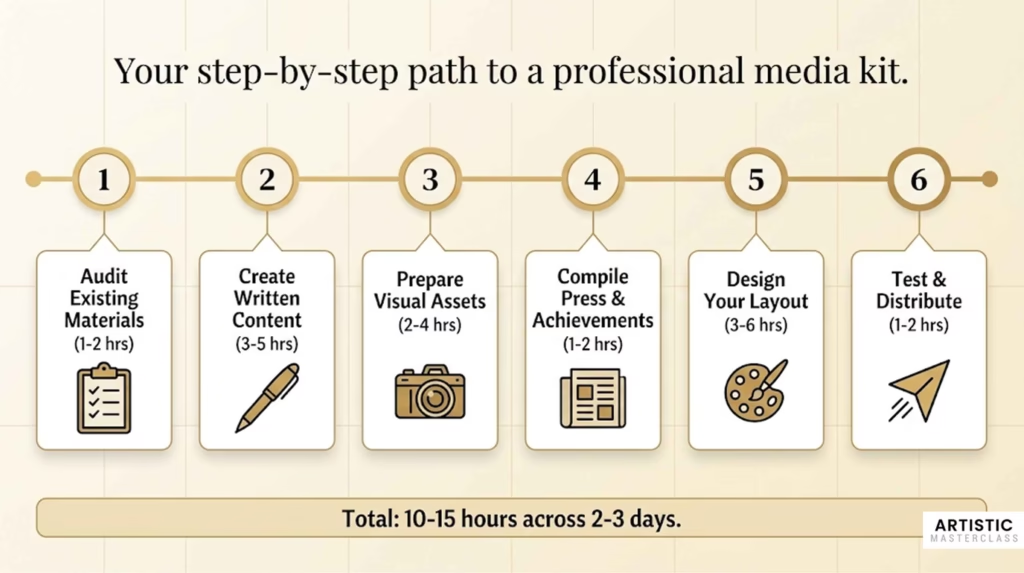
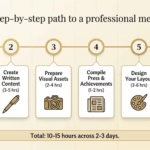
How to Create Your Media Kit: Step-by-Step Process
Building a comprehensive media kit feels overwhelming. Breaking it into clear steps makes it manageable. Set aside dedicated time (2-3 full days or 10-15 hours total) to create quality materials.
Step 1: Audit What You Already Have (1-2 hours)
Before creating anything new, inventory existing materials.
Gather:
Any previous artist statements or bios you’ve written
CVs or resumes
Images of your artwork (all available files)
Press coverage (articles, reviews, mentions)
Awards, grants, residency acceptance letters
Exhibition announcements or invitations
Existing business cards, postcards, or promotional materials
Evaluate quality:
Which materials are current and professional?
What needs updating or rewriting?
Which images are publication-quality?
What’s missing entirely?
Identify gaps:
Missing written content: □ Artist bio (any length) □ Artist statement □ Current CV
Missing visual materials: □ Professional images of recent work □ Professional headshot □ Studio/process photos
This assessment shows exactly what you need to create versus what you can update from existing materials.
Step 2: Create or Update Core Written Content (3-5 hours)
Writing about yourself and your work is challenging. Allocate serious time for this step—it’s the foundation of everything else.
Artist bio (all three lengths):
Time needed: 2-3 hours
Start with 500-word comprehensive version, then condense to create shorter versions.
Process:
Brainstorm all notable achievements, education, influences
Write 500-word version without worrying about perfection
Get feedback from artist colleagues or mentor
Revise for clarity and impact
Condense to 150 words (keep most impressive elements)
Condense further to 50 words (only essential information)
Template approach:
Download our fill-in-the-blank bio template if writing from scratch feels paralyzing. Fill in the blanks, then refine language to sound natural.
Artist statement:
Time needed: 2-3 hours (often the most difficult piece)
If you struggle with artist statements, you’re not alone—most visual artists do.
Strategies:
Talk it out first: Record yourself explaining your work to a friend. Transcribe. Edit for clarity. This captures your authentic voice.
Answer specific questions:
What do you make?
Why do you make it?
How do you make it (process)?
What do you want viewers to experience?
What larger questions does your work engage?
Write answers to each question, then weave them into cohesive paragraphs.
Get feedback: Share draft with artist friends, mentors, or writing-savvy colleagues. Ask:
Is this clear?
Does this make you want to see the work?
Does it sound like me?
Any jargon or confusing language?
CV:
Time needed: 1-2 hours
If you have existing CV, update it. If starting from scratch, compile all relevant information systematically.
Process:
Download our artist CV template
Fill in all categories (Education, Exhibitions, Awards, etc.)
Organize in reverse chronological order within each category
Proofread meticulously for consistency and accuracy
Have someone else proofread (fresh eyes catch errors)
Save all written content as separate files:
Bio_50words.docx
Bio_150words.docx
Bio_500words.docx
ArtistStatement_2026.docx
CV_YourName_2026.docx
This makes them easy to update and repurpose across formats.
Step 3: Organize and Prepare Visual Assets (2-4 hours)
Visual materials require as much attention as written content.
Select your strongest 8-15 images:
Time needed: 1 hour
Criteria for selection:
Represents current work (past 2-3 years)
Professionally photographed or high-quality DIY
Shows cohesive artistic vision
Includes range within your practice
Your absolute strongest pieces
Lay out images together. Do they look like they’re by the same artist? Do they represent your practice fairly? Get feedback from trusted colleagues.
Photograph work if needed:
Time needed: 2-4 hours depending on number of pieces
If you need new documentation:
DIY photography checklist: □ Shoot on overcast day or with consistent artificial lighting □ Use neutral background (white or gray wall) □ Keep camera parallel to work (avoid distortion) □ Shoot in RAW format for editing flexibility □ Take multiple shots of each piece □ Use tripod for consistent framing □ Color-correct in editing software
Or hire professional photographer:
Budget $50-150 per piece typically
Provide clean, accessible studio space
Have work ready and properly lit
Communicate any specific needs
Edit and optimize files:
Time needed: 1-2 hours
For each image:
Color-correct in Photoshop/Lightroom/free alternatives
Crop if needed (square up edges)
Create two versions:
Web resolution: 72 DPI, 2000px longest side, JPG format
Or recruit photographer friend with good equipment
Or take high-quality selfie/tripod photos in natural light
Aim for authentic, well-lit, professional appearance.
Step 4: Compile Press Coverage and Achievements (1-2 hours)
Organize all third-party validation of your work.
Press coverage:
Time needed: 1 hour
Search your name + “artist” to find online mentions
Compile PDFs or screenshots of articles
Create document with formatted quotes and citations
Organize from most to least prestigious
Include links to full articles
Format:“Rodriguez’s ceramic sculptures challenge traditional vessel forms.” — American Craft Magazine, Linda Peterson, October 2024 [Link to full article]
Awards and achievements:
Time needed: 30 minutes
List all:
Competitive grants received
Residencies completed or upcoming
Juried awards
Notable commissions
Teaching positions
Significant lectures or talks
Format chronologically with full details.
Step 5: Design Your Media Kit Layout (3-6 hours)
Now that all content is ready, arrange it into professional presentation.
Choose your approach:
DIY using templates:
Time needed: 3-4 hours
Select Canva media kit template (search “artist press kit”)
Replace all placeholder content with your materials
Customize colors to complement your artwork
Ensure consistent spacing and alignment
Export as high-quality PDF (300 DPI)
DIY from scratch:
Time needed: 4-6 hours
Choose design software (Canva, Google Docs, InDesign if you have it)
Establish layout grid and margins
Choose fonts (one for headers, one for body text)
Design cover page with strong artwork image
Create interior pages with consistent layout
Add page numbers
Ensure contact info on first and last pages
Export as PDF
Hire professional designer:
Time needed for you: 2-3 hours (gathering materials and giving feedback)
Collect all finalized content
Create design brief with references
Provide materials to designer
Review first draft and give specific feedback
Review revised draft
Request final files in multiple formats
Create all three digital formats:
Once you have designed PDF:
Upload to dedicated page on your website
Organize source files into Google Drive folder with README
Extract key elements for one-sheet version
Review checklist before finalizing:
□ All text proofread (no typos or errors) □ All images high-quality and properly labeled □ Contact information correct and current □ File size reasonable (under 10MB for PDF if possible) □ Fonts embedded in PDF □ Links functional (if website version) □ Consistent formatting throughout □ Professional appearance reflecting quality of artwork □ Saved with clear filename: MediaKit_YourName_2026.pdf
Step 6: Test and Distribute (1-2 hours)
Before sending your media kit to important opportunities, test it.
Send test versions:
Time needed: 1 hour
Email media kit to 2-3 trusted colleagues, asking:
Does everything display correctly?
Is anything confusing or unclear?
Does this represent me professionally?
Any typos or errors I missed?
What’s your overall impression?
Technical testing:
□ Open PDF on different devices (computer, phone, tablet) □ Check all links work (if website version) □ Verify images display properly □ Ensure file size isn’t too large to email □ Test Google Drive link accessibility (not requiring login)
Set up hosting:
Time needed: 30-60 minutes
Google Drive:
Create folder with organized materials
Set sharing to “Anyone with link can view”
Copy shareable link
Test link in incognito browser window
Website page:
Create dedicated media kit page
Upload all materials
Ensure images optimized for web
Test on mobile devices
Add link to main navigation or footer
Create distribution workflow:
Save email templates for different scenarios:
Gallery submission email template:Subject: [Your Name] – Artist Submission
Dear [Gallery Director Name],
I’m a [medium] artist based in [city] whose work explores [brief theme]. I’m writing to introduce my work for your consideration.
My media kit is attached [or: available here: link]. I believe my work aligns well with your gallery’s program, particularly given your recent exhibition of [relevant show].
Thank you for your consideration. I look forward to hearing from you.
Best regards, [Your Name] [Website] [Phone]
Press pitch email template:Subject: Artist [Your Name] Opens [Exhibition Title] at [Gallery]
Dear [Journalist Name],
I’m reaching out about my upcoming exhibition, [Title], opening [date] at [Gallery] in [city].
[One sentence about what the work is and why it’s newsworthy]
My press kit is attached with high-resolution images, press release, and additional information. I’m available for interviews or studio visits if you’re interested in covering the exhibition.
Thank you for your consideration.
Best regards, [Your Name]
Save these templates. Customize for each opportunity but having structure saves time.
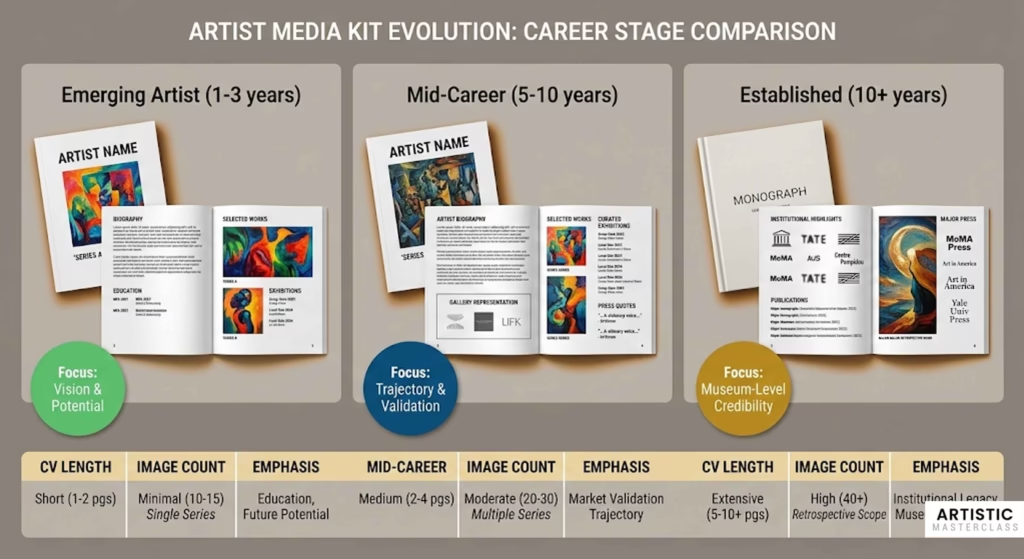
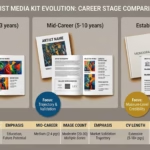
Real Visual Artist Media Kit Examples (3 Career Stages)
Seeing real examples helps you understand what works at different career stages. Here are three artists at different professional levels and how their media kits reflect their stage.
Emerging Artist Example (1-3 years professional experience)
Artist Profile: Maria Santos, Ceramicist
Background:
Graduated MFA 2 years ago
3 group exhibitions, 1 solo show in university gallery
1 regional grant, 2 student awards
Active studio practice, teaching part-time
Media Kit Strategy:
Maria focuses on potential rather than extensive track record. Her media kit emphasizes:
Strong artistic vision (clear statement)
Professional-quality work (excellent images)
Upward trajectory (recent grad but already exhibiting)
Commitment to practice (active studio, teaching)
Components included:
Cover: Single strong image of ceramic work with her name and “Ceramic Sculptor”
Bio (150 words): Emphasizes MFA from respected program, describes her artistic focus, mentions her teaching (shows professional engagement), includes solo show and group exhibitions, notes grant. Honest about being early career without apologizing.
Artist Statement (300 words): Clear, accessible explanation of her investigation into vessel forms and cultural memory. Shows sophisticated thinking without jargon. Explains process (hand-building, pit-firing) in ways that demonstrate skill.
CV (2 pages):
Education (MFA prominent)
Solo Exhibition (1 – her thesis show)
Group Exhibitions (3 – including juried museum show)
Awards (regional grant, student honors)
Teaching (part-time positions)
Residency (upcoming, shows forward momentum)
Images (8 pieces): All from past 2 years, showing cohesive body of work exploring similar themes. Professionally photographed. Demonstrates range within focused practice.
Press Coverage:
Local newspaper review of group show
University art journal feature
Quotes from faculty recommendation letters (with permission)
Current Project: Description of series in progress, exhibition-ready
What makes this work:
Maria doesn’t pretend to have credentials she lacks. Instead, she presents herself as a serious emerging artist with clear vision, professional presentation, and promising trajectory. Gallery directors can see she’s “gallery-ready” even without extensive exhibition history.
Key takeaway: Early career artists should emphasize vision, quality of work, and professional potential rather than trying to inflate limited credentials.
Mid-Career Artist Example (5-10 years professional experience)
Artist Profile: James Park, Painter
Background:
10 years post-MFA
5 solo exhibitions, 30+ group shows
Gallery representation in home city
Multiple grants and residencies
Press coverage in regional and national publications
Work in several corporate collections
Media Kit Strategy:
James presents growing momentum and established professional practice. His media kit demonstrates:
Consistent exhibition history
Gallery representation and market validation
Critical recognition (press, awards)
Developed body of work
Professional maturity
Components included:
Cover: Museum-quality design with signature painting
Bio (150 words – comprehensive version available separately): Leads with gallery representation, describes painting practice, notes solo exhibitions at respected venues, mentions press in Art in America and regional publications, includes major grants and residencies. Professional but not boastful tone.
Artist Statement (400 words): Sophisticated discussion of his investigation of color and perception. References art historical precedents (Color Field painters) while establishing his own contribution. Explains methodology. Demonstrates intellectual engagement with his practice.
CV (4 pages – curated version):
“Selected Solo Exhibitions” (highlights 8 best, not all 12)
“Selected Group Exhibitions” (25 strongest from 50+)
Images (12 pieces): From three related series over past 3 years. Shows development and range while maintaining signature style. All professionally photographed in high-quality studio shots.
Press Coverage (dedicated section):
Pull quotes from Art in America review
Regional museum exhibition catalog essay excerpt
Links to 5 major articles
Screenshots of 2 most prestigious features
Current Project: Upcoming solo exhibition at gallery, with installation views if available
Gallery Representation: Notes representation, includes gallery contact
What makes this work:
James presents himself as established professional with clear trajectory. He curates rather than listing everything, showing judgment about what matters most. Gallery directors can see he has experience, market validation, and critical recognition.
Key takeaway: Mid-career artists should curate their materials, emphasizing quality over quantity and showing clear professional development.
Established Artist Example (10+ years, significant achievements)
Artist Profile: Sarah Chen
Background:
15+ years professional practice
Solo exhibitions at major museums
Gallery representation in multiple cities
Work in museum collections
Extensive national press
Major grants (Guggenheim, Pollock-Krasner)
Media Kit Strategy:
Sarah’s media kit establishes her as a significant contemporary artist. She presents highlights rather than comprehensive lists, focusing on:
Museum-level credibility
National recognition
Critical discourse around her work
Gallery representation at prestigious venues
Components included:
Cover: Museum-quality presentation, minimal design, single powerful painting
Bio (three versions: 50/150/500 words): Leads with museum exhibitions and gallery representation. Notes press in major publications. Emphasizes current work. Professional third-person narrative. Full 500-word version provides comprehensive career narrative.
Artist Statement (400 words): Intellectually sophisticated but accessible discussion of her practice. Shows deep engagement with art historical conversations. Explains both conceptual framework and material processes. Demonstrates mature artistic thinking.
CV (6 pages – highly curated):
“Selected Solo Exhibitions” (only museums and top galleries – 12 listed from 25+)
“Selected Group Exhibitions” (only museum shows and major biennials – 20 listed from 100+)
Grants and Fellowships (only major national grants)
Selected Press (major publications only)
Selected Bibliography (books, major catalog essays)
Images (15 pieces): Impeccably photographed by professional art photographer. Show range across recent series. Some installation views from museum exhibitions. Demonstrates consistent high quality.
Press Coverage:
Pull quotes from New York Times, Artforum, Art in America
Exhibition catalog essays by prominent curators
Links to major features
“For comprehensive press, see: [link]”
Current/Upcoming Projects: Museum solo exhibition, gallery representation updates, major commission
What makes this work:
Sarah’s media kit immediately signals her stature. Museum shows are prominent. She doesn’t list every achievement—she curates highlights that establish credibility. The presentation quality matches the quality of her career.
Key takeaway: Established artists should curate carefully, lead with most impressive credentials, and maintain presentation quality that matches their professional level.
Side-by-Side Comparison
Component
Emerging
Mid-Career
Established
CV Length
2 pages
4 pages (curated)
6 pages (highly curated)
Exhibition Focus
All shows listed
Selected best shows
Museums/major galleries only
Images
8 recent works
12 works, 3 series
15 works + installations
Press
Any coverage
Regional + national
Major publications only
Emphasis
Potential, vision
Trajectory, validation
Museum-level credibility
Statement Tone
Clear, accessible
Sophisticated
Art historically contextualized
Bio Length
150 words primary
150 + 500 available
All three versions
Current Project
Series in progress
Gallery exhibition
Museum show/commission
Collections
May omit if none
Corporate prominent
Museum collections featured
Universal principles across all stages:
Professional presentation quality
Clear artistic vision
Honest accounting of achievements
High-quality artwork images
Proofread, error-free materials
Current contact information
Your media kit should reflect your authentic career stage while presenting you as professional and serious about your practice.
Technical Specifications: File Formats, Hosting, and Distribution
Getting technical details wrong costs opportunities. Recipients can’t use improperly formatted files or access broken links.
File Format Best Practices
PDF specifications (for media kit):
Optimal settings:
File format: PDF/A (archival standard, maximum compatibility)
Resolution: 300 DPI for images
Color space: RGB for screen, CMYK if print intended
Fonts: Embedded (ensures consistent display across devices)
Compression: Compress images to keep file under 10MB if possible
Security: No password protection (recipients need easy access)
How to create proper PDFs:
From Canva:
Download as PDF (Standard quality)
Check “Embed fonts”
Use “Compressed” option
From Adobe InDesign:
Export as PDF (Print)
Check “Embed all fonts”
Set image quality to “High”
Use PDF/X-4 preset
From Microsoft Word:
Save As > PDF
Options > check “ISO 19005-1 compliant (PDF/A)”
Picture Quality: High (300 PPI)
From Google Docs:
File > Download > PDF
Test your PDF by opening on different devices (computer, phone, tablet) to ensure consistent display.
Image format specifications:
For print materials and professional use:
Format: TIFF (uncompressed, highest quality) or high-quality JPG
Resolution: 300 DPI minimum
Color space: Adobe RGB or CMYK
Bit depth: 16-bit if possible, minimum 8-bit
Dimensions: At least 3000 pixels on longest side
For web/digital viewing:
Format: JPG (compressed but high quality)
Resolution: 72 DPI
Color space: sRGB
Dimensions: 2000-2500 pixels on longest side
File size considerations:
Email attachment limits typically 10-25MB. If your media kit PDF exceeds this:
Compress images more aggressively
Reduce number of images
Use web-resolution images in PDF, provide high-res separately
Host on Google Drive and send link instead
Hosting Your Digital Media Kit
Google Drive (free, simple, effective):
Setup process:
Create folder: “Media Kit – [Your Name]”
Upload all components (PDF, images, bio, CV, etc.)
Organize into sub-folders if extensive
Right-click folder > Share > Get link
Change to “Anyone with the link can view”
Copy shareable link
Advantages:
Free
Familiar to most recipients
Easy to update (swap out files anytime)
Analytics (can see how many views)
Large storage capacity
Best practices:
Create clear folder structure
Include README.txt explaining contents
Update regularly (replace outdated PDF with current version)
Test link in incognito browser (ensures no login required)
Dropbox (similar to Google Drive):
Same process, similar functionality. Choose whichever you prefer or already use.
MEDIA KIT - SARAH CHEN
Last Updated: December 2026

FOLDER CONTENTS:

01_Media_Kit_PDF: Complete media kit in single PDF (10 pages)

02_Bios: Artist bio in three lengths (50, 150, 500 words)

03_CV: Current curriculum vitae

04_Artist_Statement: Artist statement about current practice

05_Images_WebRes: Artwork images for web use (72 DPI, JPG format)
   - Optimized for online publication
   - 2000px longest dimension

06_Images_PrintRes: Artwork images for print use (300 DPI, TIFF format)
   - High-resolution for magazine/catalog publication
   - 3000px+ longest dimension

07_Image_Details: Documentation of all images (titles, dates, dimensions, media)

08_Headshot: Professional headshot in portrait and landscape orientations

09_Press_Coverage: Selected press clippings and reviews

For additional information or interview requests:
Email: sarah@sarahchenart.com
Website: sarahchenart.com
Instagram: @sarahchenart
This README file makes it effortless for journalists or curators to find exactly what they need.
Use clear subject line: “[Your Name] – Artist Media Kit”
Mention attachment in email: “My media kit is attached for your review.”
Send to yourself first as test
Check file opens correctly
When to use links instead:
File size over 10MB
Providing access to multiple files/images
Ongoing reference (link doesn’t expire like attachments)
Modern, tech-savvy recipients
Shareable link creation:
Google Drive:
Right-click folder or file
Get link
Change to “Anyone with the link can view”
Copy link
Use URL shortener if desired (bit.ly, tinyurl)
Best practice: Test all links in incognito/private browser window to ensure they work without requiring login.
QR codes for printed materials:
For business cards, postcards, or printed materials, QR codes provide instant access:
Create QR code linking to your media kit page (use free generator: qr-code-generator.com)
Test QR code thoroughly
Print on business cards or exhibition materials
Recipients scan with phone camera, instant access to full media kit
Social media sharing:
Include media kit link in:
Instagram bio
LinkedIn profile
Twitter/X bio
Email signature
Make it easy for anyone interested in your work to access professional materials instantly.
Common Media Kit Mistakes (And How to Avoid Them)
Learning from others’ mistakes saves time and prevents missed opportunities. Here are the most common errors artists make.
Content Mistakes
Including too much information (15+ page kits)
The problem: Busy recipients won’t read lengthy materials. Key information gets buried.
The solution: Edit ruthlessly. Media kits should be 8-12 pages maximum. If you have extensive achievements, curate highlights rather than listing everything.
Vague, generic artist statements
The problem: Statements like “I explore themes of identity and memory” don’t tell recipients anything meaningful.
Example of vague statement: “My work explores the human condition through visual metaphors. I’m interested in how we experience the world around us and our place in it.”
This could describe almost any artist. It provides no specific information.
The solution: Be specific. What exactly are you investigating? How? Why does it matter?
Improved version: “My large-scale charcoal drawings investigate how Alzheimer’s disease fragments visual memory. I layer and erase marks repeatedly, creating palimpsests that mirror the experience of struggling to retrieve disappearing memories.”
This is specific, clear, and gives recipients concrete understanding of the work.
Listing irrelevant achievements
The problem: Including high school art awards, irrelevant jobs, or minor accomplishments dilutes your professional credibility.
What to omit:
Awards from more than 10 years ago (unless major)
Student work or student exhibitions (unless very recent)
Participation in non-juried group shows at coffee shops (early career)
Jobs unrelated to art practice (barista, retail, etc.)
Personal hobbies unrelated to your work
The solution: Include only achievements that strengthen your professional standing. When in doubt, leave it out.
Poor quality images or wrong file formats
The problem: Pixelated, dark, poorly composed, or tiny images make even strong artwork look amateur.
Common image errors:
File size too small (images pixelated when enlarged)
Uneven lighting or color distortion
Cluttered backgrounds
Wrong file format (PNG when JPG appropriate, or vice versa)
Images not color-corrected
Wrong resolution (web images when print needed)
The solution: Invest in professional photography or learn proper DIY documentation. Provide both web and print resolution. Color-correct all images.
Typos and grammatical errors
The problem: Errors signal carelessness and unprofessionalism. They’re impossible to unsee once noticed.
Common locations of errors:
Email subject lines
First line of bio or statement
Exhibition titles or dates
Contact information (wrong email or phone)
The solution:
Proofread everything 3+ times
Read aloud (catches awkward phrasing)
Have someone else proofread
Use spell-check but don’t rely on it exclusively
Wait 24 hours, then proofread again with fresh eyes
Not updating after achievements
The problem: Sending media kit showing “upcoming exhibition March 2024” in December 2024 looks careless and outdated.
The solution:
Update media kit quarterly minimum
Update immediately after major achievements
Include “Last Updated: December 2026” date on materials
Review before every important submission
Design Mistakes
Overly decorative fonts competing with artwork
The problem: Elaborate, decorative, or multiple fonts distract from your work and appear unprofessional.
Examples of problem fonts:
Comic Sans (always avoid)
Papyrus (ditto)
Script/cursive fonts (difficult to read)
Overly decorative display fonts
Using 5+ different fonts in one document
The solution: Choose 1-2 professional fonts. One for headers (bold, clear), one for body text (readable). Good combinations:
Helvetica + Georgia
Futura + Garamond
Arial + Times New Roman
Too busy layouts that distract from content
The problem: Colorful backgrounds, decorative borders, excessive graphics compete with your artwork images.
Examples:
Patterned backgrounds
Multiple border styles
Decorative page elements
Colored text boxes
Too many colors
The solution: Keep design minimal and clean. Use white space generously. Let your artwork be the visual interest.
Inconsistent branding throughout kit
The problem: Each page looks different—varying fonts, inconsistent margins, changing color schemes. Appears unprofessional and thrown together.
The solution:
Establish design system (fonts, colors, spacing)
Use template for all pages
Maintain consistent header/footer
Same margins on every page
Unified visual identity
Using template designs that scream “template”
The problem: Highly recognizable templates make your materials look generic, especially if recipients see the same template from multiple artists.
The solution: If using templates (Canva, etc.):
Customize colors significantly
Adjust layout elements
Replace all placeholder graphics
Make it your own through thoughtful adaptation
Or start from scratch with simple, clean design
Technical Mistakes
File sizes too large to email
The problem: Email bounces back, recipient’s inbox can’t receive, or file fails to download.
The solution:
Keep PDFs under 10MB if possible (8MB safer)
Compress images appropriately
Use web-resolution images in PDF
Provide high-res images via separate link
Test file by emailing to yourself first
Broken links or inaccessible cloud folders
The problem: Recipients click link, get “Access Denied” or 404 error. Opportunity lost.
Common causes:
Google Drive set to “Restricted” instead of “Anyone with link”
Website page not published or moved
Typo in URL
Expired link from temporary sharing service
The solution:
Always test links in incognito browser
Double-check sharing settings
Use permanent hosting (not temporary services)
Verify links before sending important submissions
Images without proper documentation
The problem: Recipients have beautiful images but no information about title, date, medium, or dimensions.
The solution: Include caption for every image: Sarah Chen, Landscape Memory #4, 2024, oil and cold wax on canvas, 48 x 60 inches
Create separate image documentation file listing all details.
Outdated contact information
The problem: Recipient wants to contact you, but email bounces or phone disconnected.
The solution:
Update contact info immediately when it changes
Test contact methods (send test email to yourself)
Check phone number still works
Include multiple contact methods (email, phone, website)
Strategic Mistakes
Not tailoring kit for specific audience
The problem: Sending same generic materials to gallery (wants exhibition history) and journalist (wants newsworthy angle) dilutes effectiveness.
The solution: Create modular components you can combine differently:
Gallery submission: emphasize CV, exhibition history
Press pitch: emphasize current project, newsworthy angle
Brand partnership: emphasize aesthetic, audience
Grant application: tailor to specific requirements
Failing to update regularly
The problem: Materials become stale. Listing exhibitions from 2019 as “current project” in 2026.
The solution:
Calendar reminders for quarterly review
Update immediately after: solo shows, press coverage, awards
Review before every important submission
Mark materials with “Last Updated” date
Not proofreading before sending
The problem: Sending materials with errors to important opportunity. Can’t unsend.
The solution:
Never send materials immediately after creating them
Wait 24 hours, review with fresh eyes
Have checklist for every submission
Read everything aloud
Get second set of eyes when possible
Missing call-to-action or next steps
The problem: Recipient reviews materials, thinks “interesting,” then doesn’t know what you want or how to proceed.
The solution: Be clear about desired outcome:
Gallery submission: “I’d welcome the opportunity to discuss representation.”
Press pitch: “I’m available for interviews or studio visits.”
Brand inquiry: “I’d love to explore collaboration possibilities.”
Make it easy for them to say yes.
Maintaining and Updating Your Media Kit
Creating your media kit is the beginning, not the end. Outdated materials damage your credibility faster than having no materials at all.
When to Update Your Media Kit
Immediate updates (same week):
□ After solo exhibitions (add to CV, update current project) □ Receiving major press coverage (New York Times, Artforum, major publication) □ Winning significant awards or grants (Guggenheim, Pollock-Krasner, etc.) □ Gallery representation changes (new gallery, dropping representation) □ Contact information changes (email, phone, website, studio location)
Quarterly updates (every 3 months):
□ Review entire media kit for accuracy □ Move “upcoming” exhibitions to “past” □ Add new group show participations □ Update current project description □ Refresh images if body of work has evolved □ Check all links still functional
Annual updates (minimum):
□ Update date on all materials (2024 → 2026) □ Refresh professional headshot if needed (every 2-3 years) □ Completely review and revise artist statement □ Reorganize CV (curate if becoming too long) □ Update bio with recent achievements □ Review design—does it still represent you well?
Major practice changes:
□ Significant shift in artistic direction or medium □ Career milestone (first museum show, major award) □ Return to practice after hiatus □ Studio relocation to new city/region
What to Update Regularly
Current project/series information:
This is your “now” content—what you’re actively working on or what’s immediately available for exhibition.
Example timeline:
January 2024: “Current project: Fracture Patterns (ongoing series, 8 pieces completed, 4 in progress)”
March 2024: “Current project: Fracture Patterns (12 completed pieces, solo exhibition planned for fall 2024)”
November 2024: “Current exhibition: Fracture Patterns, Blackfish Gallery, Portland OR (November 15–January 10, 2026)”
February 2026: “Recent exhibition: Fracture Patterns, Blackfish Gallery, Portland OR (November 2024). Current project: Vessel Forms (new series exploring…)”
Exhibition history:
Move exhibitions through lifecycle:
Before opening: Listed under “Upcoming Exhibitions”
During run: Listed under “Current Exhibition” in media kit body; remains “Upcoming” on CV until it opens
After closing: Immediately move to “Past Exhibitions” or regular CV listing
Common error: Leaving “upcoming exhibition March 2024” on materials in October 2024. Update the week after exhibition closes.
CV additions:
Add within 1-2 weeks of achievement:
Exhibition participation (after opening)
Awards received
Press mentions
Residency completions
New teaching positions
For CV becoming unwieldy (6+ pages), start curating:
Create “Selected Exhibitions” instead of comprehensive list
Emphasize museums, major galleries, significant shows
Condense older, minor exhibitions
Professional headshot:
Update every 2-3 years or when:
Your appearance has changed significantly
Previous photo looks dated (hair, style, etc.)
Quality is poor compared to current standards
You’ve aged more than 5 years since photo
Your headshot should look like you now.
Artist statement:
Review annually at minimum. Update when:
Your practice evolves (new media, new themes)
You realize current statement doesn’t reflect your work accurately
It sounds dated or doesn’t represent your thinking anymore
You’re embarrassed by something you wrote 3 years ago
Artist statements should evolve as your practice matures.
This makes updates efficient—edit source file, regenerate PDF.
Updating hosted versions:
Google Drive:
Replace old PDF with updated version (same filename keeps link working)
Update any changed components
Revise README file with new date
Website:
Upload new PDF (replace old version)
Update any text on page
Check links still work
Test on mobile devices
Email signature: Update link in email signature when media kit URL changes.
Setting Reminders
Don’t rely on memory. Create calendar reminders:
Quarterly (first day of Jan/Apr/Jul/Oct):
“Review media kit for necessary updates”
Check through entire kit
Make any needed changes
Update if significant changes since last review
After exhibitions:
Add calendar reminder 1 week after exhibition closes
“Update media kit: move [Exhibition Name] to past exhibitions”
Annual (January 1):
“Annual media kit refresh”
Update all dates (2024 → 2026)
Review headshot (still current?)
Read through statement (still accurate?)
Review design (still represents you well?)
Before major opportunities:
Gallery submission deadline: reminder 2 weeks before
Grant deadline: reminder 1 month before
“Review and update media kit before [Opportunity] submission”
Setting these reminders takes 10 minutes. Missing opportunities because materials were outdated takes much longer to recover from.
Beyond the Media Kit: Maximizing Impact
A great media kit is a tool, not a magic wand. How you use it determines success.
Creating a Compelling Pitch Email
Your media kit’s effectiveness depends partly on the email introducing it.
Template for gallery submissions:
Subject: [Your Name] – Artist Submission

Dear [Gallery Director Name],

I'm a [medium] artist based in [city] whose work [one sentence about your practice/what makes it distinctive]. I'm writing to introduce my work for your consideration.

[One sentence connecting your work to their gallery program—shows you've done research]

My media kit is attached [or: available here: link]. I'd welcome the opportunity to discuss my work further at your convenience.

Thank you for your time and consideration.

Best regards,
[Your Name]
[Website]
[Phone]
What makes this effective:
Brief (gallery directors are busy)
Specific (not generic form letter)
Researched (mentions why you’re approaching them specifically)
Professional (no desperation, no overselling)
Clear next step (welcomes discussion)
Template for press pitches:
Subject: [Artist Name] Opens [Exhibition Title] at [Gallery] – [Newsworthy Angle]

Dear [Journalist Name],

[One sentence news hook: what's opening, when, why it's timely/relevant]

I'm a [brief credentials] whose new exhibition, [Title], opens [date] at [Gallery] in [city]. This body of work [what it's about in one sentence + why it's newsworthy].

[Optional: one sentence about what makes this particularly timely or interesting to their publication's audience]

My press kit with high-resolution images, press release, and additional information is attached. I'm available for interviews or studio visits if you're interested in covering the exhibition.

Thank you for considering this story.

Best regards,
[Your Name]
[Contact]
What makes this effective:
Clear news angle (not just “I have a show”)
Timely (sent 4-6 weeks before opening, ideal lead time)
Relevant to their publication
Makes their job easy (all materials provided)
Template for brand collaboration inquiry:
Subject: Collaboration Inquiry – [Your Name]

Dear [Brand Contact],

I'm a [medium] artist whose work focuses on [aesthetic/themes]. I'm reaching out to explore potential collaboration opportunities with [Brand Name].

My aesthetic [how it aligns with their brand—specific examples of their products/values that connect]. I believe my [painting style/ceramic work/etc.] could translate beautifully to [specific product category or collaboration type they do].

My media kit is available here: [link]. I'd love to discuss possibilities for collaboration.

Looking forward to connecting.

Best regards,
[Your Name]
[Website]
What makes this effective:
Shows research (mentions specific brand products/values)
Clear alignment (explains why partnership makes sense)
Specific idea (not vague “let’s work together”)
Professional presentation
Following Up Professionally
Most opportunities require follow-up. Do it professionally without being pushy.
Timeline for follow-ups:
Gallery submissions:
Wait 3-4 weeks before following up
Galleries receive many submissions; slow response is normal
Follow up once, maybe twice maximum
If no response after two follow-ups, move on
Press pitches:
Wait 1-2 weeks before following up
Journalists work on tight deadlines but juggle many stories
One follow-up is appropriate
If they don’t respond, they’re likely not interested
Brand inquiries:
Wait 2-3 weeks before following up
Corporate timelines are slower
One or two follow-ups acceptable
Be patient—decisions go through multiple people
How to follow up without being pushy:
Good follow-up:
Subject: Following up: [Your Name] Artist Submission

Dear [Name],

I wanted to follow up on my submission sent [date]. I understand you receive many inquiries and wanted to ensure my materials reached you.

I remain very interested in


. Please let me know if you need any additional information.

Thank you for your consideration.

Best regards,
[Your Name]
Bad follow-up:
Subject: Did you see my email???

Hi,

I sent my portfolio 3 days ago and haven't heard back. Very eager to hear your thoughts. When can we meet? I'm available anytime this week.

Thanks!
[Name]
The first is professional and patient. The second is pushy and desperate.
When to take no response as “not interested”:
After two professional follow-ups with no response, move on:
They’ve seen your materials
They’re not interested currently
Continuing to follow up becomes harassment
Exception: If they explicitly said “check back in 3 months,” respect that timeline.
When to follow up again:
After 6-12 months with significant new developments:
Subject: Update from [Your Name]

Dear [Name],

I submitted work for your consideration last [season/year]. Since then, I've [major achievement: had solo show at X, received Y grant, etc.].

I wanted to update you on my practice and renew my expression of interest in


. Updated materials available here: [link]

Best regards,
[Your Name]
This shows professional persistence and genuine developments.
Building Relationships First
Cold outreach has low success rates. Warm relationships convert much better.
Successful artists build relationships over years:
Year 1: Attend gallery openings, follow on social, engage with their program
Year 2: Gallery director recognizes you from openings, maybe casual conversations
Year 3: You’ve shown in local group exhibitions, received some press
Year 4: When you finally submit, they already know who you are
This timeline seems long, but relationships convert far better than cold submissions.
Your media kit supports relationships:
When someone you’ve met at an opening says “Send me your materials,” your professional media kit:
Reinforces the positive impression from your conversation
Makes it easy for them to consider your work seriously
Demonstrates you’re as professional as you seemed in person
Media kit as supporting material, not sole outreach strategy, works best.
Frequently Asked Questions About Artist Media Kits
What’s the difference between a media kit and a press kit for visual artists?
A media kit is a comprehensive portfolio covering your entire career and artistic practice—your bio, CV, full body of work samples, exhibition history, artist statement, press coverage, and contact information. Think of it as your general artist “resume” you’d provide to galleries considering representation or brands exploring collaboration.
A press kit is a focused package for a specific event, exhibition, or announcement. It contains your current project description, 3-5 images from that specific body of work, an event press release, a condensed bio highlighting recent achievements, and contact information. This is what you’d send to a journalist covering your upcoming solo show.
Most artists need a comprehensive media kit first, then can extract relevant pieces to create event-specific press kits as needed.
How long should an artist media kit be?
A comprehensive PDF media kit should be 8-12 pages maximum. This includes:
Cover page
Table of contents (optional)
Artist bio (1 page)
Artist statement (1 page)
CV (2-4 pages depending on career stage)
Artwork images (8-12 images with captions)
Press coverage (1-2 pages)
Contact page
Longer than 12 pages and you risk losing busy recipients. If you have extensive achievements, curate highlights rather than listing everything.
For digital hosting (Google Drive or website), you can include more extensive materials since recipients browse selectively and download only what they need.
Do I need both physical and digital versions?
Most opportunities now require digital materials. Focus on creating:
Professional PDF media kit (email-friendly, universal compatibility)
Dedicated website page (always accessible, easy to update)
Google Drive folder (organized components, easy image downloads)
Create physical versions only if you regularly:
Attend art fairs or portfolio reviews where you can’t hand someone a PDF
Meet gallery directors face-to-face
Participate in networking events
Encounter traditional venues that prefer physical submissions
Most successful contemporary artists use digital-only media kits, creating physical versions on demand for specific situations.
Can I create a professional media kit with no exhibition history?
Yes. Focus on what you do have:
Strong artistic vision (compelling statement)
Quality of work (excellent images)
Education and training
Any awards or recognition (even student awards)
Artistic potential and development
Every artist started with zero exhibitions. Galleries understand emerging artists have limited history. What matters is showing:
Professional presentation
Developed artistic practice
Serious commitment to your work
Potential for growth
Include any exhibitions you have, even non-traditional venues (community centers, coffee shops, online group shows), but be honest about the venues. Don’t inflate or apologize—just present your actual record professionally.
What image resolution should I use?
Create two versions of every image:
For print materials and professional publication:
Resolution: 300 DPI minimum
File format: TIFF for highest quality, or high-quality JPG
Dimensions: At least 3000 pixels on longest side
Color space: Adobe RGB or CMYK
For web viewing and screen display:
Resolution: 72 DPI acceptable
File format: JPG
Dimensions: 2000-2500 pixels on longest side (large enough for publication but manageable file size)
Color space: sRGB
In your media kit PDF, use web-resolution images to keep file size manageable. Provide high-resolution images in a separate download folder for press who need print-quality files.
Should I hire a professional designer?
Invest in professional design when:
You’re pursuing major gallery representation
Your budget allows ($300-1,500 typically)
Your DIY attempts don’t reflect your artwork quality
You need cohesive branding across materials
DIY design works well when:
You’re emerging with limited budget
You have some design sensibility
You’re willing to learn tools (Canva, etc.)
You’re seeking local or regional opportunities
Most important: content quality matters more than elaborate design. A simple, clean design with strong content outperforms elaborate design with weak content. If DIY, choose minimal templates and focus on making your artwork shine.
Where should I host my digital media kit?
Best practice: use multiple platforms for different purposes.
Google Drive (primary comprehensive materials):
Organized folders with all components
Easy to update individual files
Shareable link you can email
Dedicated website page (permanent reference):
Always accessible
Professional branded presentation
Good for SEO (journalists find it searching your name)
Include downloadable PDF, key images, bio, contact
PDF attachment (formal submissions):
For grant applications, gallery submissions, specific requests
Keep file under 10MB for email compatibility
Having all three ensures you can accommodate any recipient’s preference.
How often should I update my media kit?
Minimum: Annually (update all dates, review content for accuracy)
Quarterly recommended (every 3 months, check for needed updates)
Immediate updates after:
Solo exhibitions (add to CV, update current project)
Major press coverage (significant publications)
Important awards or grants
Gallery representation changes
Contact information changes
Include “Last Updated: [Month Year]” on your materials so recipients know they’re current.
Set calendar reminders quarterly to review your materials. Outdated media kits damage credibility faster than having no materials at all.
What do galleries look for in an artist media kit?
Galleries prioritize:
Professional presentation that reflects artwork quality—well-designed, error-free, comprehensive materials signal you’re serious about your practice.
Cohesive body of work showing consistent artistic vision—galleries want to see you have a developed practice, not scattered experiments across multiple unrelated styles.
Exhibition history demonstrating upward trajectory—museums and established galleries (even group shows), consistent activity, quality venues over quantity.
Market validation—press coverage, awards, grants, collections (corporate or museum acquisitions), past sales if impressive.
Clear artistic vision—intelligent but accessible artist statement, understanding of where your work fits in contemporary art.
Your media kit should immediately answer: Is this artist gallery-ready? Will their work sell? Does it fit our program?
How do I write an artist bio if I’m not a writer?
Use the fill-in-the-blank template approach:
For 150-word bio:
[Your name] is a [medium] artist based in [city/region] whose work [central focus—what makes it distinctive]. [Brief methodology in one sentence].
[He/She/They] has exhibited at [2-3 most impressive venues], and [his/her/their] work has been featured in [publications or collections]. [Optional: specific achievement].
[Your name] received [highest degree] from [institution]. [He/She/They] has been awarded [1-2 notable grants/residencies]. [Current representation if applicable]. [He/She/They] lives and works in [location].
Fill in your specific information, then revise to sound natural.
Tips:
Talk it out first—record yourself explaining your practice, then transcribe and edit
Get feedback from artist friends or mentors
Keep it simple and authentic—avoid jargon
Write in third person for professional contexts
If truly struggling, consider hiring a writer ($100-300) to interview you and draft your bio. Many artists do this.
What file format should my media kit be?
Primary format: PDF
Most versatile—email-friendly, maintains formatting across all devices, professional appearance, works offline.
Technical specifications:
PDF/A format for archival compatibility
Embed fonts (ensures consistent display)
300 DPI for images
Compress to keep under 10MB if possible
Export as “PDF (Print)” or high-quality setting
Also create:
Individual components as separate files (Word docs for bio, CV, statement)
Website version (HTML page on your artist site)
Google Drive folder (organized components)
Different recipients prefer different formats—having multiple options ensures you can accommodate any request.
Can I take my own press kit photos or do I need a professional photographer?
Invest in professional photography when:
Preparing for gallery representation
Applying for major grants or museum acquisitions
Budget allows ($50-150 per image typically)
Your work has complex surface qualities, is three-dimensional, or requires sophisticated lighting
DIY photography works when:
You’re emerging with limited budget
You have good photography skills and equipment
Your work is two-dimensional and relatively flat
You understand lighting and color correction
If shooting yourself:
Use neutral, even lighting (overcast daylight ideal)
Neutral background (white or gray wall)
Keep camera parallel to work (avoid distortion)
Shoot in RAW format for editing flexibility
Color-correct in editing software
Use tripod for consistent results
For headshots, professional photography is worth the investment ($100-300). Your artwork documentation might work DIY if done carefully, but headshots benefit significantly from professional expertise.
How do I get press coverage to include in my media kit?
Start small and build incrementally:
Local arts blogs are most accessible—pitch them story angles beyond “I have a show” (unique process, interesting background, timely themes).
Community newspapers often cover local artists—introduce yourself to arts writers, invite them to studio, build relationships.
Arts writer relationships—engage genuinely with arts journalists on social media, attend talks they give, become familiar before pitching.
Group exhibitions at galleries that generate press—even group show mentions count.
Artist interviews on podcasts, YouTube channels, blogs—all count as press coverage.
Award announcements—many grants and awards issue press releases announcing recipients.
Build press coverage over time. Even one blog mention is worth including initially. Each piece of coverage makes the next easier to obtain.
Should I include prices in my media kit?
Generally, no—omit prices from media kits and press kits.
Why:
Gallery directors prefer to discuss pricing directly
Journalists don’t need price information for coverage
Prices may change based on venue, format, market
Exceptions where prices are appropriate:
Collector-focused materials (if selling directly)
Gallery specifically requests pricing
Separate price list provided upon request
For brand partnerships, licensing fees are negotiated separately—don’t include artwork pricing.
If gallery asks about pricing during conversation, discuss then. Your media kit should focus on the work itself and your professional credentials.
What if I don’t have a professional website?
Minimum acceptable online presence:
Create a simple, professional web presence using:
Squarespace, Wix, or WordPress ($10-20/month) for basic artist site
Cargo Collective or Format (portfolio platforms designed for artists)
Free Google Sites (basic but functional)
At minimum, include:
Your name and medium
Gallery of your work (8-12 images)
Artist statement
Biography
Contact information
Instagram can supplement a website but not replace it—Instagram is for social engagement, your website is your professional hub.
A website signals professionalism. If budget is truly impossible, a well-maintained Instagram account with highlights for Bio, CV, and Contact is better than nothing, but invest in a simple website as soon as possible.
Free website builders exist—there’s no excuse not to have some online presence beyond social media.
Key Takeaways: Creating Your Artist Media Kit
Every visual artist needs a professional media kit—whether pursuing gallery representation, press coverage, grant applications, or brand partnerships. It’s the baseline expectation for professional opportunities.
Core components are non-negotiable: artist bio (three lengths), CV, artist statement, 8-15 high-quality artwork images, professional headshot, press coverage (if you have any), and current contact information. Missing these elements makes your media kit incomplete.
Digital formats serve most needs: Create a professional PDF media kit for formal submissions, upload materials to a dedicated website page for standing reference, and organize components in a Google Drive folder for press needing high-resolution images.
Tailor your media kit for specific audiences—what gallery directors want (exhibition history, cohesive body of work) differs from what journalists need (newsworthy angle, publication-ready images) and what brands evaluate (audience alignment, aesthetic fit).
Update regularly, at minimum annually—and immediately after major achievements like solo exhibitions, significant press coverage, or important awards. Outdated media kits damage credibility.
Professional presentation matters, but content matters more—invest time in strong written content (clear bio, compelling statement, accurate CV) before worrying about elaborate design. Simple, clean design with excellent content outperforms fancy design with weak content.
Quality images are worth the investment—professional photography elevates even emerging artists’ presentations. If budget is tight, learn proper DIY documentation or invest selectively in photographing your strongest pieces.
Build your media kit once, adapt it many times—create modular components you can combine differently for gallery submissions, press pitches, grant applications, and brand partnerships.
Media kits support relationships, they don’t replace them—warm introductions and genuine connections convert far better than cold submissions, even with perfect materials. Use your media kit to strengthen relationships, not as your sole outreach strategy.
Start now, even if your materials feel incomplete—you don’t need museum exhibitions and major press to create a professional media kit. Begin with what you have, present it professionally, and update as your career develops.
Next Steps: Start Building Your Media Kit This Week
You now have everything you need to create a professional artist media kit. Here’s your action plan:
This week (3-4 hours):
Download our free Artist Media Kit Component Checklist
Audit what materials you already have
Identify specific gaps in your materials
Gather all existing content (bios, CVs, images, press coverage)
Next week (8-10 hours):
Write or update your artist bio (all three lengths)
Draft or revise your artist statement
Update your CV with current information
Select your strongest 8-12 artwork images
Week 3 (4-6 hours):
Choose your design approach (Canva template, hiring designer, or DIY)
Create your media kit layout
Assemble all components into professional PDF
Set up Google Drive folder organization
Create website page for media kit
Week 4 (2-3 hours):
Send test versions to trusted colleagues for feedback
Make final revisions
Set up distribution workflow (save email templates)
Submit to first opportunity (gallery, press contact, or grant application)
Four weeks from now, you’ll have professional media kit ready to send to any opportunity.
Remember: your media kit will evolve throughout your career. The version you create today doesn’t need to be perfect—it needs to be professional, accurate, and ready to send. You’ll refine and improve it continuously as your practice develops.
The artists who succeed aren’t necessarily the most talented—they’re the ones who present their work professionally and make it easy for opportunities to say yes.
Start building your media kit today.
Share this guide: Know an artist who needs help creating their media kit? Share this comprehensive guide to help them get started.
Questions or feedback? What challenges are you facing creating your media kit? What topics would you like us to cover in future guides? Leave a comment below or email us at [contact email].
About This Guide: This comprehensive guide is based on analysis of successful visual artist media kits, conversations with gallery directors and curators, and best practices from professional artists at all career stages. Last updated March 2026.
This guide provides educational information about creating artist media kits. Media kit requirements vary by gallery and opportunity; always follow specific submission guidelines provided. Building relationships and creating quality work remain the foundation of professional success.