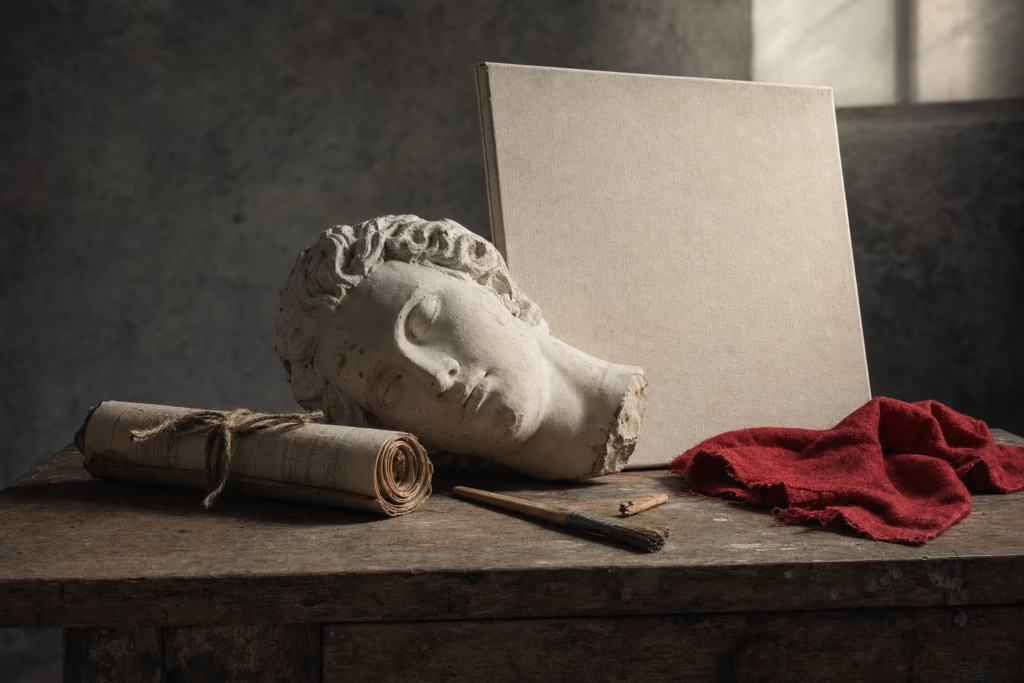
You’ve just bought a beautiful roll of linen canvas and a set of oil paints, and you’re ready to start. Then you walk into the art supply store and the whole plan unravels. There’s “acrylic gesso.” There’s “oil ground.” There’s “universal primer.” Something called “rabbit skin glue.” And confusingly, some of these products seem to be describing the same thing while others look nearly identical but come with contradictory instructions on the back.
Here’s the honest truth: this terminology mess is not your fault. Manufacturers use “gesso,” “primer,” and “ground” interchangeably — often incorrectly — and the art world has never quite agreed on a standard vocabulary. The result is that even experienced painters sometimes grab the wrong product, apply it in the wrong order, and wonder years later why their painting is cracking, yellowing, or peeling away from the canvas.
The stakes are real. Using the wrong preparation can mean your painting begins deteriorating within your lifetime. But with the right foundation — literally — your work can outlast you by centuries. Renaissance paintings created on traditionally prepared panels are still vibrant after 600 years. Modern paintings on improperly prepared surfaces have started failing within decades.
This guide covers everything: what each term actually means, the full preparation sequence from raw support to first brushstroke, how to choose the right materials for every medium and surface, and which specific brands to trust. By the end, you’ll have a clear, practical system — not just a vocabulary lesson.
Quick-Decision Matrix: Which Ground Do I Need?
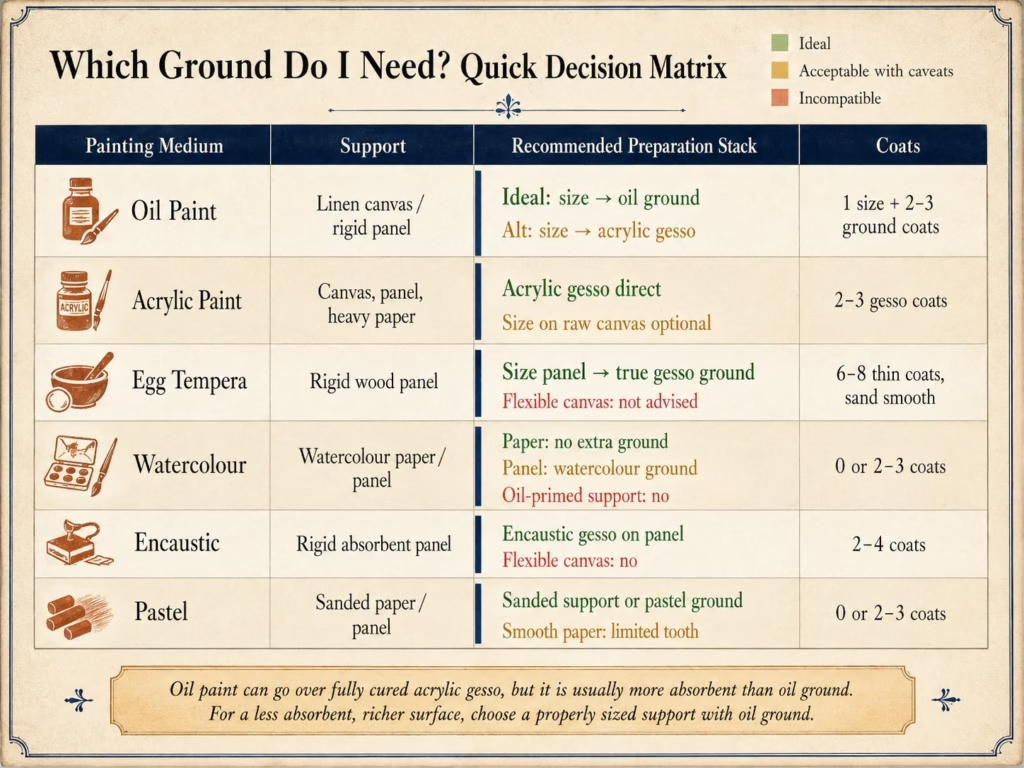
Before diving into the explanations, here is the practical answer most guides never give you. Find your situation in the table below:
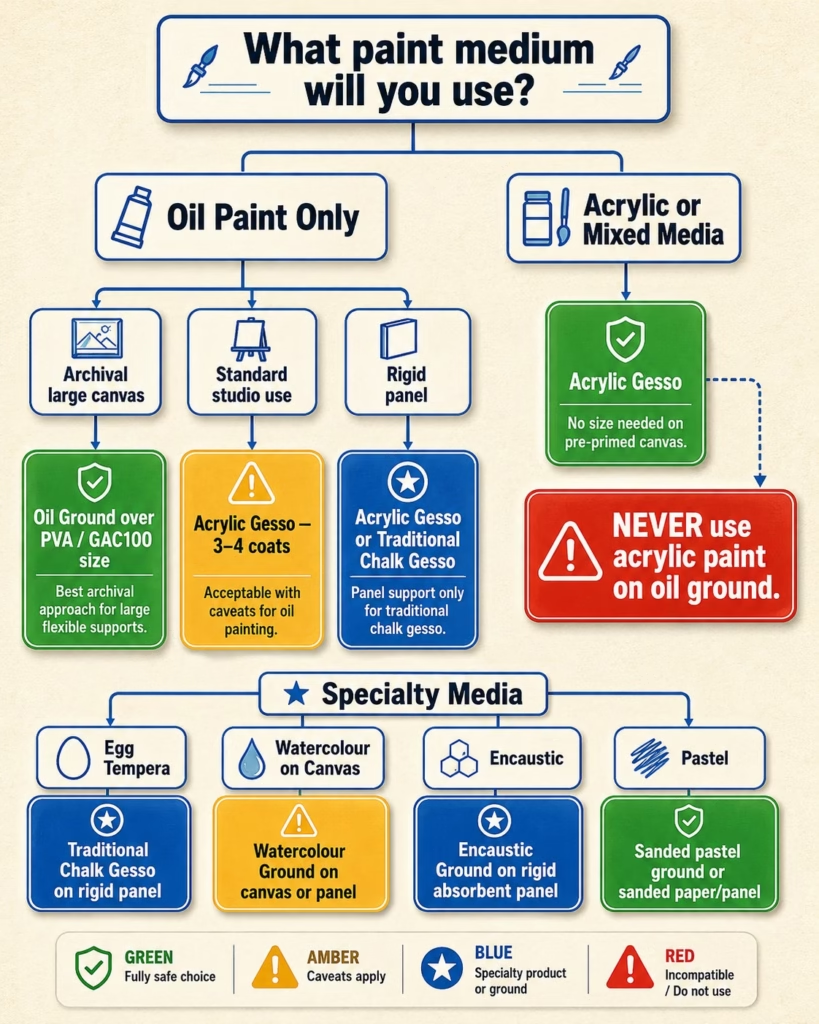
| Painting Medium | Support | Recommended Preparation Stack | Coats |
|---|---|---|---|
| Oil paint | Raw stretched canvas (cotton/linen) | PVA size or GAC100 → oil ground OR acrylic gesso (see note) | Size: 2; Ground: 2–3 |
| Oil paint | Wood panel (MDF, birch, hardboard) | Acrylic sealer → traditional chalk gesso OR oil ground | Sealer: 2; Ground: 3–8 |
| Oil paint | Pre-primed store-bought canvas | Wipe surface with warm water, allow to dry → paint directly | — |
| Acrylic paint | Stretched canvas | Acrylic gesso directly (no separate size needed) | 2–4 |
| Acrylic paint | Wood panel | Acrylic sealer → acrylic gesso | Sealer: 2; Gesso: 2–3 |
| Egg tempera | Wood panel | RSG size → traditional chalk gesso (multiple thin layers) | Size: 2; Gesso: 8–12 |
| Watercolour (on canvas) | Stretched canvas | Acrylic gesso → absorbent/watercolour ground | Gesso: 2; Ground: 2 |
| Encaustic | Wood panel or hardboard | No priming, OR absorbent ground only (NOT acrylic gesso) | 1–2 if using ground |
| Pastel | Canvas or board | Acrylic gesso + pumice ground, OR dedicated pastel ground | 2 |
| Oil or acrylic | Paper (heavyweight) | Acrylic medium diluted (acts as size) → acrylic gesso | Size: 2; Gesso: 2 |
Note on oil over acrylic gesso: Oil paint applied over acrylic gesso is widely used and generally acceptable, especially on rigid supports. On flexible stretched canvas, some conservators flag a long-term delamination risk due to differing flexibility as each layer ages. For archival-grade work on large canvases, an oil ground over an acrylic or PVA size is the safest choice. For most studio practice, acrylic gesso works fine.
Understanding the Terminology: Gesso, Primer, Ground, and Size
Let’s clear the air before going further. These four words all refer to materials that go between your raw support and your paint — but they are not the same thing, and using them interchangeably (as most manufacturers do) creates real confusion.
What Is a Size?
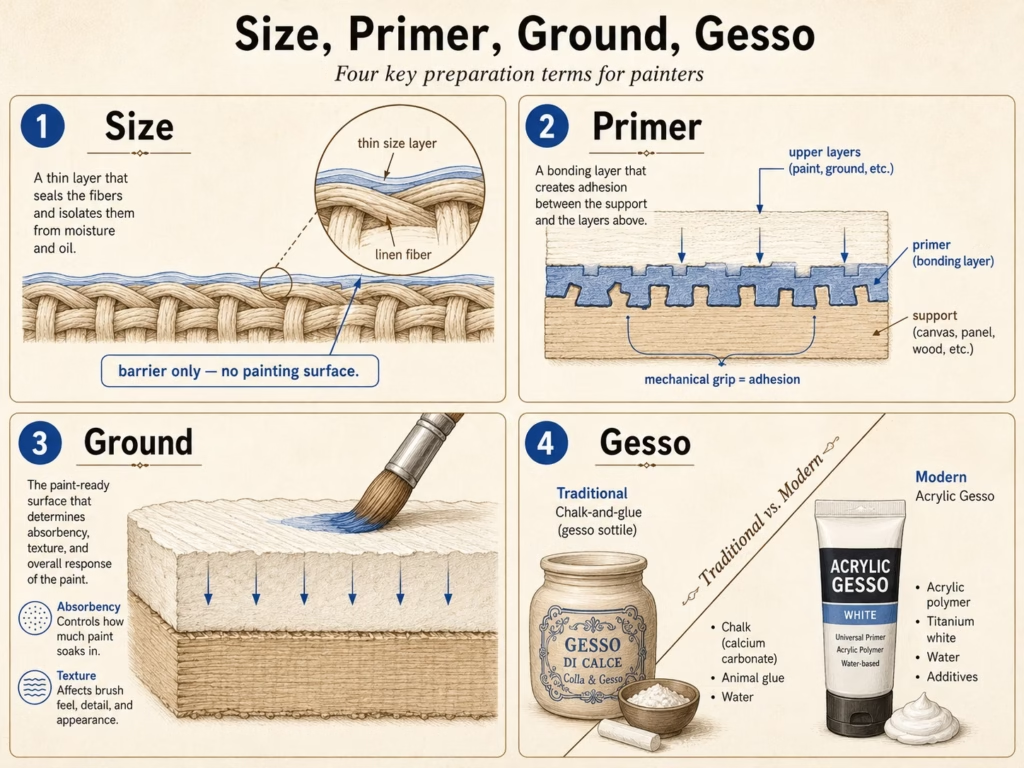
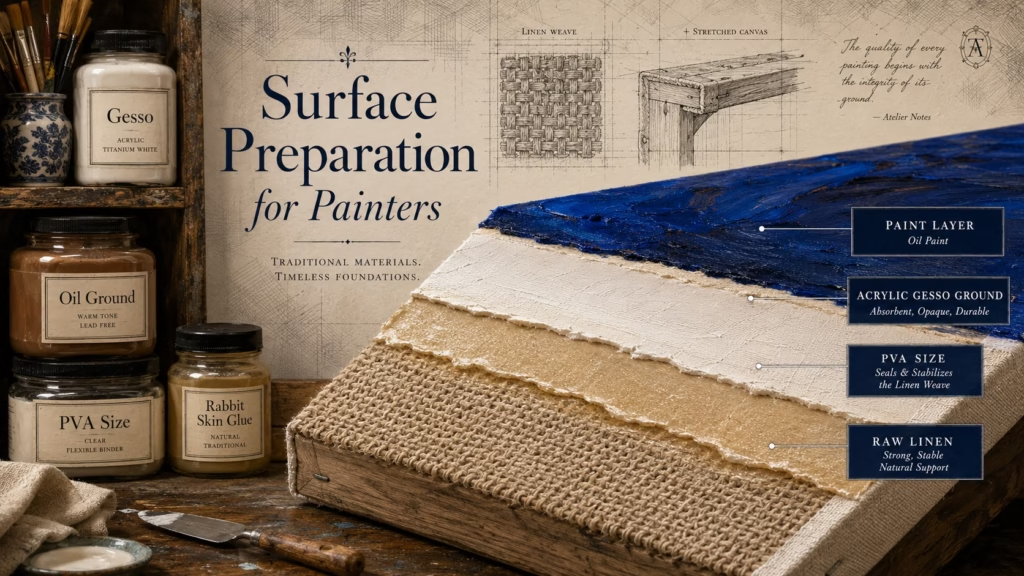
Sizing is the first step — and the most misunderstood. A size is a sealing agent, not a painting surface. Its job is to reduce absorption and, in the case of canvas used for oil painting, create a barrier that prevents oil from making direct contact with the canvas fibers.
Why does that matter? Linseed oil — the binder in most oil paint — contains linolenic acid that chemically degrades cotton and linen over time. Without a proper barrier, oil literally rots the canvas from within, causing the support to darken, become brittle, and eventually fail. This “support-induced rotting” is why improperly prepared canvases from the early 20th century are in such poor condition today.
Sizing does NOT add texture or tooth. It doesn’t create a painting surface. It simply seals. After sizing, you still need to apply a ground before painting.
What Is a Primer?
A primer is a bonding layer. It adheres to the sized (or raw) surface better than paint alone would, and it provides a base that paint can grip reliably. The word is used loosely in art supply packaging — most “acrylic gesso” products are technically primers in this sense.
The key property of a good primer is adhesion: it must bond more strongly to the support than the paint layers above it. If the primer fails, everything above it fails with it.
Some primers are described as “universal” — meaning they accept both oil and acrylic paint. This works because the acrylic polymer base doesn’t block oil paint from bonding, and acrylic paint naturally grips the acrylic surface. Read labels carefully, though: not all acrylic gessos are rated for oil painting.
What Is Gesso — Traditional vs. Modern?
Here is where the real confusion lives. “Gesso” is an Italian word meaning gypsum, and it refers historically to a very specific material: a mixture of animal hide glue and chalk or gypsum, applied warm in many thin layers to rigid wood panels. This traditional gesso has been used since at least the 13th century. Leonardo da Vinci prepared his panels with it. Vermeer’s works rest on it.
In 1955, Liquitex developed the first water-based acrylic primer and called it “acrylic gesso.” The name stuck — then every acrylic paint manufacturer followed suit. Today, almost every product labeled “gesso” in an art supply store is actually an acrylic dispersion primer. It contains no gypsum and no animal glue, but the word has become the de facto term for any white artist’s primer.
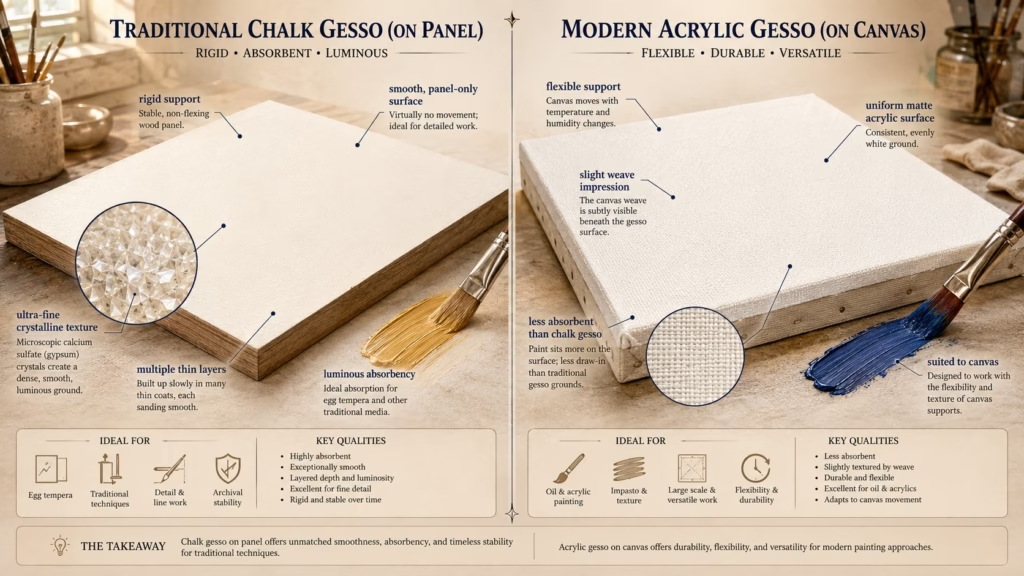
Traditional gesso (also called “chalk gesso,” “glue gesso,” or “Italian gesso”) is still made and used — particularly by painters working in egg tempera and oil on panel. It produces an extraordinarily smooth, brilliant white, highly absorbent surface that acrylic gesso simply cannot replicate. But it is brittle, and it will crack if applied to a flexible surface like stretched canvas. Traditional gesso belongs on rigid panels only.
Modern acrylic gesso is flexible, durable, quick-drying, and works on both canvas and panel. It is the right choice for the vast majority of contemporary painting scenarios. But it is not the same material as traditional gesso, and conflating them causes real mistakes.
What Is a Painting Ground?
A ground is the surface your paint actually touches. It’s what you experience with your brush. The ground determines absorbency, texture (tooth), color tone, and how paint handles and dries.
In many cases, the primer and the ground are the same product — when you apply acrylic gesso to a canvas, that acrylic gesso IS both your primer (bonding layer) and your ground (painting surface). But in more traditional approaches, the primer and ground are different layers: you might apply RSG as a size, then a lead oil ground over it, and the oil ground is your painting surface. Or you might apply a clear acrylic medium as a size, then a traditional chalk gesso as the ground on a panel for tempera work.
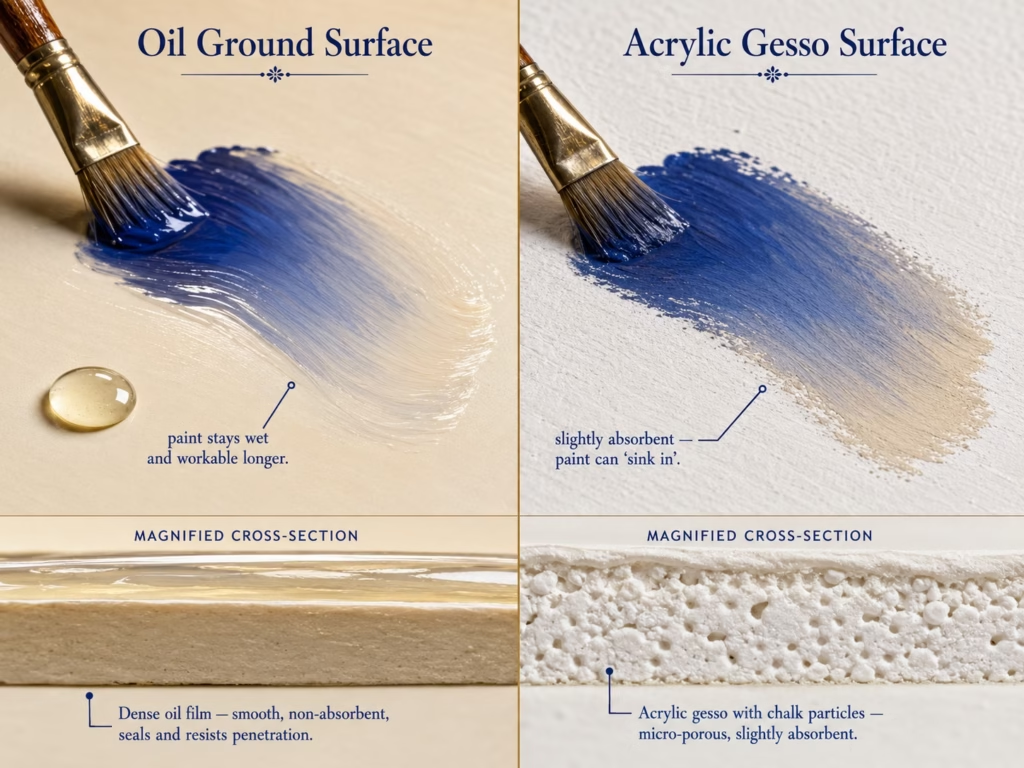
The distinction matters because the ground’s properties directly affect the outcome of the painting. A smooth, low-absorbency oil ground makes paint glide and blend easily. A heavily textured, high-absorbency acrylic gesso grips the paint and dries it quickly. Choosing a ground is not just a technical decision — it’s a creative one.
The Complete Guide to Sizing: Do You Actually Need It?
The short answer is: it depends on your medium and your support. Here is how to think through it.
Why Raw Canvas Needs Sealing for Oil Painting
If you are painting in oil on raw canvas — cotton or linen that has not been pre-treated — you must create a barrier between the oil and the fiber. Failing to do this doesn’t cause immediate problems, but over years and decades the linolenic acid in the oil weakens the fabric. You may also see “halos” form immediately: rings of oil that bleed out from painted areas into the unprimed weave, leaving paint that looks dull, flat, and under-bound at the edges.
Store-bought pre-primed canvas already has this protection built in — the acrylic gesso coating seals the fibers. If you are starting with raw canvas (which gives you control over the surface), you need to apply your own size.
Rabbit Skin Glue (RSG): The Traditional Choice — and Its Problems
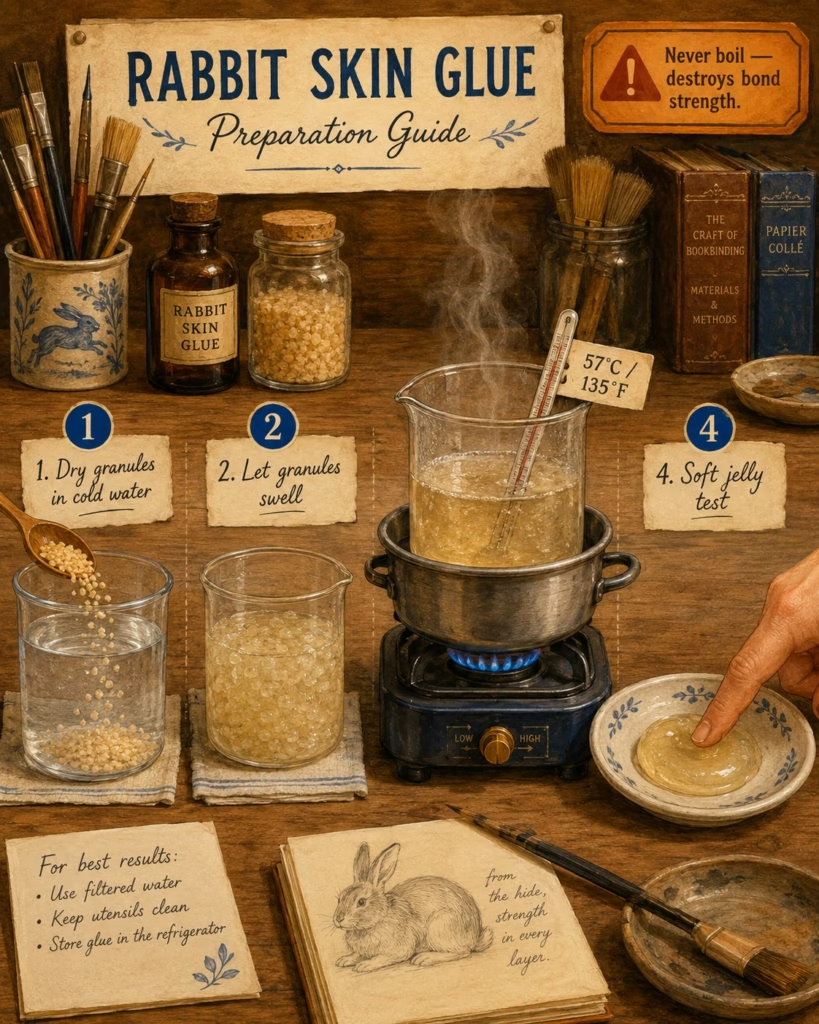
Rabbit skin glue is derived from the collagen of rabbit hides and has been used to size canvas for oil painting since at least the Renaissance. When properly prepared and applied, it tightens and stiffens the canvas as it dries, provides an excellent oil barrier, and creates a surface that receives oil ground beautifully.
Preparation requires soaking the dry granules in cold water (ratio of approximately 1 part RSG to 10–12 parts water by weight), then gently heating the mixture in a double boiler to around 57°C / 135°F — never boiling, which destroys the glue’s strength. The correctly prepared solution should gel to a soft-jelly consistency when cooled to room temperature. Applied warm to raw canvas in two thin coats, it seals the weave thoroughly.
The problem with RSG — and this is the reason most modern conservators no longer recommend it for new work — is its hygroscopic nature. RSG continuously absorbs moisture from the atmosphere, swelling in humid conditions and contracting in dry ones. Over decades, this repeated expansion and contraction flexes the brittle oil paint film above it, causing cracks to develop. Many cracked oil paintings from the 17th and 18th centuries owe their condition directly to the RSG sizing beneath them. The Painter’s Handbook (Ralph Mayer, revised 1991) and subsequent conservation research from institutions including the National Gallery of Art have identified RSG as a primary cause of cracking in historical oil paintings.
RSG is also incompatible with acrylic products. Wet acrylics have an alkaline pH that reactivates the RSG below, causing the size to gum up and the acrylic layer to crack. If you use RSG, you must follow it with an oil or alkyd ground — never acrylic gesso.
Modern Alternatives to RSG
For artists who want a proper oil barrier without RSG’s conservation drawbacks, two products are widely respected:
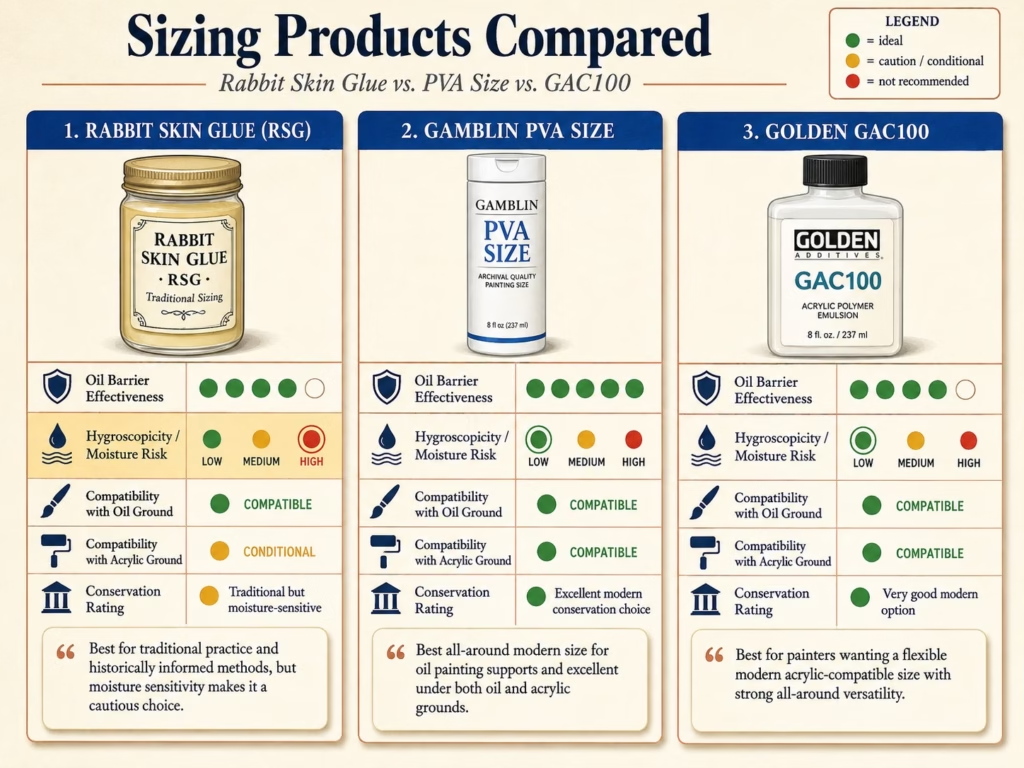
Gamblin PVA Size is specifically formulated for oil painters as an RSG replacement. It creates a good oil barrier, has very low hygroscopicity, and is compatible with oil grounds applied over it. It does not stiffen and tighten canvas as dramatically as RSG — a tradeoff most painters accept for the archival benefit.
Golden GAC100 is an acrylic polymer that seals canvas fibers against oil penetration and is compatible with both oil and acrylic grounds applied over it. It is the recommended size when you want flexibility to use either acrylic or oil ground above it.
Both products should be applied in two thin coats to raw canvas, allowing full drying between coats. Avoid hardware store PVA (white glue): there are over 50 PVA formulations and most are not artist-grade. They tend to become brittle and yellow, and they are not formulated for archival painting.
When Sizing Is Optional
Acrylic painting on pre-primed canvas: no additional size is needed. The acrylic gesso coating already seals the fibers.
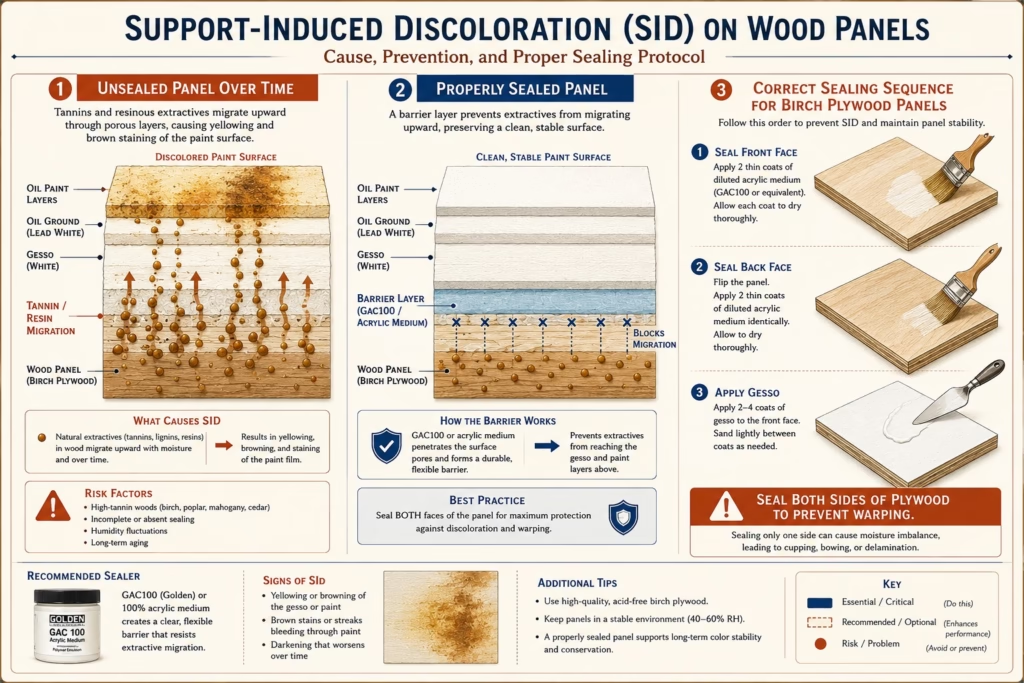
Wood panels for acrylic painting: sizing is recommended not for oil protection but to seal the wood against SID — Support-Induced Discoloration. Tannins and lignin in wood (especially birch and MDF) can migrate through gesso into paint layers over time, causing yellowing. A diluted acrylic medium or Golden GAC100 applied to the panel face (and both sides for thin plywood) before gessoing prevents this. Allow it to dry fully before applying gesso, but do not sand between sealer and gesso — they must bond as a unit.
Wood panels for oil painting: wood does not need oil protection the way canvas does, but sizing still helps by evening out the different absorbencies between wood grain and the grain lines, giving you a more consistent gesso application. Acrylic medium or GAC100 works here.
Acrylic Gesso: The Versatile Modern Standard
Acrylic gesso is what most painters mean when they say “gesso.” It is the right choice for the majority of contemporary painting scenarios and the product you’ll reach for most often.
What Acrylic Gesso Is Made Of
Modern acrylic gesso is a blend of three main ingredients: an acrylic polymer emulsion binder, calcium carbonate (chalk) as a filler and tooth-builder, and titanium dioxide for white opacity. Some formulations include silica for additional texture.
The chalk particles are the key to how acrylic gesso works. They create a microscopically rough surface — the “tooth” you hear artists talk about — that gives paint something physical to grip. Without this tooth, paint would sit on the surface poorly and be prone to lifting. The acrylic binder holds everything together, stays flexible as it dries, and bonds strongly to the support beneath.
Black gesso achieves its color by substituting carbon black or lamp black for the titanium dioxide. Clear or transparent gesso replaces the white pigment with a matting agent and chalk only, creating tooth without opacity. Both serve specific purposes discussed later.
What Acrylic Gesso Works With
Acrylic paint: Ideal. Acrylic gesso and acrylic paint share the same polymer base, making adhesion excellent and the surface chemistry fully compatible. The absorbency helps dry acrylic paint quickly and keeps colors vibrant.
Oil paint: Yes, with caveats. Oil paint bonds adequately to acrylic gesso, and most professional oil painters use it without incident. The ongoing conservation debate concerns long-term behavior: acrylic grounds remain permanently flexible, while oil paint films become progressively stiffer and more brittle with age. The concern is that this differential flexibility could cause delamination over several decades, particularly on large canvases that flex with humidity and temperature changes. On rigid panels, this concern largely disappears because there’s no movement. For most studio painting, acrylic gesso under oil is accepted practice — but for archival-critical work on large stretched canvases, an oil ground is the safer choice.
One practical note: before applying oil paint to acrylic gesso, wipe the surface down with a clean cloth dampened with warm water. This removes surfactants (soap-like compounds) left from the acrylic manufacturing process that can cause adhesion issues. Allow the surface to dry for 24–48 hours before painting.
Watercolour: Standard acrylic gesso is not ideal for traditional watercolour techniques. Its surface is not absorbent enough to hold washes properly — water beads or sits on top rather than sinking in. A dedicated absorbent ground (covered in the specialty grounds section) is needed if you want a watercolour-on-canvas surface.
Egg tempera: Not suitable. Egg tempera requires a highly absorbent ground that wicks the egg binder away from the pigment particles as each layer dries. Acrylic gesso is not absorbent enough, and tempera paint will lift and smear as you apply subsequent layers. Traditional chalk gesso on a rigid panel is the correct ground for tempera work.
Encaustic (hot wax painting): Acrylic gesso creates a non-absorbent surface that prevents hot wax from bonding. Encaustic requires either an unprimed rigid surface or a dedicated absorbent ground.
How to Apply Acrylic Gesso
Good application technique matters more than most painters realize. Here is the correct process:
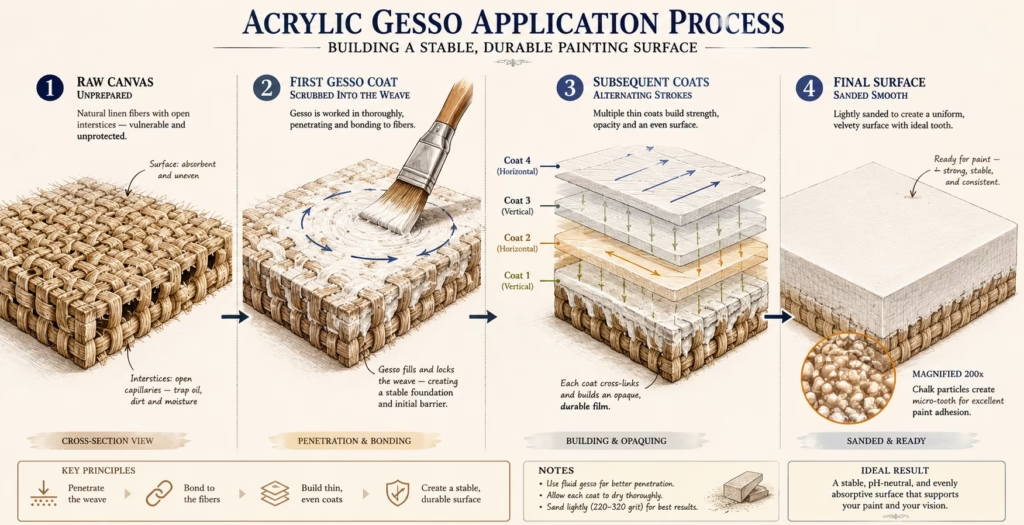
Apply the first coat to raw canvas by scrubbing it into the weave with a wide, stiff-bristled brush using circular motions. The goal of this first coat is penetration — you want gesso to fill the interstices of the weave and bond to the fibers, not just sit on top. Use moderate pressure. This first coat may look thin and patchy; that’s fine.
Allow to dry fully (minimum 2 hours in normal conditions; longer in humid weather). Apply the second coat in parallel strokes running one direction — say, horizontally. Allow to dry again. Apply a third coat perpendicular to the second (vertically), and a fourth coat horizontally if you want a very smooth or heavily built surface.
Sand only the final coat, using fine-grit sandpaper (220–320 grit). Never sand between coats — this can disrupt the bonding between layers. After sanding, wipe with a dry lint-free cloth to remove dust before painting. Wear a dust mask when sanding any acrylic or chalk gesso; the fine particles are not pleasant to inhale.
Minimum coats: 2 for a basic primed surface for acrylic painting. For oil painting: 3–4. For a very smooth surface on a rigid panel: sand the final coat and apply one more, unsanded.
Drying times for a fully cured surface before oil painting: acrylic gesso is touch-dry in minutes but needs at least 24 hours of full cure before you apply oil paint over it.
Traditional (Genuine) Gesso: The Master’s Choice for Panels
If you paint in egg tempera, or if you want the extraordinary surface that Old Master panel paintings were made on, traditional gesso is what you need. It is more labor-intensive than acrylic gesso, it requires specific materials and technique, and it only works on rigid supports — but the surface it produces is unlike anything else.
What Traditional Gesso Is and Why It Matters
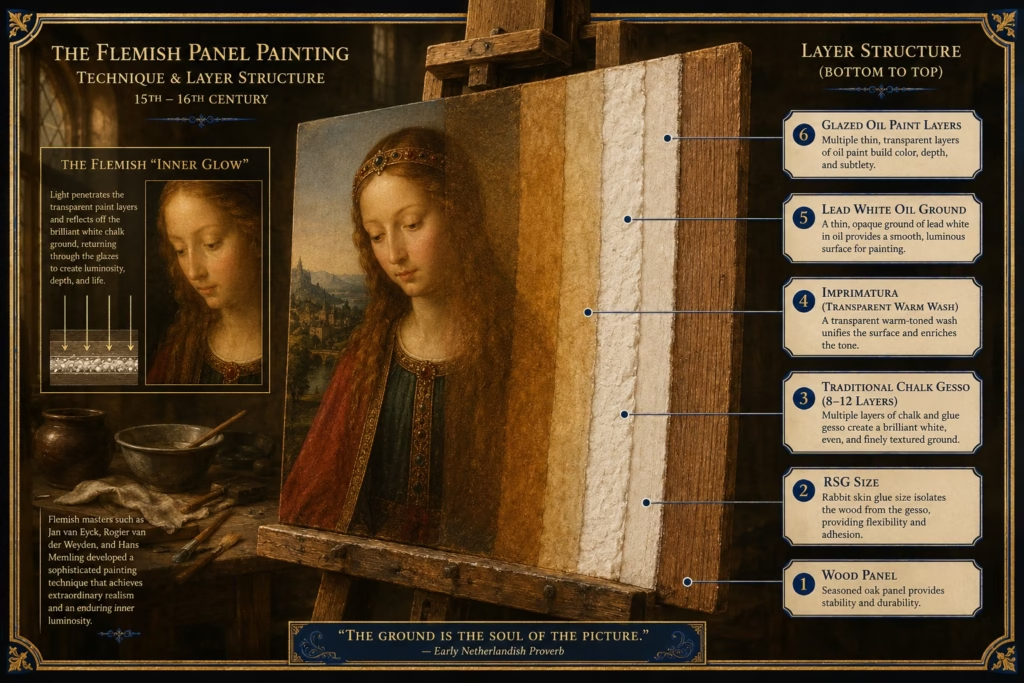
Traditional chalk gesso is a mixture of warm animal hide glue (classically rabbit skin glue, though other collagen glues work) and inert white pigment — gypsum, chalk (whiting), or a combination. It has been used since at least the 13th century, appearing in medieval altarpieces, Renaissance paintings, and Northern European panel paintings.
The surface traditional gesso creates is uniquely luminous, brilliantly white, ultra-smooth, and highly absorbent. Its absorbency is actually essential for egg tempera: as each thin layer of tempera is applied, the ground wicks the egg yolk binder slightly away from the pigment surface, helping each layer dry quickly and allowing subsequent layers to bond without disturbing what’s below. On traditional gesso, tempera can be built up in dozens of layers with extraordinary control. On acrylic gesso, this technique fails — the paint drags and smears.
For oil painting on panel, traditional gesso produces a surface that interacts with the paint in a distinctly different way from acrylic grounds. Many painters who have tried both describe a quality of luminosity in the painted result that comes from light reflecting off the brilliant white chalk beneath translucent paint layers. This is what gives Flemish and Italian Renaissance panel paintings their characteristic inner glow.
The limitation is brittleness. Traditional gesso contains animal glue that sets hard and rigid — far too brittle to flex. On a stretched canvas, normal handling and humidity changes cause the canvas to flex slightly, and traditional gesso will crack immediately. It belongs exclusively on rigid, well-supported panels: cradled wood, thick MDF, hardboard (Masonite), or dense fiberboard.
How to Make and Apply Traditional Gesso

This is a craft with significant technique, but it is learnable and highly rewarding.
Preparing the RSG size: Soak RSG granules in cold water at a ratio of approximately 1 part RSG to 10–12 parts water by weight. Allow to soak for 30–60 minutes until the granules have absorbed the water and become gelatinous. Gently heat in a double boiler to around 57°C / 135°F, stirring until fully dissolved. Never boil. Test consistency by allowing a small amount to cool on a plate: it should set to a soft jelly — firm enough to hold its shape but yielding under light pressure. If too stiff, add water; if it stays liquid when cold, add more granules and reheat.
Preparing the gesso: The basic ratio is roughly 1 part RSG solution to 2 parts chalk/whiting by volume (artists vary this). Add the dry chalk to the warm glue solution slowly, stirring gently to avoid air bubbles. Keep the mixture warm but not hot — you’ll apply it at approximately 40–45°C / 105–113°F. Strain through cheesecloth if lumpy.
Sizing the panel first: Apply two thin coats of the RSG solution alone to the raw panel, allowing each to dry fully. This seals the wood and provides a key for the gesso layers.
Applying gesso layers: Apply the gesso in very thin coats while warm, using a wide, soft brush. Work quickly; the gesso gels rapidly as it cools. Apply each coat while the previous coat is still slightly tacky — not wet, not fully dry. This “open time” application is critical: all gesso coats must be applied in a single session before the first coat has cured fully, or the layers will not bond and will delaminate.
A typical traditional gesso preparation involves 8–12 layers. With each layer you build up a thick, dense, porcelain-like surface. Allow the fully built-up surface to dry for 24 hours, then sand with increasingly fine sandpaper — working from 220 grit down to 400 or even 600 grit — until you have a surface as smooth as eggshell. Traditional gesso panels prepared this way can be polished to look almost like ivory. This is the surface Leonardo applied his sfumato layers over.
A time-saving approach: If making panels in batches (8 panels instead of 1), the process takes almost the same time — by the time you’ve applied the first coat to panel eight, panel one is ready for coat two. Many painters who work on traditional gesso prepare panels in large batches seasonally.
Oil Ground: The Premium Choice for Oil Painters
Many contemporary oil painters have never worked on an oil ground. They default to acrylic gesso because it’s convenient and it works — and for most purposes, it does. But oil ground offers a fundamentally different painting experience, and understanding when it’s the better choice is worth the extra preparation time.
What Oil Ground Is and How It Feels
Oil ground is composed of a drying oil (usually linseed, sometimes alkyd-modified) combined with white pigment — traditionally lead white, now usually titanium white in lead-free formulations. It is related in composition to a thick layer of oil paint.
The surface feel is completely different from acrylic gesso. Where acrylic gesso is absorbent and slightly rough, oil ground is smooth and has very low absorbency. Paint applied over oil ground sits on the surface rather than sinking in. It stays wet and workable longer, blends more easily, and allows the kind of extended manipulation that oil painting’s slow-drying nature is designed for.
Painters who work in the classical tradition — glazing, layering, wet-into-wet blending — often find that an oil ground is the only surface that feels right. The paint glides rather than drags. Tonal transitions happen smoothly. The surface does not suck the linseed oil out of the paint, which can leave paint crumbly and under-bound (a phenomenon called “sinking in” that happens when oil-lean paint is applied over a highly absorbent surface).
Lead White vs. Lead-Free Oil Ground
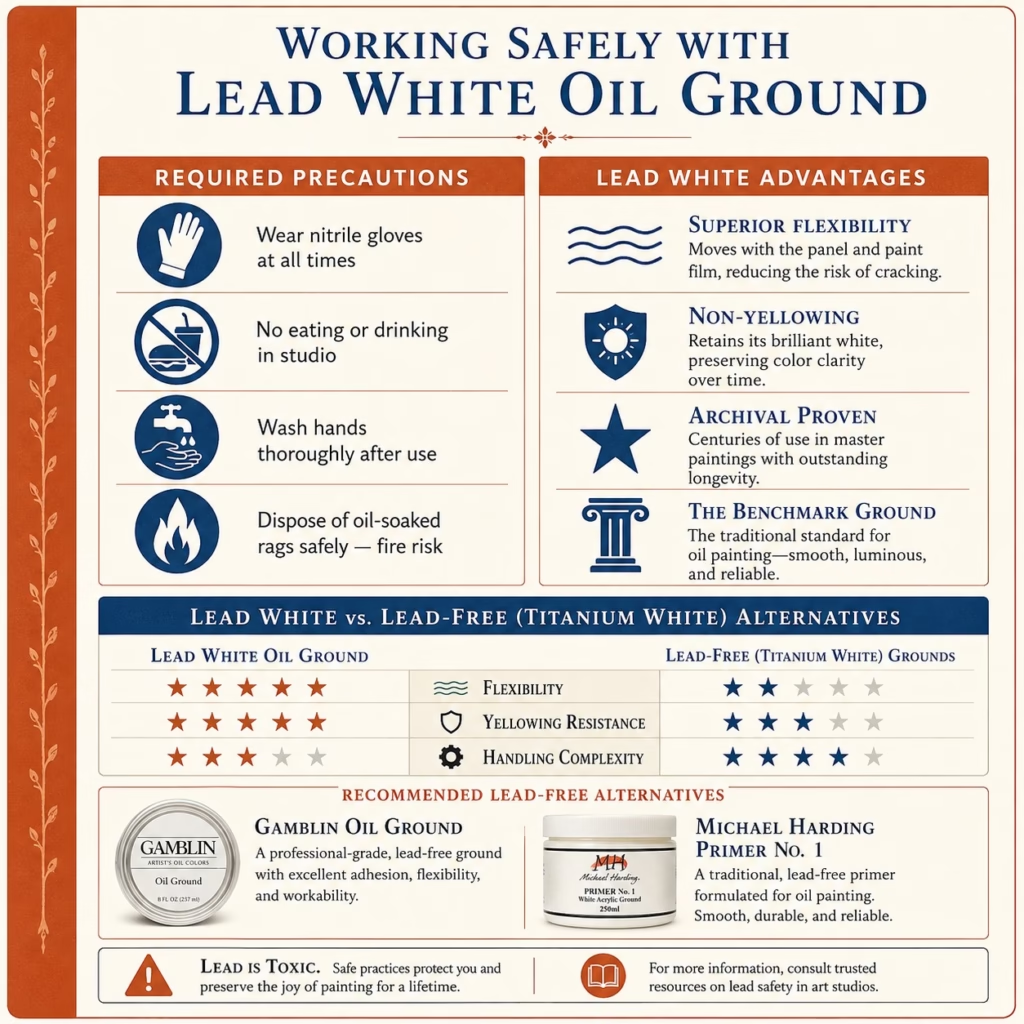
Traditional oil ground used lead white as its pigment — specifically flake white or Cremnitz white. Lead white dries to an exceptionally flexible, non-yellowing film, and many conservators consider it the most durable ground for oil painting. The same lead carbonate that makes it hazardous to handle is what gives it its unique physical properties.
Working with lead white oil ground requires proper safety precautions: gloves, no eating or drinking in the studio, washing hands thoroughly after use, disposing of rags properly (oil-soaked rags can combust spontaneously). For artists committed to traditional oil painting technique who accept these protocols, lead white oil ground remains the benchmark.
Lead-free alternatives use titanium white as the primary pigment. Modern formulations from brands like Gamblin have been carefully engineered to match the handling properties and flexibility of lead ground as closely as possible. Gamblin’s Oil Painting Ground is the industry-standard lead-free option and is widely used by professional oil painters. Michael Harding Primer No. 1 is another highly regarded lead-free oil ground.
Application and Drying Time
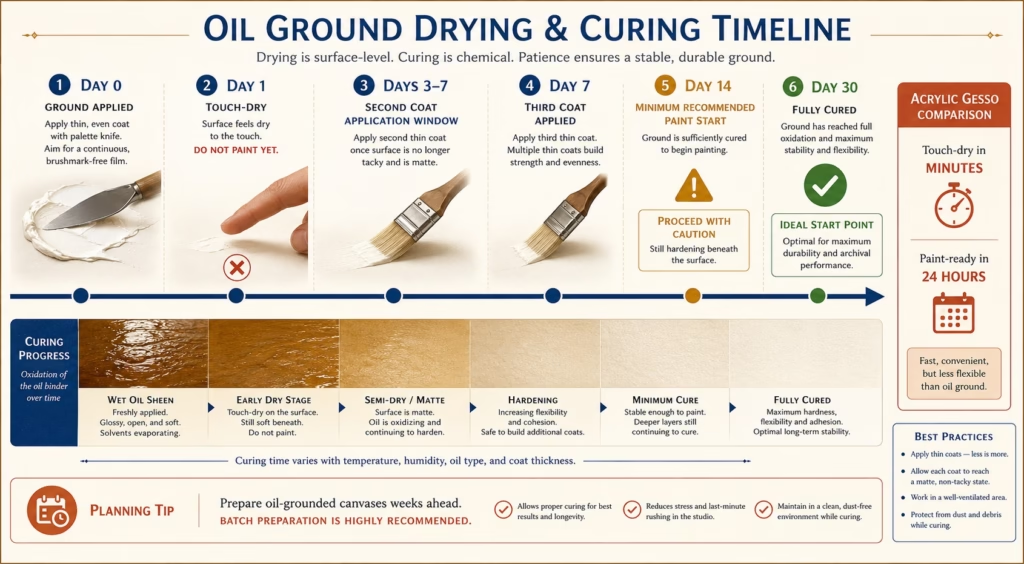
Oil ground must be applied over a properly sized canvas — never over raw canvas (the sizing protects the fibers from the oil in the ground itself). Apply with a palette knife or wide brush in thin coats, working it into the weave thoroughly. Two to three coats, applied 3–7 days apart, build up a fully covered surface.
Here is the critical difference from acrylic gesso: oil ground must cure before you paint on it. “Dry to the touch” is not sufficient — the oil must oxidize fully through the layer. Most manufacturers recommend waiting at least two weeks before painting; some suggest a month. Painting on a ground that has not fully cured can cause adhesion issues between the ground and the paint above it.
Plan ahead. Prepare your oil-grounded canvases weeks before you intend to use them. Many painters who prefer oil ground prepare a batch of canvases in the fall for winter painting, or set aside a month of lead time.
The Non-Negotiable Compatibility Rule
An oil-primed canvas can only accept oil paint — permanently. Acrylic paint will not bond durably to an oil ground. The acrylic, being water-based and flexible, cannot form a lasting adhesion to the dried oil film. Paint applied over oil ground will eventually peel or flake. This is not a preference or a guideline — it is a physical incompatibility.
Conversely, acrylic gesso accepts both oil and acrylic paint. If there is any chance you might want to use acrylic paint on a surface, or if you share surfaces across media, use acrylic gesso. Only commit to oil ground on surfaces where you are certain you will paint exclusively in oil.
Specialty Grounds: Toned, Colored, Clear, and Absorbent
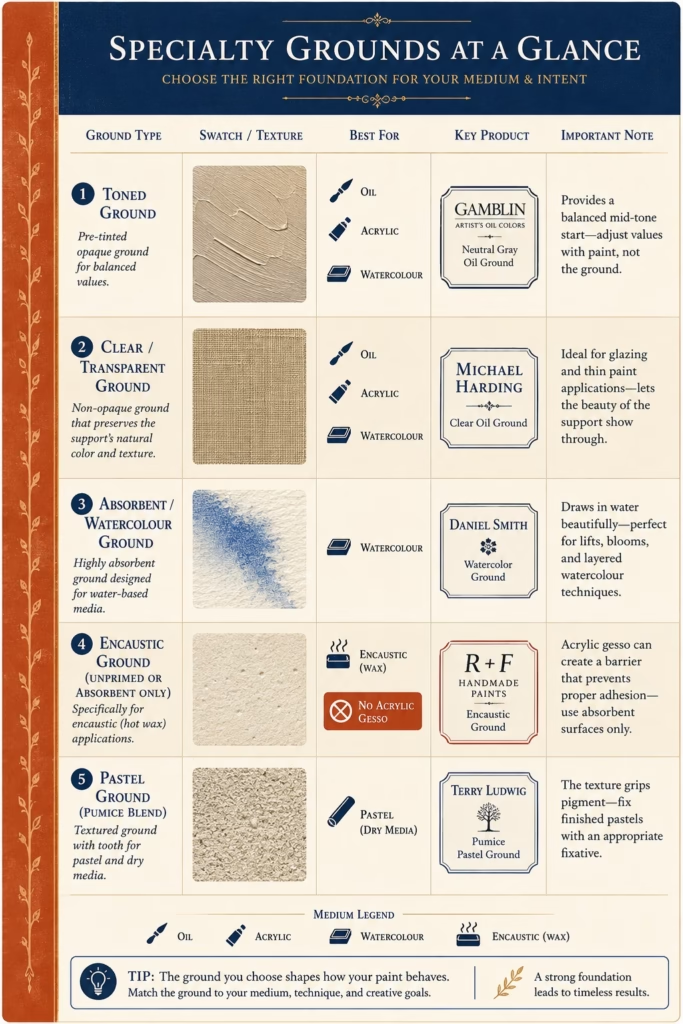
This is the most underserved section in the online landscape of gesso and primer content. Most guides cover white acrylic gesso and stop there. But specialty grounds are a significant part of how intermediate and advanced painters work — and understanding them opens up real creative possibilities.
Toned and Colored Grounds
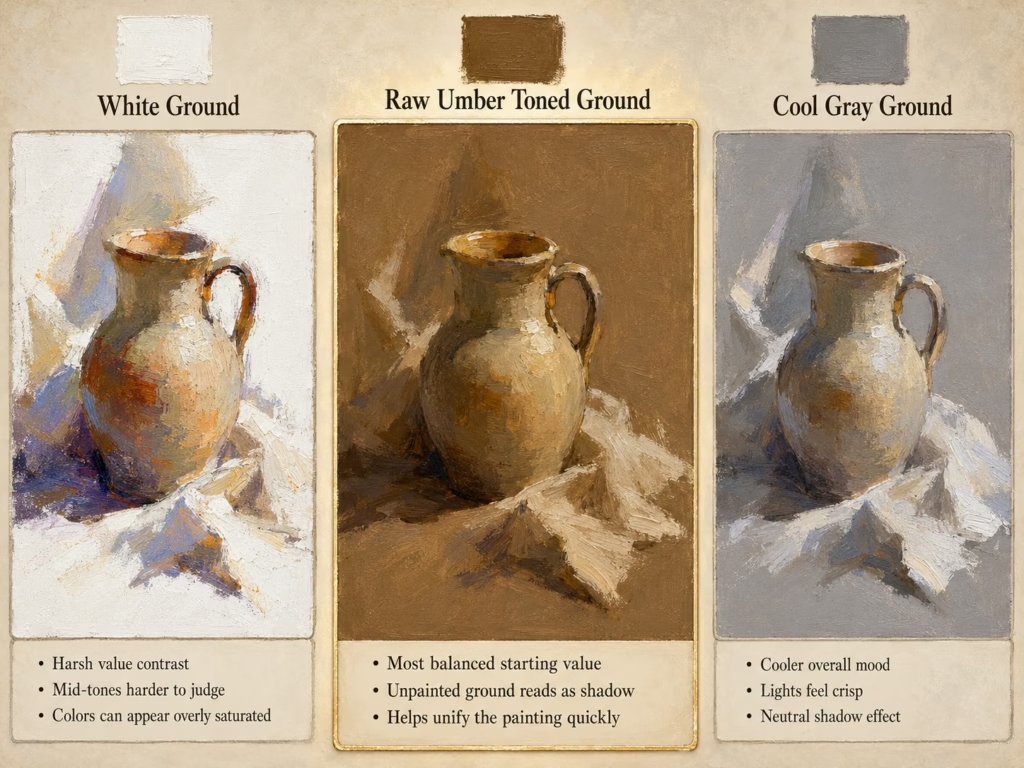
Working on a brilliant white ground is not always the best choice. Here’s why: a white surface makes every color you apply look darker and more saturated than it actually is in context. You end up continually adjusting colors as you paint, discovering that what looked right against the white now looks wrong against other colors. Many painters find that a mid-value toned ground solves this problem immediately.
A toned ground is simply a ground that has been given a mid-value color — usually warm or neutral. Its benefits are practical and well-established going back centuries:
Neutral mid-gray is the most versatile toned ground for contemporary painters. When you work on a medium gray, your lights look light and your darks look dark right from the first stroke. You can judge color and value accurately much earlier in the painting process. Any bits of ground left unpainted read as a mid-tone rather than as harsh white gaps.
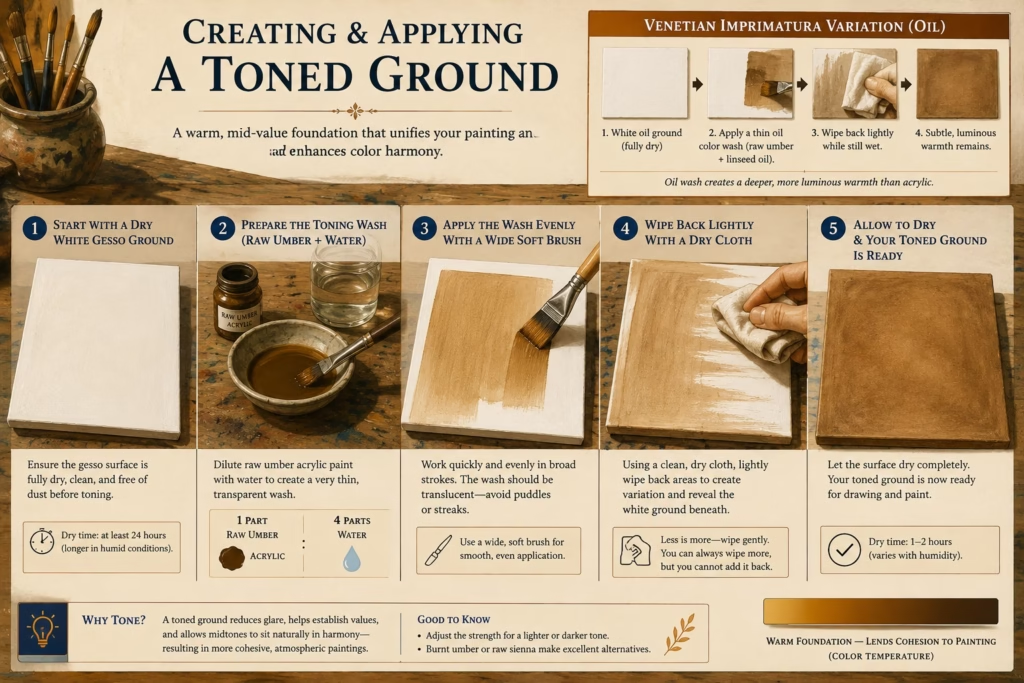
Warm raw umber or burnt sienna is one of the most popular toning choices, especially for oil painters. These earth tones dry quickly (raw umber is a classic drier), are fully compatible with oil and acrylic, and create a warm visual foundation that lends cohesion to paintings built over them. Rembrandt used warm toned grounds extensively — his characteristic golden warmth in shadow areas often comes from the ground color showing through translucent paint layers.
The imprimatura is a related but distinct technique from the Venetian Renaissance tradition. Rather than adding color to the gesso before applying it, the imprimatura is a transparent wash of oil paint — typically a warm earth color like raw sienna or burnt umber thinned with solvent — applied over a white oil ground and wiped back until the white barely glows through. It sets to a translucent amber layer that functions as both a tone and a visual unifier. Titian used this technique to warm his paintings from within.
Cool blue-gray grounds work well for painters who want the opposite effect — particularly those painting cool-light scenes, winter landscapes, or wanting shadows that feel distinctly cool against warm light areas. Working on a warm ground naturally shifts the whole painting warmer; a cool ground does the opposite.
How to create a toned ground: The simplest method is to apply your normal white acrylic gesso, allow it to dry, then apply a thin wash of acrylic paint in your chosen tone color, diluted significantly with water, and wipe it back lightly with a dry cloth. Allow to dry — this is your toned ground. Alternatively, mix a small amount of paint directly into your gesso before applying it. For oil painters, tone over a white oil ground with a lean wash of oil paint thinned with odorless mineral spirits, wiped back and allowed to cure.
Black ground is a dramatic choice used by some painters for its “light out of dark” quality — you build luminous light areas by adding light paint to a dark ground rather than darkening a light ground. Caravaggio’s work made extreme use of dark grounds to create his characteristic tenebrist effects. Black gesso (available from most manufacturers) handles exactly like white acrylic gesso.
Clear and Transparent Grounds
Clear gesso is used when you want to preserve the natural color and texture of the support while still creating a tooth for paint to grip. Raw linen, for example, has a beautiful warm mid-tone that many painters deliberately preserve. A clear ground seals and provides tooth without covering the linen color with white.
A practical note: “clear gesso” products often create a slight white haze as they build up, because the matting agents that give tooth are opaque at the particle level. To avoid this, use a truly clear polymer medium (like Golden Polymer Medium in Matte) for the first coat or two — which seals the surface without any haze — and then one final coat of clear gesso for tooth. This combination gives you a sealed, tooth-bearing surface that genuinely preserves the support color.
RSG alone (without any chalk) also functions as a clear size for canvas — used specifically by oil painters who want to see raw linen through any unpainted areas of their work.
Absorbent and Watercolour Grounds
Watercolour on canvas is a genuine technique with beautiful results, but standard acrylic gesso does not support it. Water sits on the gesso surface and dries unevenly; washes won’t flow properly. A dedicated absorbent ground transforms the surface.
Golden Absorbent Ground and Liquitex Absorbent Ground are the two most commonly used products. Applied over a properly sealed canvas (2 coats of acrylic gesso first, then the absorbent ground on top), they create a surface that behaves remarkably like watercolour paper — washes absorb immediately, wet-into-wet techniques work, and pigment disperses naturally.
The same absorbent grounds work beautifully for pastel on canvas, especially when mixed with pumice powder or marble dust to add additional tooth. Many pastel painters prime their canvas with a mixture of absorbent ground and fine pumice, which grips pastel both through texture and through the paper-like absorbency.
Specialty Grounds for Encaustic
Encaustic (hot wax painting) requires a fundamentally different approach. Hot wax must absorb slightly into the support to bond permanently. Acrylic gesso creates a non-porous surface that prevents this bond — wax applied over acrylic gesso will eventually pop off in sheets.
Encaustic works best on unprimed rigid supports like Ampersand Encausticbord (a natural clay-coated hardboard specifically designed for the medium), or on wood panels primed only with a dedicated absorbent ground. No acrylic gesso, no oil ground. If you’re exploring encaustic for the first time, always check that your support is either unprimed or specifically prepared for the medium.
Support-by-Support Preparation Guide
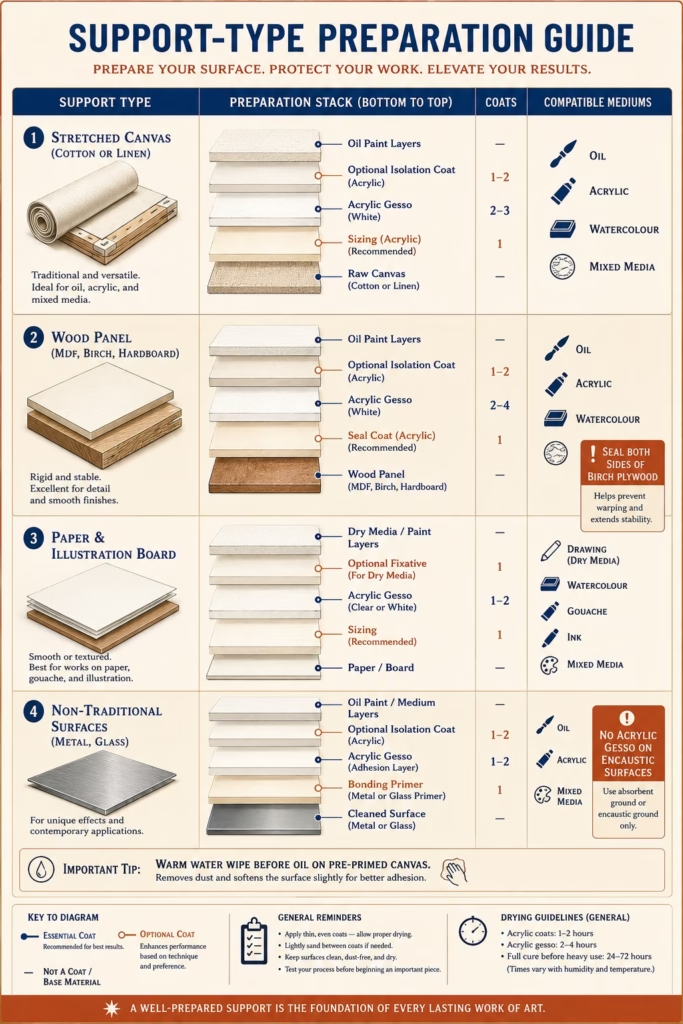
The same primer behaves differently on different supports. Here is a practical guide organized by surface type.
Stretched Canvas (Cotton or Linen)
Pre-primed store-bought canvas: The most common starting point for most painters. Pre-primed canvas has an acrylic gesso coating already applied — typically 1–3 coats, depending on the manufacturer’s quality tier. It’s ready for acrylic painting immediately. For oil painting, wipe the surface with a clean damp cloth (warm water, no soap) and allow to dry 24–48 hours before painting to remove any surface surfactants from the gesso manufacturing process. You can apply additional coats of acrylic gesso if you prefer a smoother or more heavily built surface, and sand the final coat for a fine-grained result.
Raw cotton canvas: More economical and gives you control over the final surface. For oil painting: 2 coats of PVA size or GAC100 → 2–3 coats acrylic gesso (or 2–3 coats oil ground after the size has cured). For acrylic painting: 2–4 coats acrylic gesso directly, no separate size needed.
Raw linen canvas: Preferred by many oil painters for its strength, texture, and neutral warm tone. The preparation is the same as cotton for oil painting, with a few notes: linen weave is tighter and denser than cotton, so the first gesso coat may require more pressure to work in. Linen can also be sized with RSG and then an oil ground if you want the completely traditional approach, accepting the conservation tradeoffs of RSG discussed earlier.
For both cotton and linen, if you want the natural color of the fabric to show in the finished work, apply a clear size (multiple coats of acrylic matte medium or GAC100) and then one coat of clear gesso for tooth, or use RSG alone for oil work.
Wood Panels: MDF, Birch, Basswood, and Hardboard
Wood panels are the preferred support for traditional gesso and egg tempera, and a popular choice for oil and acrylic painters who want a rigid, non-flexing surface.
Sealing first is essential: All wood panels should be sealed before gessoing, regardless of what paint medium you’ll use. Wood tannins and resins can migrate through gesso into paint layers, causing SID (support-induced discoloration) — a yellowing or browning effect that can appear over months or years. Diluted acrylic medium (1:1 with water) or Golden GAC100 applied in 2 coats seals effectively.
For birch and basswood plywood panels: Apply sealer to both the front AND the back. Without back-sealing, moisture from humidity enters through the unprotected back of the panel, causing the wood to swell unevenly and warp. Ampersand’s solid-panel boards (Hardbord) require sealing the front only, as their density prevents moisture penetration from the back.
For traditional gesso application on panels: Apply 2 coats of RSG solution first (as size), then apply 8–12 thin layers of traditional chalk gesso while warm. All gesso layers in one continuous session. Sand progressively finer after 24-hour cure.
For acrylic gesso on panels: After sealing, apply 2–3 coats of acrylic gesso, sanding the final coat if desired. This is suitable for oil or acrylic painting.
Cradles and side edges: If you’re painting to the edges of a cradled panel, seal and prime the sides as well. If leaving the cradle natural wood, mask the edges of the painting surface with painter’s tape before applying sealer and gesso.
Paper and Illustration Board
Paper can be used as a painting surface for oil and acrylic, but it requires preparation. Raw paper absorbs oil paint so aggressively that paint dries quickly and flatly, and the oil itself will eventually degrade the paper fibers — the same problem as raw canvas, but worse because paper fibers are more vulnerable.
For oil on paper: Apply 2–3 coats of diluted acrylic medium (50/50 with water) to seal the surface, front and back if lightweight, then 1–2 coats of acrylic gesso. Heavyweight cold-pressed illustration boards (300gsm+) hold up well when properly sealed. This approach is suitable for studies and paintings not intended as archival masterworks — for archival-grade oil work, use canvas or panel.
For acrylic on paper: Heavyweight paper (300gsm+) can accept acrylic directly without preparation. For lighter paper, 1–2 coats of diluted acrylic medium prevent buckling from the water in the paint.
Non-Traditional Surfaces
Metal (aluminum, steel): Requires a bonding primer specifically formulated for metal before acrylic gesso can be applied. Standard acrylic gesso does not adhere permanently to raw metal. A spray primer designed for metal — available at hardware stores — followed by 2 coats of acrylic gesso creates a workable surface for acrylic or oil painting. Aluminum Composite Material (ACM), such as Dibond, is a popular modern rigid painting support — it accepts acrylic gesso or oil ground after light sanding without a separate metal primer.
Glass: Acrylic paint does not adhere to glass without a specific bonding primer. Turner and Liquitex make dedicated glass primers designed for this purpose. Apply the glass primer, allow to cure fully per manufacturer instructions, then proceed with painting.
Primed canvas mounted on panel: Some painters mount canvas on a rigid panel for the best of both worlds — the texture of canvas with the rigidity of panel. The canvas brings its own texture; preparation follows the same steps as raw canvas, applied before or after mounting depending on the method.
Brand Guide: What to Actually Buy

Generic advice to “check the label” is not helpful when you don’t know what good looks like. Here are the specific products worth your money by category.
Best Acrylic Gessos
Winsor & Newton Professional Gesso produces a surface with excellent coverage, good tooth, and consistent results. The high pigment load means fewer coats to achieve opacity.
Liquitex Professional Gesso is the category standard — the direct descendant of the first acrylic gesso ever made. Reliable, widely available, compatible with all brands of acrylic and oil paint.
Golden Artist Colors Gesso offers exceptional flexibility and consistency. Golden is also the manufacturer of the widest range of specialty grounds (absorbent, clear, texture) in the market, making it easy to build an entire ground system from one brand.
Michael Harding Non-Absorbent Acrylic Primer is worth knowing for oil painters who prefer acrylic preparation but want a less absorbent surface closer to the feel of an oil ground. It’s a specialty product that occupies a useful middle position.
Best Oil Grounds
Gamblin Oil Painting Ground is the most trusted lead-free oil ground in current production. Formulated specifically as an RSG replacement, it provides good flexibility, handles well, and is available from most serious art suppliers. Apply over PVA size or GAC100.
Williamsburg Handmade Oil Colors Oil Ground is a premium product for painters who want exceptional quality. Dries to a beautiful surface with excellent handling.
Natural Pigments Rublev Colours Lead White Oil Ground is for painters who work in a traditional framework and are willing to handle lead-safe protocols. The lead-white version produces the most historically authentic oil ground surface.
Michael Harding Primer No. 1 has a devoted following among classically trained oil painters in the UK and Europe. Smooth, well-handling, excellent results.
Best Sizing Products
Gamblin PVA Size is the most widely recommended modern RSG replacement for oil painters. Specifically formulated for archival oil painting preparation.
Golden GAC100 is the flexible choice — compatible with both oil and acrylic grounds, excellent oil barrier properties, easy to apply.
Williamsburg Rabbit Skin Glue is the choice for painters committed to traditional RSG sizing, with full awareness of the conservation considerations.
Best Specialty Grounds
Golden Absorbent Ground for watercolour and pastel on canvas — the category standard with proven results.
Liquitex Absorbent Ground is a solid alternative to Golden’s version, slightly lower price point, similar performance.
Golden GAC100 + one coat of clear gesso for transparent/toned clear ground preparation, as described in the specialty grounds section above.
For traditional gesso ingredients: Natural Pigments (Rublev) and Williamsburg both supply high-quality RSG and chalk/whiting for artists who prepare their own traditional gesso.
Frequently Asked Questions About Primers, Gesso, and Grounds
What is the difference between gesso and primer?
In common contemporary use, they’re nearly synonymous — both terms refer to acrylic dispersion grounds that prepare a surface for painting. Technically, “traditional gesso” is a specific material (animal glue + chalk/gypsum) with a 600-year history, while “primer” is the general term for any bonding preparatory layer. The confusion arises because modern acrylic primers are sold as “gesso” — a name Liquitex introduced in 1955 that the industry adopted wholesale. For practical purposes: if a product says “acrylic gesso” on the label, it is an acrylic primer.
Do I need to size my canvas before applying gesso?
For acrylic painting: no. Acrylic gesso can be applied directly to raw canvas and will act as both size and ground. For oil painting on raw canvas: yes, sizing is recommended to prevent oil from rotting the canvas fibers over time. Use Gamblin PVA Size or Golden GAC100. If you’re painting on pre-primed store-bought canvas, the size is already built into the gesso coating.
Can I use acrylic gesso for oil painting?
Yes. Oil paint adheres to acrylic gesso, and most professional oil painters use it. For archival-quality work on large stretched canvases, an oil ground provides better long-term flexibility compatibility. On rigid panels, acrylic gesso under oil raises no significant conservation concerns. Wipe the gesso surface with warm water before painting and allow 24–48 hours to dry.
Can I use oil ground for acrylic painting?
No — never. Acrylic paint does not bond permanently to an oil ground. It will eventually peel or flake. An oil-primed surface accepts only oil paint, forever.
How many coats of gesso do I need?
Minimum 2 coats for a basic surface. For oil painting, 3 coats. For a very smooth surface (especially on panels), apply 3–4 coats and sand the final coat with 220–320 grit sandpaper. For traditional chalk gesso, 8–12 thin layers applied in one session.
Should I sand between coats of gesso?
Sand only the final coat — not between intermediate coats. Sanding between coats disrupts the bonding surface between layers and reduces adhesion. Apply all coats, allow full drying, then sand only the top layer for surface smoothness.
What is a toned ground and how do I apply one?
A toned ground is a ground that has been given a mid-value color rather than left white. This helps you judge color and value more accurately from the start of the painting. The simplest method: apply normal white gesso, allow to dry, then apply a thin diluted wash of acrylic paint in your chosen color (raw umber and burnt sienna are the most popular) and wipe lightly. Alternatively, mix a small amount of paint into fresh gesso before applying. For oil painters, tone over the cured white ground with a lean wash of oil paint and solvent.
Is rabbit skin glue still recommended?
Most modern conservators do not recommend RSG for new paintings due to its hygroscopic nature, which causes cracking in oil paint over decades. For new work, Gamblin PVA Size or Golden GAC100 are the recommended alternatives. RSG remains the traditional choice for artists working in historically authentic methods who accept the tradeoff.
What happens if I don’t prime my canvas at all?
For acrylic painting: the paint beads up on cotton (which repels water) and may sink unevenly into the weave. Colors look dull. For oil painting: oil soaks directly into the fibers, starving the paint of its binder (leaving it crumbly), creating halos around painted areas, and beginning the long-term degradation of the canvas fibers. Don’t paint on raw canvas without at least basic preparation — it damages your work’s longevity from day one.
Do I need to prime a store-bought canvas?
Not necessarily — most store-bought pre-primed canvases are ready to paint. For acrylic painting, start immediately. For oil painting, wipe the surface with a damp cloth and let dry before starting. If you prefer a smoother or more heavily built surface, add additional coats of acrylic gesso and sand before painting.
What is support-induced discoloration (SID)?
SID is the yellowing or browning that occurs when tannins and other compounds from wood migrate through improperly sealed panels into the gesso and paint layers above. It’s most common on birch and MDF panels. Prevent it by sealing both sides of the panel with 2 coats of diluted acrylic medium or Golden GAC100 before applying gesso.
What grounds are suitable for egg tempera?
Traditional chalk gesso on a rigid wood panel is the historically correct and practically ideal ground for egg tempera. The high absorbency wicks the egg yolk binder as each layer dries, allowing rapid layer buildup and the fine linear control tempera is known for. Acrylic gesso is not suitable for egg tempera — the insufficient absorbency causes the paint to smear and lift rather than dry in place.
Key Takeaways
Preparing a painting surface well is one of the most consequential technical decisions a painter makes — and one of the most neglected. The wrong preparation doesn’t announce itself immediately; it shows up years or decades later as cracking, yellowing, delamination, or structural failure.
Here is what to remember:
The preparation stack always goes in the same order: support → size (when needed) → ground/primer → paint. Never skip ahead. Never reverse the order.
Match your ground to your medium: acrylic gesso handles oil and acrylic with everyday reliability; oil ground gives the traditional oil painting experience but locks you into oil only; traditional chalk gesso is essential for egg tempera on panel and produces a unique surface worth exploring for oil panel work.
RSG has conservation concerns — use modern alternatives (Gamblin PVA Size, Golden GAC100) for new archival work unless you are committed to working in a fully historical tradition.
The support matters as much as the primer. Canvas needs a barrier against oil. Wood needs sealing against SID and moisture. Rigid supports can receive traditional chalk gesso; flexible canvas cannot.
Toned grounds are an underused, powerful tool. Working on raw white is not always the best choice — a warm umber ground or neutral gray transforms the painting process in ways that are worth experiencing firsthand.
Finally: get to know your materials through direct experiment. Apply acrylic gesso on one panel and oil ground on another, paint the same subject on both, and feel the difference with your own brush. The knowledge that comes from that comparison is worth more than any guide — including this one
Once your surface is ready, choose your oil paints and a set of oil painting brushes to match. New to painting? Begin with our essential art supplies for beginners.